
- How to Create an NFT Minting Website – Adding the JavaScript Logic
- login()
- upload()
- mintToken()
- Features Your NFT Minting Website Must Have
- Take A Deep Dive Into NFT Space And Create NFT Minting Website Based On Solana Blockchain Technology
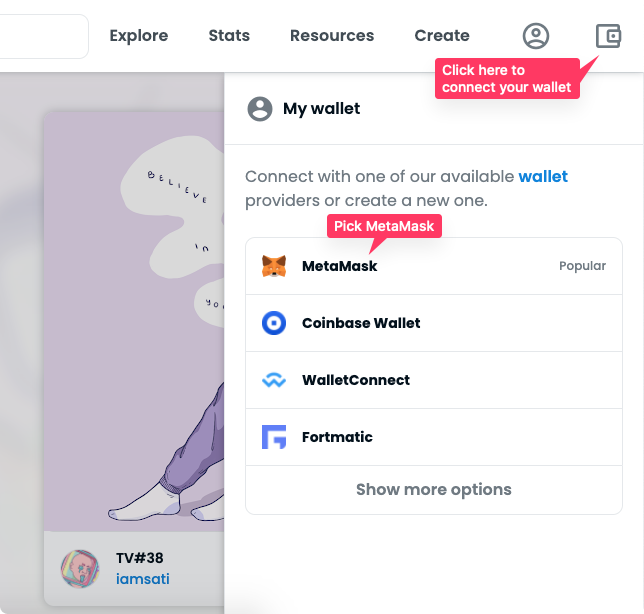
- Setup the connect wallet button
- How to Create an NFT Minting Website – Finding a Smart Contract
- Setting up the Migration File
- Coding the Smart Contract
- Link to Project
- Testing the Smart Contract
- How to Create an NFT Minting Website in 5 Steps
- Mint an NFT Drop
- Part 2 – How to Integrate into Your Website
- Option 1: Link to OpenSea
- Option 2: OpenSea integration
- How to Create an NFT Minting Website – Creating the HTML File
- Congratulations!
- Build an NFT Minting Platform with NFT Standards
- How to create an NFT Minting website?
- How long does it take to build an NFT marketplace from scratch?
- What is the role of Advanced Token Search to build an NFT minting website?
- What Would be the Cost To Make A Website To Mint NFTs?
- Are You Leaving Already?
- Launching an app may feel a bit overwhelming.
- Create an NFT Minting Website – Summary
- What is the NFT Minting Platform?
- How to Create NFT Minting Website
- Hire Our Expertise For Top-Notch NFT Minting Website Development
- How to Create an NFT Minting Website – Creating a Moralis Dapp
- How to Launch an NFT Minting Page – An Example Project
- How to Launch an NFT Minting Page – Preview
- Create Your Own Minting Website
- Create Your Own Minting Website – Code Walkthrough
- Create Your Own Minting Website – Initial Moralis Setup
- Video Explaining How to Launch an NFT Minting Page
- Take Your NFT Development Further
- Lazy Minting Tutorial:
- NFT Rarity Tutorial:
- Clone the template repository
- Prerequisite
- Part 1 – How to Mint
- What is NFT minting?
- Step 1: Connect your wallet
- Step 2: Create an item
- Step 3: Mint
- Get A Reliable Solution For Your Question, How To Create An NFT Minting Website?
- Key Steps to Build an NFT Minting Platform From Scratch
- Struggling to Create NFT Mint Website? Explore The Right Technology With Us
- Understand the Technological Aspect of Creating NFT Minting Website
- In defense of the modern web
- Interacting with the Smart Contract
- How to Launch an NFT Minting Page – Full Walkthrough – Summary
- Add useEffect to check for state changes
- Setup the blockchain
- Business Benefits of Using NFT Minting Script
- Easy Than Building From Scratch
- Creating an NFT Minting Platform with NFT Minting Script
- Blockchain Technologies To Make A Minting Website
- How To Create An NFT Minting Website With Top-Notch Security Features?
- NFT Minting Website Development Company
- How does NFT Minting Script Works?
- What are NFTs?
- What is NFT Minting?
How to Create an NFT Minting Website – Adding the JavaScript Logic
With the HTML elements added and you being satisfied with the structure of your NFT minting website, we can take a closer look at the JavaScript logic. This can be found in the “logic.js” file. More specifically, we’ll take a closer look at these three essential functions:
- login()
- upload()
- mintToken()
So, to clarify things, let’s break down each function and explore what the code actually does!
login()
Let’s begin dissecting the code and quickly look closer at the “login()” function:
async function login(){ document.getElementById('submit').setAttribute("disabled", null); document.getElementById('username').setAttribute("disabled", null); document.getElementById('useremail').setAttribute("disabled", null); Moralis.Web3.authenticate().then(function (user) { user.set("name",document.getElementById('username').value); user.set("email",document.getElementById('useremail').value); user.save(); document.getElementById("upload").removeAttribute("disabled"); document.getElementById("file").removeAttribute("disabled"); document.getElementById("name").removeAttribute("disabled"); document.getElementById("description").removeAttribute("disabled"); })
}
upload()
async function upload(){ const fileInput = document.getElementById("file"); const data = fileInput.files[0]; const imageFile = new Moralis.File(data.name, data); document.getElementById('upload').setAttribute("disabled", null); document.getElementById('file').setAttribute("disabled", null); document.getElementById('name').setAttribute("disabled", null); document.getElementById('description').setAttribute("disabled", null); await imageFile.saveIPFS(); const imageURI = imageFile.ipfs(); const metadata = { "name":document.getElementById("name").value, "description":document.getElementById("description").value, "image":imageURI } const metadataFile = new Moralis.File("metadata.json", {base64 : btoa(JSON.stringify(metadata))}); await metadataFile.saveIPFS(); const metadataURI = metadataFile.ipfs(); const txt = await mintToken(metadataURI).then(notify)
}
await imageFile.saveIPFS();mintToken()
The third function is regarding the actual minting process of the NFT. Here is the complete function:
async function mintToken(_uri){ const encodedFunction = web3.eth.abi.encodeFunctionCall({ name: "mintToken", type: "function", inputs: [{ type: 'string', name: 'tokenURI' }] }, [_uri]); const transactionParameters = { to: nft_contract_address, from: ethereum.selectedAddress, data: encodedFunction }; const txt = await ethereum.request({ method: 'eth_sendTransaction', params: [transactionParameters] }); return txt
}
The function initially creates a new object containing an encoded function call. This is necessary since we’re executing a transaction to a smart contract. With the encoded function finalized, it’s added as a parameter to the “transactionParameters” object along with the smart contract address.
Features Your NFT Minting Website Must Have
- An Outstanding Ecommerce Storefront to display and sell NFTs
- Advanced Search Functions to Seach the desired NFTs
- Various Filter Options to Reduce Searching Time
- Minting NFTs and Product Listing Options.
- Buying Functionality like Shopping Cart, Checkout, etc.
- Bidding Functionalities to Auction an NFT.
- Digital Wallet Integration to Store and Trade NFTs
- Rating and Reviewing Capabilities.
Take A Deep Dive Into NFT Space And Create NFT Minting Website Based On Solana Blockchain Technology
Token Standards
Setup the connect wallet button
import { useAddress, useMetamask } from "@thirdweb-dev/react";
import "./styles.css";
const App = () => { // get address of user & allow them to connect with metamask const address = useAddress(); const connectWithMetamask = useMetamask(); //if there isn't a wallet connected, display our connect MetaMask button if (!address) { return ( <> <h1>Welcome to the Cookie Club</h1> <button className="btn" onClick={connectWithMetamask}> Connect MetaMask </button> </> ); } // if an address is connected, display address return ( <div> <p>Your address: {address}</p> </div> );
};
export default App;Let’s preview what our app looks like and ensure it’s working by running npm start in the terminal.

How to Create an NFT Minting Website – Finding a Smart Contract
const nft_contract_address = ""
/*
Available deployed contracts
Ethereum Rinkeby 0x0Fb6EF3505b9c52Ed39595433a21aF9B5FCc4431
Polygon Mumbai 0x351bbee7C6E9268A1BF741B098448477E08A0a53
BSC Testnet 0x88624DD1c725C6A95E223170fa99ddB22E1C6DDD
*/
What’s more, if you’d like to look closer at the contract, you’ll find it in the GitHub repository in the ”nft_base.sol” file.
Setting up the Migration File
Let’s create the migration script in the migrations folder before we start testing the smart contract.

const Adulam = artifacts.require('Adulam')
module.exports = async function (deployer) { const BASEURI = `https://bafybeidfpvjszubegtoomoknmc7zcqnay7noteadbwxktw46guhdeqohrm.ipfs.infura-ipfs.io/` await deployer.deploy(Adulam, 'Adulam', 'ADU', BASEURI)
}Coding the Smart Contract
Open the project in VS code, head on to the src >> contracts directory, you will see an existing contract named Migration.sol.
// SPDX-License-Identifier: MIT
pragma solidity >=0.7.0 <0.9.0;
import "./ERC721.sol";
import "./ERC721Enumerable.sol";
import "@openzeppelin/contracts/access/Ownable.sol";
contract Adulam is ERC721Enumerable, Ownable { // Codes goes here
}We are using a particular ERC721 version for our smart contract, let’s say it favors us over the newer versions.
The code snippet above describes a smart contract that inherited some attributes, properties, and methods from ERC721. The ERC721 is a smart contract standard for writing NFT based smart contracts.
Note: In solidity, declaring a smart contract in your code is like declaring a class, they are just similar, so your object-oriented programming skills could give you an added advantage.
// Defining essential variables...
using Strings for uint256;
mapping(string => uint8) public existingURIs;
uint256 public cost = 0.01 ether;
uint256 public maxSupply = 100;
uint256 public supply;
string public baseURI;We make sure that a uint256 variable can call up a function in the string library. Next, we created an existingURIs variable that returns 0 or 1 when an NFT URI is passed into it.
We use the cost variable for setting up the sales price of our NFT, while maxSupply indicates the total number of NFTs available for minting.
Lastly, the supply variable will track the number of NFTs minted and baseURI tracks the location of our NFT folder on IPFS.
// Sales event structure
event Sale( uint256 id, address indexed from, address indexed to, uint256 cost, string metadataURI, uint256 timestamp
);It will keep track of the tokenId, the buyer and seller addresses, the cost of the NFT, the URI of the artwork, and also the time at which the NFT was purchased.
// The sales object of an NFT
struct SaleStruct { uint256 id; address from; address to; uint256 cost; string title; string description; uint256 timestamp;
}
SaleStruct[] minted;This struct seems almost like interfaces on TypeScript. The job of this struct is to help us define complex datatypes where one datatype is insufficient to describe our data.
If you observe the SaleStruct above, you’ll discover that it has multiple data types in it such as uint256, address, and string. Solidity makes combining data super easy through the use of structs.
constructor( string memory _name, string memory _symbol, string memory _baseURI
) ERC721(_name, _symbol) { supply = totalSupply(); baseURI = _baseURI;
}function payToMint( string memory title, string memory description ) public payable { // Specifies criteria for minting NFTs require(supply <= maxSupply, "Sorry, all NFTs have been minted!"); require(msg.value > 0 ether, "Ether too low for minting!"); require(msg.sender != owner(), "This is not permitted!"); // Defines critical math operations supply += 1; string memory URI = concat(Strings.toString(supply + 1)); existingURIs[URI] = 1; sendMoneyTo(owner(), msg.value); // Saves minted NFT in an array minted.push( SaleStruct( supply, msg.sender, owner(), msg.value, title, description, block.timestamp ) ); // Logs out NFT sales information emit Sale( supply, msg.sender, owner(), msg.value, URI, block.timestamp); // Mint the NFT with the ERC721 safeMint method _safeMint(msg.sender, supply);
}This payToMint method is responsible for basically five things, which include;
- Receiving NFT details from the front end and pass them to the smart contract.
- Checking if all criteria for minting NFTs are met.
- Performing mathematical operations including sending the minting money to the deployer.
- Including the NFT in the minted array for further references.
- Logging the sales details to the client and also recording them on the ethereum network.
Minting the NFT using the ERC721 inherited _safeMint method.
Currently, the array variable we declared earlier on is keeping track of all minted NFTs. We prepared this method for retrieving all the minted NFTs from the smart contract when we’ll be consuming them on React.
function getAnNFTs( uint256 tokenId ) public view returns (SaleStruct memory) { return minted[tokenId - 1];
}This method returns a particular NFT object when called. It fetches the NFT by specifying its tokenId. Since arrays start their indexes from 0, we have to subtract 1 from the tokenId to get the exact NFT we want.
function concat( string memory str ) internal view returns (string memory) { return string(abi.encodePacked(baseURI, "", str));
}This is an internal method which means it’s only accessible within this particular smart contract. We use this method to join the tokenId with the baseURI. This is done this way so that each NFT can point to their exact location on the IPFS folder sitting somewhere online.
function sendMoneyTo(address to, uint256 amount) internal { (bool success1, ) = payable(to).call{value: amount}(""); require(success1);
}Lastly, this is another internal method callable by this smart contract alone. It has to send ethers to a specified address. This is the function that ensures that the money used for purchasing an NFT is sent to the owner of the NFT or in this case the deployer.
That’s all the codes we will need for our smart contract, here is the full code snippet.
Now that we’ve coded our smart contract we need to test it to ensure that it’s bug-free and performs the task we created it for.
Link to Project
You can create a copy of this project from our example repository.
Testing the Smart Contract
Start Ganache and make sure it’s up and running. Run the command below on the terminal.
npm install -g ganache-cli #Skip if already installed
ganache-cli -a #spins up the blockchain server
Next, locate the test folder and create a file called Adulam.test.js.
Paste the code snippet inside of it.
Now run the test script using the command below.
truffle testThe result should look this one below.

The prior test is intended to ensure that our smart contract can sell NFTs. Writing a script to interact with your smart contract is an extra precaution to ensure that it runs properly. Let’s get started.
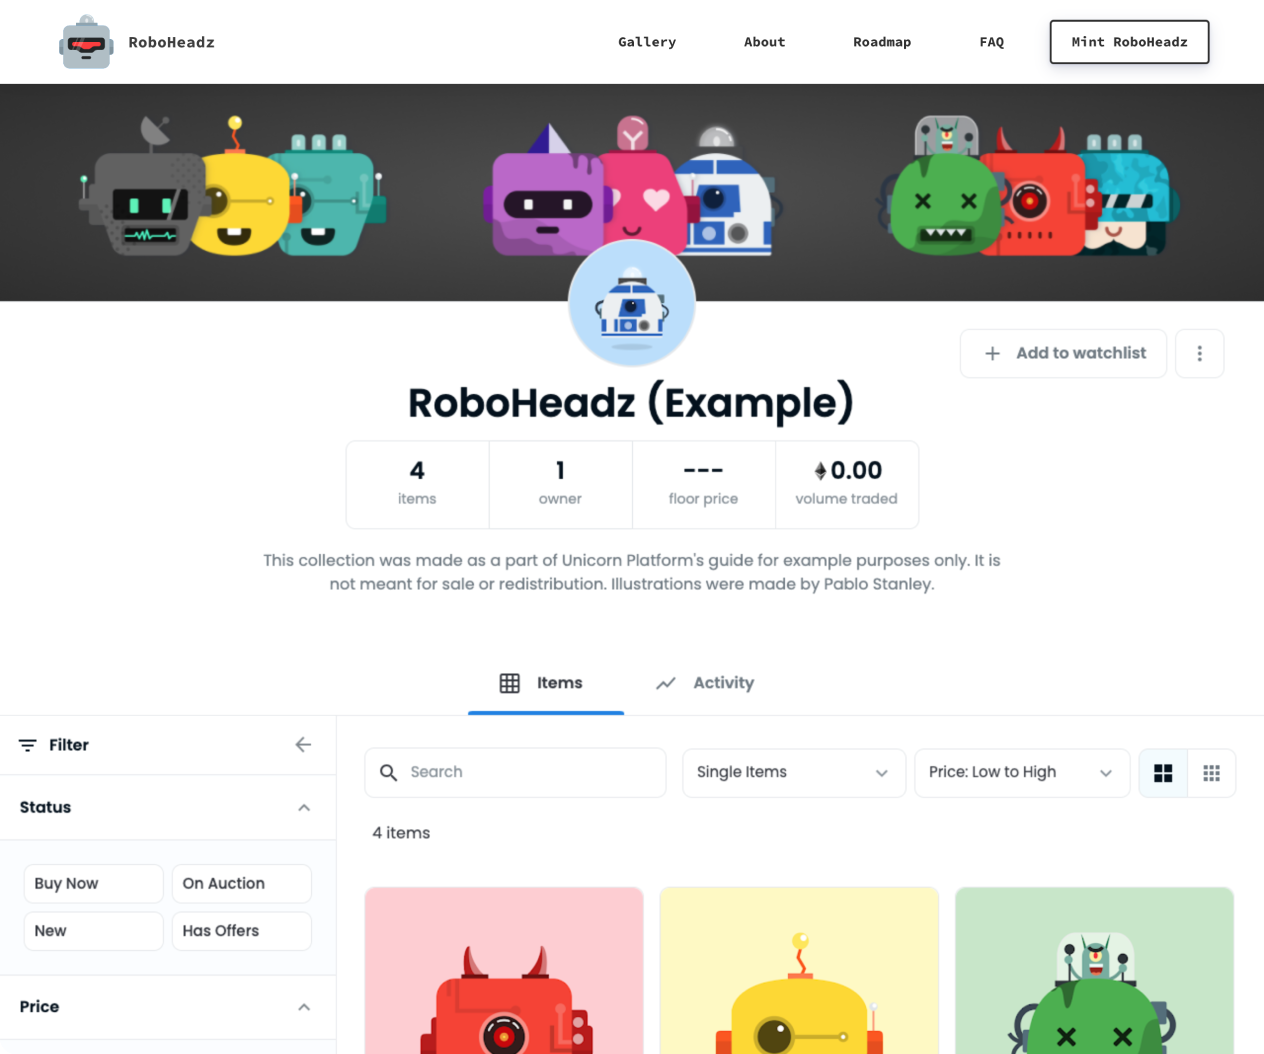
How to Create an NFT Minting Website in 5 Steps
Let’s proceed with the central part of this article and take a closer look at how you can create an NFT minting dapp. However, before we continue, we’ll look closer at what the website will look like once finalized. This will give you an idea of what we’re working toward. Here is a screenshot of the final product:


This is a powerful yet simple application we can create in only five simple steps, thanks to Moralis:
- Creating a Moralis Dapp
- Connecting the Moralis SDK and Initializing Moralis
- Creating the HTML File
- Adding the JavaScript Logic
- Finding a Smart Contract
Mint an NFT Drop
If your NFTs are an NFT Drop or Edition Drop contract, set up claim phases before using the claiming functions mentioned later in the guide.
For our example, I am using an NFT Drop contract called Cookie Club for members of the Cookie Club. 🤫
You can view the Cookie Club NFT Drop on the thirdweb dashboard.
Part 2 – How to Integrate into Your Website
Now that your NFTs are created and ready for trade, you need to link them with your landing page.
Luckily, Unicorn Platform allows you to do this in minutes.
There are 2 possible options for that.
Option 1: Link to OpenSea
You can add a direct link to your OpenSea collection. This will allow you to redirect visitors to your OpenSea page when they click a button or a link.
To do so, open your OpenSea collection page and copy the URL.
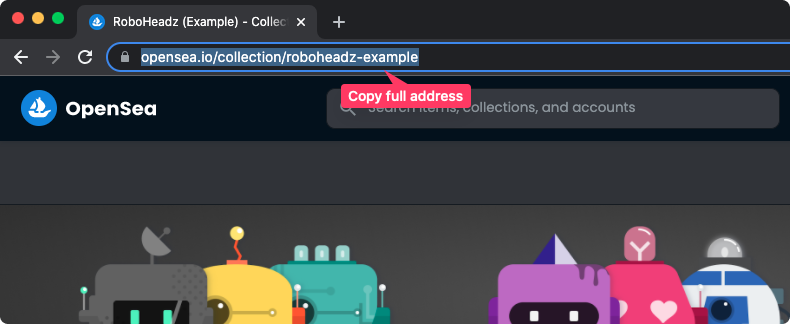
Now, pick any button on your Unicorn Platform page, and paste the URL into this button’s URL field.
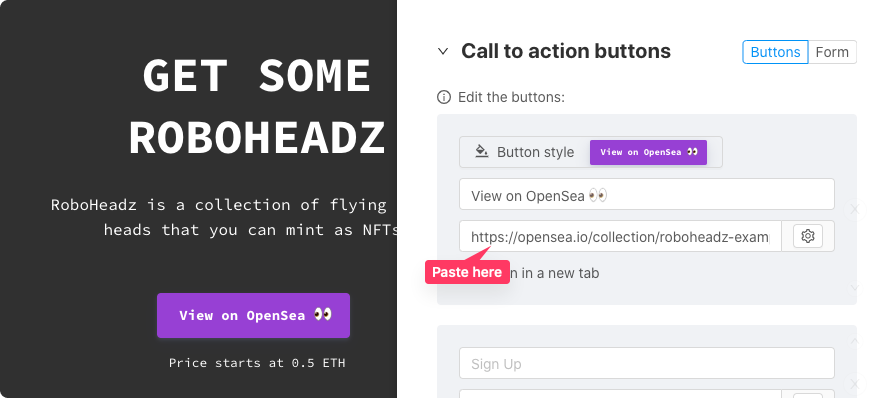
Done! Now when clicked, this button will open your NFT collection.
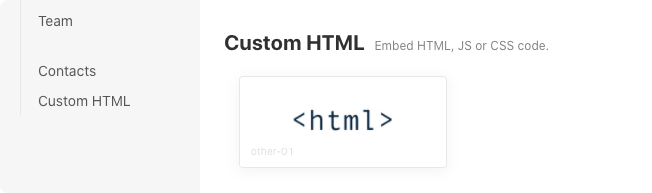
Option 2: OpenSea integration
You can integrate your OpenSea collection directly into Unicorn Platform website page.
First, you need to copy the code snippet below.
<iframe src='https://opensea.io/assets?embed=true' width='100%' height='1080px' frameborder='0' allowfullscreen>
</iframe>
Then, go to Unicorn Platform and create a special component called Custom HTML.
Create it on a page where you want your NFT collection to be located. You can either choose an existing page or create a new one.
Paste the code inside.
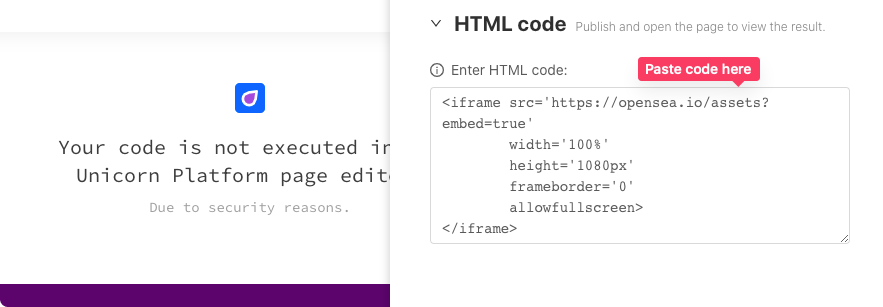
Open your OpenSea collection page, and add ?embed=true to the end of the URL. If a question mark already exists in the URL, add &embed=true instead.

Copy this URL address ending in ?embed=true and paste it into the code. Simply replace the previous URL.
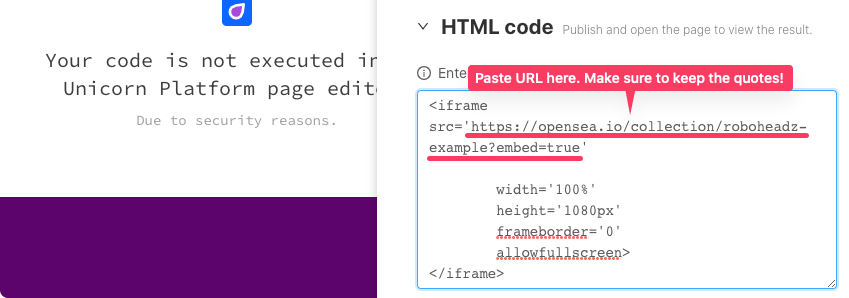
Done! Open the live version of your page to see your NFT collection!
If you are looking for a landing builder that allows you to integrate your NFT collection easily, try Unicorn Platform.
Designed by crypto-geeks like yourself, it has everything an NFT project needs. This includes pre-designed components and free ready-to-use NFT landing page templates.
Just sign up and try it yourself. It is free ✌️
How to Create an NFT Minting Website – Creating the HTML File
In actuality, you have several options that you can take to create an NFT minting website; however, we decided to create a simple Python flask application. This app will trigger all the associated code, some of which is the HTML file used to structure the contents of our website.

The first file we’re briefly going to cover is “index.html“. This is where we’ll find all the HTML code for the fields and buttons of our NFT minting website. We won’t be covering all aspects of the code since this isn’t essential. Your website’s structure should depend on your own preferences and needs as a developer, which is why we’ll not cover all the intricacies of this file. However, here is an example of an HTML element from “index.html”:
<button class="btn btn-primary" id="submit" onclick="login();">Connect MetaMask</button>As you can see from the code snippet above, this is the code for the “Connect MetaMask” button. If you’d like to view the complete HTML code, please click the link above for the “index.html” file. The file is relatively straightforward and contains just above 50 lines of code.
Congratulations!
Let’s go! You created an NFT gated membership website using React. Feel free to add some downloadable content or secret updates behind this new page for your NFT community members!

Build an NFT Minting Platform with NFT Standards
Our Solution
FAQ
How to create an NFT Minting website?
There are two ways to build a NFT minting website — Building a website from scratch, or choosing a White-label NFT minting solution.
How long does it take to build an NFT marketplace from scratch?
Generally it takes 4-8 weeks to build, rest your technology selection and features choice can take 7-8 months for development.
What is the role of Advanced Token Search to build an NFT minting website?
Search options allow visitors to find the first NFT listing on the platform in a blink of an eye. Experts place this option on the top right side of the platform to boost your sales.
What Would be the Cost To Make A Website To Mint NFTs?
The cost of building a NFT minting website could be between $85000 to $135,000. Rest it could depend on your selected features, functionalities and development company.
Are You Leaving Already?
Launching an app may feel a bit overwhelming.
Keep CALM & Get In Touch With Our Experts
Create an NFT Minting Website – Summary
With the increased attentiveness towards NFTs and the flourishing state of the industry, now is a great time to get into NFT development. For this reason, we took this guide to show you how to create an NFT minting website in only five simple steps:
- Creating a Moralis Dapp
- Connecting the Moralis SDK and Initializing Moralis
- Creating the HTML File
- Adding the JavaScript Logic
- Finding a Smart Contract

If you found this article interesting, please make sure to browse additional articles here at NFTCoders to get the hottest NFT development content. For example, you can read about NFT game development or learn how to build an NFT marketplace!
What is the NFT Minting Platform?
Now that we have looked at the detailed insights of NFT Minting applications. Finally, let’s unfold the most important question – how to build an NFT Minting Website.
There are several ways that you can build an NFT Minting Platform. The easiest and most cost-efficient approach is simply to get a White Label Solutions that you can customize and deploy straight away. This approach helps to keep development costs and time to a minimum and minimal technical knowledge is needed. However, there is another way by building it from the scratch. Here we discuss both ways in detail.
How to Create NFT Minting Website

NFT Marketplace like OpenSea

NFT Marketplace For Video & Music

NFT Development for eCommerce
Assign a new digital token to your exceptional design and enjoy a big chunk of market profit. Our developer’s expertise in technology and fashion industry knowledge can assist you in increasing productivity at a high rate.

NFT Marketplace Development on Corda

NFT Marketplace for Memes
Flourish your market for memes and spark in the era of the digital world. We design highly progressive designs that absolutely match your business style and target audience.

NFT Marketplace For Real Estate
Set your business into lucrative trend-winning fame with NFT real estate marketplace. Our marketplace ensures stand-through prominent options for property tokenization and sales.

SolSea Clone App Development

NFT Aggregator Development
Hire Our Expertise For Top-Notch NFT Minting Website Development
- Enhanced Tradability
- Interoperability At Its Best
- Improvised Token Liquidity
- Pre-Tested Products
- Effective Strategies
- Market Compliant Product
How to Create an NFT Minting Website – Creating a Moralis Dapp
The next step is to click on the “Create New Dapp” button to begin the setup process of your Moralis dapp. Once you click this button, you’ll first be prompted to select the development environment. You can pick from either “Mainnet”, “Testnet”, or “Local Dev Chain”.

This choice should depend on where you plan to launch your NFT minting website. However, in this instance, and since this is a guide, we’ll opt for the testnet alternative. Once you have picked the desired environment, you must select the network(s). This should also be dependent on where you plan on launching your dapp. Finally, all that remains is to select the region, name your dapp, and hit the “Create Your Dapp” button to spin up the dapp!

How to Launch an NFT Minting Page – An Example Project
In this part of the article, we’ll show you how to build an NFT minter dApp from scratch. Of course, you can use the same principles to add the mint function to an existing interface. As such, we’ll build a Web3 application, which will enable you to mint NFTs. Along the way, you’ll get to see how various Moralis tools simplify the development process. The most important tool for minting in a decentralized manner is Moralis’ IPFS integration. Now, keep in mind that you can avoid using the leading solution for decentralized storage (IPFS). However, doing so will limit you to a more centralized minting method. Moreover, since we don’t want to be exposed to a single point of failure risk, we’ll focus on the decentralized way for this project. Now, let’s do a brief preview of our dApp before exploring how to launch an NFT minting page.
How to Launch an NFT Minting Page – Preview
This is what our finished dApp’s interface will look like:
Create Your Own Minting Website
There are several different paths you can take to create the above-presented minter dApp. However, we decided to create a Python flask app. This application will trigger the associated code. Moreover, the main parts of our code are the “index.html” and “logic.js” files. As such, we will focus on those two files herein.
Create Your Own Minting Website – Code Walkthrough
Here’s a preview of our “index.html” file:
Here is the preview of the “logic.js” file:
Let’s also repeat that minting is done via interaction with smart contracts. In addition, creating your own smart contract can be tricky. Thus, we decided to cover that aspect using a shortcut (the code on line four). As such, you can focus your attention on using Moralis’ API to mint NFTs.
Create Your Own Minting Website – Initial Moralis Setup
At this point, you know that you need to obtain your created Moralis server URL and application ID. This information is vital when you want to launch an NFT minting page. As such, let’s go through the steps that will provide you with those details:
Once you select a server type, a new window will appear. There, you need to enter your server’s name (this can be anything you want), select your region, network, chain(s), and click on “Add Instance”.
- Access Server Details – With your server up and running, you get to access its details (to populate your “.js” file with). As such, click on “View Details” next to your server name. A pop-up window will appear containing all details.
- Initialize Moralis – Now, use the above details and paste them into your “.js” file to obtain the required backend functionality:
Note: Make sure you use the details of your particular server. Do NOT copy the server details from the image above.
Video Explaining How to Launch an NFT Minting Page
In case you want more details about the code presented for our example project, we recommend watching the video that covers creating your own NFT minting application (the above steps in more detail). As such, you’ll discover how to launch an NFT minting page quickly and easily with Moralis.
Take Your NFT Development Further
Using the above tutorial, you should now be able to create your own minting website. Thanks to Moralis and its option to interact with smart contracts through your website, you get to create a powerful NFT minting page with ease. Moreover, we recommend you learn how to implement other excellent NFT features using Moralis. For example, you can incorporate lazy minting. This is when listed NFTs mint at the time of purchase. Thus, the fees related to the minting transaction become relevant only when an NFT sell. Also, with lazy minting, the minting fee can be covered by an NFT creator, a buyer, or the NFT platform.
Lazy Minting Tutorial:
NFT Rarity Tutorial:
Nonetheless, it also makes sense to learn the details of creating and launching your own NFTs. For that purpose, use this tutorial:
Clone the template repository
To get started will use a cra-javascript-template which already includes a working SDK setup. This template will make it easy to learn and save time when getting started with our project.
First, navigate to the cra-javascript-starter GitHub repository and click on «Use this template» to create a copy.

Add the project’s name, description, and other settings, and then clone it locally on your device. Open the directory and run npm install in your terminal to install all the dependencies.
Prerequisite
- NodeJs installed on your machine.
- Yarn package manager installed.
- Truffle installed.
- Ganache-CLI installed.
- And an unbending attitude to learn Web3.
Part 1 – How to Mint
What is NFT minting?
In this guide, we will tell you how to mint NFTs using the most popular NFT marketplace – OpenSea.
Step 1: Connect your wallet
To get started with OpenSea, you need to create and connect your crypto wallet. The most popular solution for that is MetaMask.
After you installed and configured MetaMask, you need to connect it to your OpenSea account.
Step 2: Create an item
Now that your account is all set up, you can create your first NFT item.
Click Create button on OpenSea’s homepage. Then, upload your asset. It can be either image, video, audio, or 3D model.
You can also add info to your items, such as name, description, stats, and more.
-0w3nl.png)
Step 3: Mint
After you added all the necessary info, click on Create button at the bottom of the page.
That’s it! Your first NFT item has been minted.
-sko0g.png)
Get A Reliable Solution For Your Question, How To Create An NFT Minting Website?
Protect Your Website
Key Steps to Build an NFT Minting Platform From Scratch
Now, Let’s talk briefly about the NFT Minting Platform development process.
The first stage of the development process involves setting objectives and goals by analyzing the requirements of the clients. The end goal of this stage is to finalize the minting platform requirement specifications in a form of a specification document. This document covers every aspect of the platform including functional requirements, non-functional requirements, API Integrations, security testing, etc. Once the document has been finalized now the developers can start the development process.
Smart Contract Development
UI/UX Design and Development
Architecture is the one that shows how your NFT Minting platform functions and performs. The key to how a minting website operates is based on the architecture and function coded. So designing the architecture is the most important factor of the process. Once the architecture has been designed now the coding process starts with integrating smart contracts to both the front end and back end to meet the functional and non-functional requirements of the platform.
Integration of APIs
Now the testing process will be carried out to ensure that the NFT Minting Website functions the same it is coded and is also able to tackle various kinds of data that will be thrown at it. Once the testing process has been ended now the product will be out for deployment.
Struggling to Create NFT Mint Website? Explore The Right Technology With Us
Get in Touch
Ways to Make Money
Enjoy Whopping Revenue Opportunities By Making NFT Mint Website

Listing Fee

Transaction fee
Transaction fees can be generated from creators and buyers, i.e., 2 to 5% when they complete transactions on your website.

Initial setup fee
An initial setup fee is paid by creators to register for the first time on the platform. A one-time chargeable fee works as an entry fee on a website.

Private Sale
Sellers who do not want to publicize their assets can offer private sales to specific customers that allow you to charge some amount from creators.

Minting fee
Every platform has to pay a minting fee to developers, but you can charge the amount from traders every time they mint their digital assets.

Auction sale
Charge a certain amount from both buyers and sellers to participate in bidding options on the website. The fee could be fixed or variable.
Website Building Scenario
Roadmap to Create NFT Minting Website


Plan Your Meeting Platform
We strategies how we can give shape to your dreams. Our experts carefully analyze your competitors, buyer & creators’ expectations, and the technologies that best suit your project.

Create Prototype

Develop Plan
Our developers develop codes that incorporate smart contracts, business needs, and storefronts. Our experts build basic as well advanced codes that comply with your business needs.

Multiple Times Testing
We test your platform automatically and manually to remove all errors, bugs, & issues. We focus on continuous improvements to provide best-in-industry NFT minting website development.
Know Our Tech-Slacks
Understand the Technological Aspect of Creating NFT Minting Website

UI/UX Designs

Smart contract development

AML/KYC Compliance

Efficient Admin Panel
We integrate ERP, CMS, and other third-party applications on your platform to enjoy all essential tools and features on your websites.

Cyber Security

Multiple Payment Options
Get the advantages of multiple payment options on your website to enjoy magnitudes of payment opinions on your platform.
In defense of the modern web
I expect I’ll annoy everyone with this post: the anti-JavaScript crusaders, justly aghast at how much of the stuff we slather onto modern websites; the people arguing the web is a broken platform for interactive applications anyway and we should start over;
Interacting with the Smart Contract
This is the most effective method for validating the functionality of your smart contract. We’d like to create a script that simulates the sales process.
Head to the scripts folder and create a file called BuyNFT.js. Next, paste the following codes inside of it.
Terrific, now run the following command on the terminal after you’ve created and pasted the codes above. Please ensure that your ganache-CLI is still operational before running the code below.
truffle migrate --reset
Observe the following result on your terminal.
If you’ve made it this far, congratulations! Let’s run the BuyNFT script by typing this code into the terminal.
truffle exec scripts/BuyNFT.jsYou should have the minting process play out on the terminal…
We can be happy that our smart contract is functional. Let’s deploy it to the rinkeby test net.
Deploying to Alchemy

At the moment, our smart contract can only run on our computer, and no one else can connect to it. We will use alchemy to make it available to everyone at no cost.
Sign up with them now, or log in if you already have an account.

When you log in, you will see the dashboard page, which allows you to create a new blockchain application.

Creating an Alchemy App
Click on the CREATE APP button and enter the information shown in the image below, making sure to include the Rinkeby test network.

After you’ve created the app, you can view its information by clicking on the app’s name or the view the details button.

Copy the WSS URL as shown in the image below by clicking on the VIEW KEY button.

Amazing, now proceed as shown in the images below to obtain your Rinkeby account. Please keep in mind that we are not using the regular account address, but rather the private key to that account.


ENDPOINT_URL=<YOUR_ALCHEMY_WSS_URL>
SECRET_KEY=<YOUR_METAMASK_SECRET_PHRASE>
DEPLOYER_KEY=<YOUR_METAMASK_PRIVATE_KEY>Please do not use your real Metamask details; these keys must be kept secret. That’s why we put them in the environment file and tell git to ignore them.
After you’ve entered the above keys into their respective variables, execute the commands below.
truffle migrate --reset --network rinkebyAs we can see below, your smart contract will be deployed on the Rinkeby test net.

You’ve worked extremely hard to get to this point. You’ve just completed the deployment of an appealing smart contract to the Ethereum blockchain network. In PART TWO of this tutorial, we’ll connect it to a ReactJs frontend.
Check out my YouTube channel for FREE web3 tutorials now.
How to Launch an NFT Minting Page – Full Walkthrough – Summary
We’ve covered quite a lot of ground in this article. At this point, you know how to launch an NFT minting page. Furthermore, you know that when using Moralis, you get to create your own minting website utilizing your JavaScript proficiency and MetaMask. Moreover, we also hope you’ve joined us as we took on an example project presented above. If so, you now have your own simple NFT minting page up and running. Now, it is up to you to take your NFT development to the next level.
Add useEffect to check for state changes
import { useAddress, useMetamask, useNFTDrop } from "@thirdweb-dev/react";
import { useState, useEffect } from "react";
import "./styles.css";
export default function App() { // allow user to connect to app with metamask, and obtain address const address = useAddress(); const connectWithMetamask = useMetamask(); // const nftDrop = useNFTDrop("0x66463b3C1EBf08b9dE889BCc0A5cbf29dc0e2B7a"); const [hasClaimedNFT, setHasClaimedNFT] = useState(false); const [isClaiming, setIsClaiming] = useState(false); useEffect(() => { // If they don't have an connected wallet, exit! if (!address) { return; } const checkBalance = async () => { try { const nfts = await nftDrop.getOwned(address); setHasClaimedNFT(nfts?.length > 0); } catch (error) { setHasClaimedNFT(false); console.error("Failed to get NFTs", error); } }; checkBalance(); }, [address, nftDrop]); const mintNft = async () => { try { setIsClaiming(true); await nftDrop.claim(1); setHasClaimedNFT(true); } catch (error) { setHasClaimedNFT(false); console.error("Failed to mint NFT", error); } finally { setIsClaiming(false); } }; //if there isn't a wallet connected, display our connect MetaMask button if (!address) { return ( <> <h1>Welcome to the Cookie Club</h1> <button className="btn" onClick={connectWithMetamask}> Connect MetaMask </button> </> ); } // if the user is connected and has an NFT from the drop, display text if (hasClaimedNFT) { return <h2>Congratulations! You have a Cookie NFT! 🍪</h2>; } // truncates the address so it displays in a nice format function truncateAddress(address) { return `${address.slice(0, 6)}...${address.slice(-4)}`; } // if there are no NFTs from collection in wallet, display button to mint return ( <> <p className="address"> There are no Cookie NFTs held by:{" "} <span className="value">{truncateAddress(address)}</span> </p> <button className="btn" disabled={isClaiming} onClick={mintNft}> Mint NFT </button> </> );
}
export default function app;Setup the blockchain
Inside our src folder, we will open the index.js file. We will first change the chain id to the chain of our NFT Drop. For this project, we’ll be using Rinkeby since our NFT Drop contract is on the Rinkeby testnet.
import React from "react";
import ReactDOM from "react-dom";
import App from "./App";
import reportWebVitals from "./reportWebVitals";
import { ChainId, ThirdwebProvider } from "@thirdweb-dev/react";
// This is the chainId your dApp will work on.
const activeChainId = ChainId.Rinkeby;
ReactDOM.render( <React.StrictMode> <ThirdwebProvider desiredChainId={activeChainId}> <App /> </ThirdwebProvider> </React.StrictMode>, document.getElementById("root")
);
// If you want to start measuring performance in your app, pass a function
// to log results (for example: reportWebVitals(console.log))
// or send to an analytics endpoint. Learn more: https://bit.ly/CRA-vitals
reportWebVitals();Business Benefits of Using NFT Minting Script
Easy Than Building From Scratch
Building an NFT Minting Website from scratch will consume a lot of time and amount whereas with NFT Minting Script there is no need of building it. Just a few customizations to the script based on your business requirements such as brand name, logo, extra features and deploy it live into the market.
Ready to Use Solution
As said earlier NFT Minting Website Scripts are pre-built which eliminates the development operations and is deployed instantly. Within a day NFT Minting Scripts can begin its operations to gain profit.
Creating an NFT Minting Platform with NFT Minting Script
The above process of developing from scratch can be time and cost-consuming. As said earlier there is another process that can reduce development cost and time to the market. This can be done with the help of White label solutions.
White Label Solutions are pre-built platforms that are readily available for deploying into the market. These White Label Solutions don’t require businesses to have an experienced development team. However, they don’t allow much customization of the platform. Just a little customization to the platform based on business needs and deploy it. Here is such a White Label solution that can help one to launch the NFT Minting Website in a shorter time frame.
Blockchain Technologies To Make A Minting Website
Solana
Binance Smart Chain
Polygon
PolkaDot
Huobi ECO Chain
Hedera Hashgraph
Meter
Raydium
Chainlink
Tron
How To Create An NFT Minting Website With Top-Notch Security Features?

Two Factor Authenticity
We focus on neutralizing the risks associated with compromised passwords. Our two-factor authenticity ensures your password should not be hacked, guessed, or even phished.

SMS/Email Verifications

Diverse Collection
Our experts launch your secured platform that protects your platform from security breaches and safeguards collectibles from hacking activities on website.

Multiple Wallet Integration

Multi-Signature Wallet
Get rid of the security concerns that come in your way and affect the private key mechanism with our multi-signature wallet integration support.

Encryption Based SSL

Cross-site Forgery Protection
CSFP is used to protect against CSRF attacks and secure random tokens on your platform. The CSFP platform ensures every token session on the website.

Distributed Denial of Services
DDoS security protects your website from hacking important databases and networks from cybercriminals activities that demand emails and ransom to release data.

Server Side Forgery Protection
Safeguard your website from attackers who abuse functionality to read and update internal systems. The absence of features can allow attackers to modify the information.
NFT Minting Website Development Company
Ready To Start Your Business?
Leave Your Details Below
What We Provide
Entering The NFT World
How does NFT Minting Script Works?
Prefer your NFT
Double-check the description & title and Confirm whether the title and description of your artwork file are accurate before starting the minting process. Once you have confirmed.
Sign your NFT
Approve Gas Fee
Mint your NFT
This process gets started once the gas fee gets approved. The digital version of the unique assets will be deployed in the form of smart contracts. Afterward, you can track your digital assets and get an indication of how long it will take to complete the process.
Avoid Double Minting
Avoid double minting during the transaction. Be patient during the minting process. Repeated clicks can lead to multiple transactions. Ethereum executes the minting process according to the order it received.
You can see your minted tokens in your dashboard when the transaction has been completed.
What are NFTs?
There might be some complete beginners among you; therefore, we need to cover some basics first before we educate you on how to launch an NFT minting page. As such, let’s start by answering, “what are NFTs?”. NFTs are unique crypto assets, clearly denoted by the word “non-fungible”. As such, there are no two or more NFTs alike. Even when NFTs are copies of the same item they represent, they have unique properties. Thus, NFTs are a great choice for digital collectibles and digital art. Furthermore, they also offer a wide range of real-world use cases. For instance, NFTs can represent all sorts of certifications and ownerships and contribute to overall transparency.
What is NFT Minting?
Now that you know what NFTs are, we can focus on NFT minting, which is also important to understand when wanting to learn how to launch an NFT minting page. So, what is NFT minting? Let’s start by pointing out that without minting, there would be no NFTs. As such, minting is a key aspect of NFTs. Moreover, it’s the minting that takes a file (JPEG, PNG, MP3, MP4, PDF, etc.) and a set of specific details (description, attributes, etc.) and converts them into a non-fungible token.
Note: A basic understanding of NFT standards is crucial when minting NFTs, especially when you want to create your own minting website. Thus, make sure to check out the above links.