
- Как создать невзаимозаменяемый токен через OpenSea?
- What’s Next?
- What are ERC-721 NFTs?
- How to Create an ERC-721 NFT on OpenSea
- Using Open Zeppelin, Truffle, and Pinata
- В чем главное отличие NFT от криптовалют?
- Nonfungibility
- Create Your Own NFT on Ethereum Blockchain
- В каком блокчейне лучше выпустить NFT?
- Writing the Smart Contract
- Как создать NFT
- Все о NFT
- Из чего можно сделать NFT?
- Какой блокчейн лучше использовать
- Краткое изложение
- Building an ERC-721 Token using OpenZeppelin and Truffle
- How to Create an ERC-721 NFT – Summary
- Какие могут возникнуть проблемы при создании NFT?
- How to Create an ERC-721 NFT with Moralis
- Initializing Moralis
- Finding a Smart Contract
- Creating the dApp
- Login()
- MintToken(_uri)
- Как отправить НФТ другому человеку
- The ERC-721 Standard
- Что лучше, ERC 721 или ERC 1155?
- Bringing It All Together
- About QuikNode
- Доступные платформы для создания NFT
- Как создавать NFT на Opensea
- Регистрация и настройка аккаунта
- Пример создание NFT токена
- Комиссия платформы
- Создание NFT на Binance
- Как создавать NFT на Juggerworld
- Создание NFT токена на OKEx
- Как создавать NFT на BakerySwap
- Как создавать NFT на Treasureland
- Что нужно для создания NFT
- Testing ERC-721 Token
- Какую площадку для создания и продажи NFT выбрать?
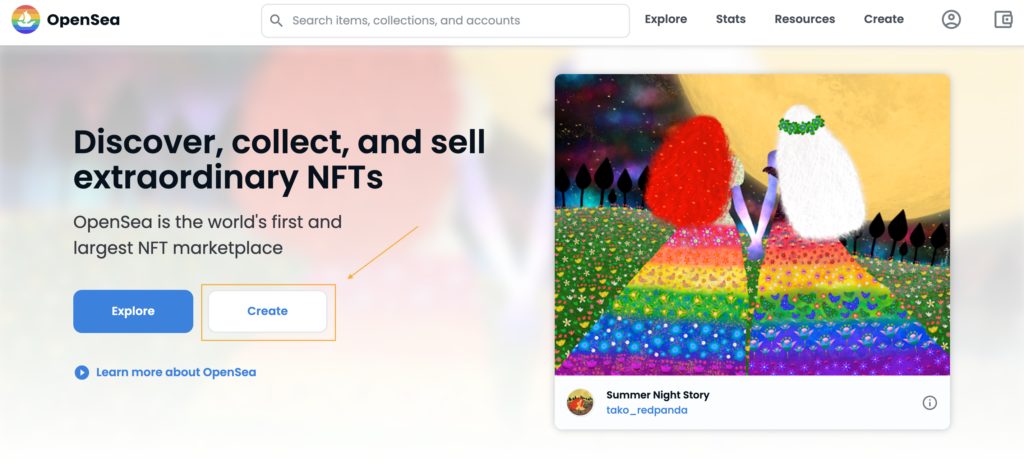
Как создать невзаимозаменяемый токен через OpenSea?
Рассмотрим процесс создания NFT на примере OpenSea.
1. Переходите на главную страницу и нажимайте кнопку Create:
2. Платформа автоматически предложит подключить к сервису подходящий криптокошелек. Мы будем использовать MetaMask.
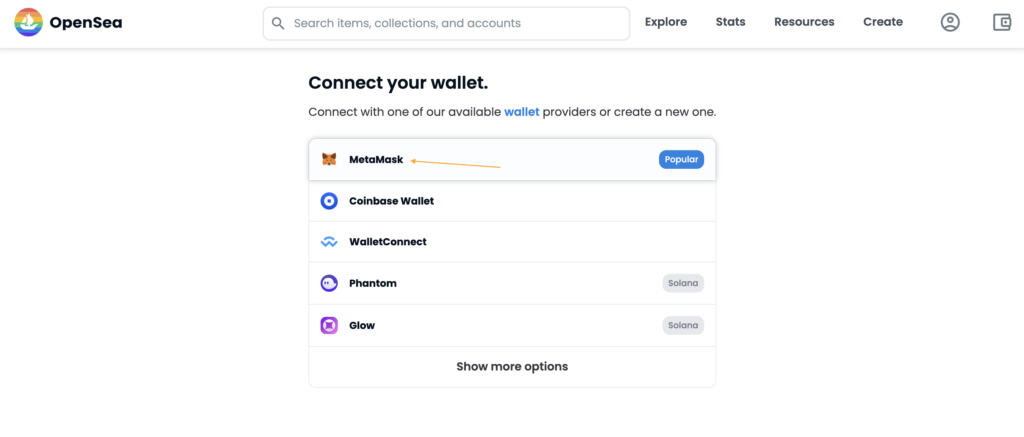
Подключение криптокошелька на OpenSea
3. Кошелек попросит подписать сообщение, необходимое для его соединения с OpenSea. После подтверждения платформа автоматически создаст ваш профиль.
4. В новом окне появится страница для создания NFT. Вам нужно загрузить объект, к которому будет привязан токен: изображение, аудио, видео или 3D-модель.
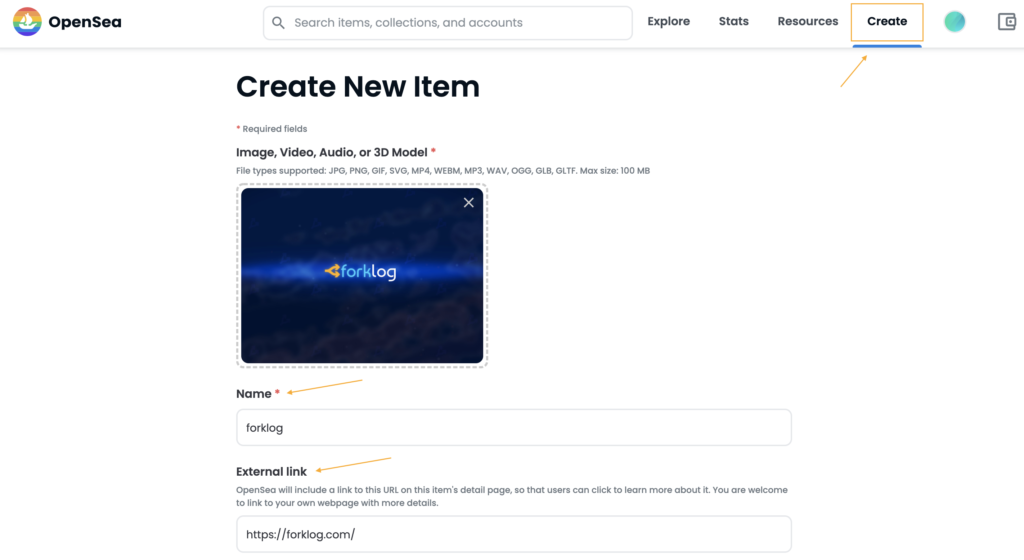
Страница для создания NFT на OpenSea
Также можно использовать опцию разблокированного контента (Unlockable Content) — в таком случае метаданные токена смогут увидеть только его держатели.
5. Когда все параметры настроены, нажимайте кнопку Create, и NFT автоматически появится в вашей коллекции.
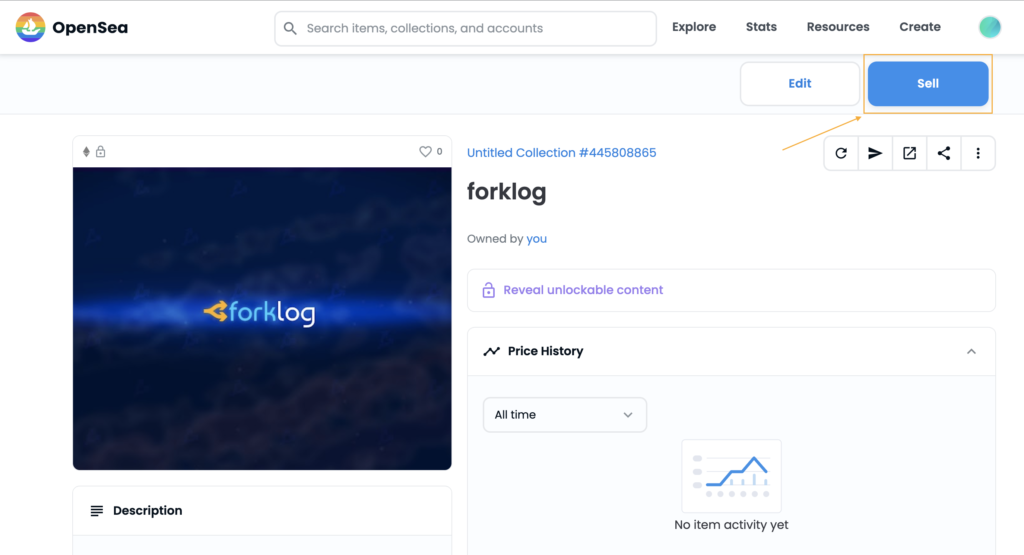
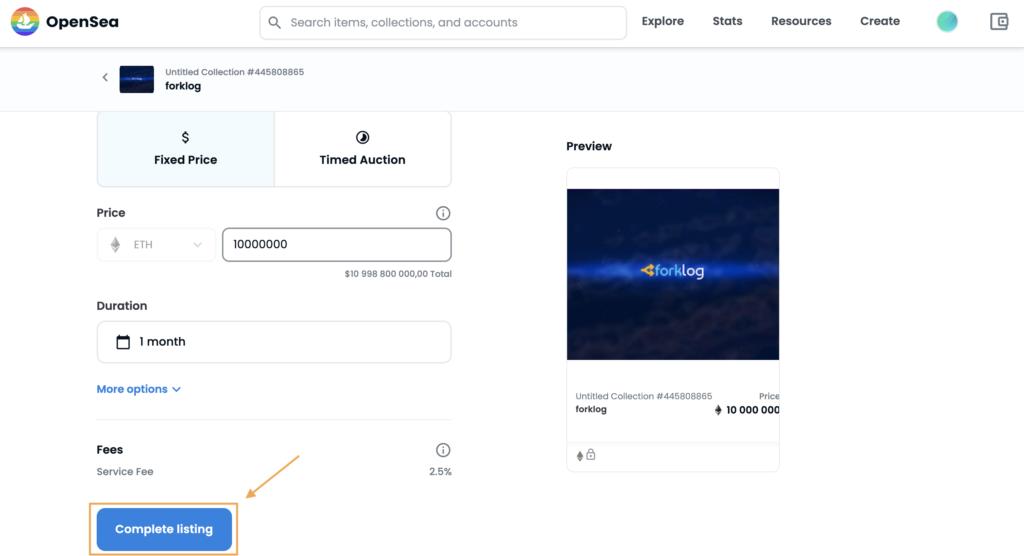
Страница продажи NFT на OpenSea
Появится страница с настройками параметров цены, срока размещения и других условий. При желании создатель NFT может провести аукцион или установить фиксированную цену. Также можно установить роялти и выбрать криптовалюты, доступные для оплаты за токен. После того как параметры заданы, нажмите на Complete listing.
What’s Next?
Let us know what you want to learn about in the comment section.👇
What are ERC-721 NFTs?
To illustrate this point, we’re going to take the Ethereum ecosystem as an example. Within Ethereum, the ERC-20 token standard regulates fungible tokens; meanwhile, the ERC-721 standard is utilized when developing NFTs. Moreover, an honorable mention is the ERC-1155 token standard which regulates semi-fungible tokens. These different standards handle different types of tokens, ensuring that all Ethereum-compatible tokens implement a standard minimum interface, making them compatible through the entire system.
Moreover, the ERC-20, ERC-721, and ERC-1155 are just a few examples of regulatory standards from the Ethereum ecosystem. Other systems have their own unique standards, such as BNB Chain’s BEP-20 or BEP-2.
So, now that we’re familiar with some of the most popular standards, we can try to explain more about ERC-721 NFTs. ERC-721 NFTs are flexible, and they are generally used to represent ownership of virtual and physical assets. As such, they have the potential to represent virtual assets such as digital art, physical property, and negative value assets like debt.
How to Create an ERC-721 NFT on OpenSea
The first alternative is to create an ERC-721 NFT using a reputable NFT marketplace. There are several prominent options on the market, including SuperRare, Rarible, and, of course, OpenSea.
OpenSea is the largest NFT marketplace, and for this reason, we’ll direct our attention to this platform. If you don’t have any solid coding skills and would like to create an NFT both easily and quickly, this is the best option.
So, to create an ERC-721 NFT using OpenSea, the first thing you’ll need to do is visit their official website and click on the ”Create” button:
Once you click on the button, OpenSea will prompt you to connect your wallet. It provides various options; however, we recommend using MetaMask since this is the most well-established crypto wallet on the market. If you’re unfamiliar with the wallet, be sure to check out our article answering the question ”What is MetaMask?”.
With an image uploaded, the next step is to name your NFT, maybe add a description, and simply click on the ”Create” button at the bottom of the page, which will mint your ERC-721 NFT. However, it’s important to know that minting an NFT this way requires you to pay a gas fee. As such, it’s essential to keep track of the current gas prices since they might be pretty expensive.
Using Open Zeppelin, Truffle, and Pinata
The ERC-721 standard has given rise to the non-fungible token (NFT) market on Ethereum. ERC-721 is a standard for creating an NFT—a complicated way of saying “unique items”. Any unique thing can be an NFT. A house, a baseball card, a piece of art, etc. But the power is not in the item just being unique and digitized. The power is in verifiability. That’s where the ERC-721 standard shines.
In general, the cost to store data on Ethereum works out to approximately 17,500 ETH/GB, or around $4,672,500 at today’s prices.
It’s not cryptographically verifiable.
The whole point of an NFT is digital verification and control of what might be a physical or digital asset. If we cannot verify the underlying asset itself in a similar way to verifying the ownership of the token that represents the asset, we have lost track of the ultimate goal.
IPFS also takes care of the verifiability for us. Because all content is defined and stored based on the content itself, should a piece of content be tampered with or changed, we would have a mismatch when trying to verify the content and know it is wrong. Let’s make this a little more clear with a simple example:
Alice stores a picture of a cat on IPFS and that cat picture is represented by a content identifier. For simplicity, let’s say the identifier is “C”.
Bob requests that cat picture and then draws a mustache on that poor cat. When Bob uploads his picture, he will no longer have the same identifier. Because he has changed the underlying data (from cat to mustachioed cat), Bob’s identifier might be “M”.
If Bob tried to pass his photo off as Alice’s anyone who bothered to check would know he was lying. Alice’s identifier does not match Bob’s and therefore, the image Bob is trying to pass off as Alice’s is verifiably fake.
I think you can start to see how this comes in handy when trying to verify digital assets like NFTs. So, with that in mind, let’s see how we can create an NFT and store the associated asset on IPFS.
В чем главное отличие NFT от криптовалют?
У всех криптовалют есть определенная эмиссия, монеты которой одинаковые и их можно обменивать друг на друга. В свою очередь, каждый NFT уникален и не имеет аналогов. Хотя выпуск невзаимозаменяемых токенов, как и криптовалюты, происходит через смарт-контракт. К одному контракту может относиться любое число NFT с общими чертами, таким образом они могут объединяться в коллекции.
Главная особенность и, одновременно, ценность NFT — в цифровых предметах, к которым они относятся. Токен не хранит в себе сам предмет — он указывает на ссылку на медиафайл, размещенный на сервере. Благодаря свойствам блокчейна данную запись невозможно подделать или изменить, помимо легальных случаев — обмена или продажи. Таким образом NFT выступают свидетельством права собственности на цифровой предмет (или его долю).
Наиболее популярный блокчейн для создания NFT — Ethereum. Метаданными токена управляет смарт-контракт, созданный по стандартам ERC-721 или ERC-1155. С помощью метаданных любой NFT-маркетплейс и другие приложения «находят» контент каждого токена и правильно отображают его атрибуты.
В случае NFT-коллекции Эрмитажа, созданной на основе картин из собрания музея, все работы существуют в двух экземплярах: один, физический, хранится в Эрмитаже, а второй, цифровой, представлен на площадке Binance NFT. Их подлинность заверена директором музея, а в метаданных закреплены дата, время и место подписания.
Nonfungibility
Let’s understand what is non-fungibility.
A non-fungible token represents a unique token which can’t be interchanged with another token.
You can’t divide or add up to get a higher quantity because every unit is unique and you cannot replace or interchange it with other assets. For example, two pieces of land. They are both non-fungible regarding their location.
Image source- Every Kitty is unique and represents a different token. Aren’t they cute? See the leftmost one, isn’t he shy? 😋
Create Your Own NFT on Ethereum Blockchain
Goal — We will explore the ERC-721 token standard, non-fungibility, and build a SIMPLE ERC-721 token.
В каком блокчейне лучше выпустить NFT?
Большинство невзаимозаменяемых токенов выпускают в Ethereum, однако комиссии в сети составляют минимум несколько десятков долларов. Существует ряд альтернативных блокчейнов, которые часто используют для NFT:
У каждого блокчейна есть свой стандарт для NFT. От сети, в которой выпущен токен, зависит, какие приложения и кошельки будут поддерживать операции с ним. Невзаимозаменяемый токен, выпущенный в сети Ethereum, можно продать только на тех платформах, которые поддерживают его стандарты токенов, например Rarible. Другой NFT-маркетплейс может поддерживать только BNB Chain, как BakerySwap, и NFT из Ethereum на нем разместить нельзя.
Популярные блокчейны дают доступ к большой аудитории и развитому рынку, однако в них зачастую дороже транзакции. В свою очередь, сети с более низкими комиссиями за переводы может иметь экосистему меньшего размера.
Writing the Smart Contract
ERC-721 tokens are governed by smart contracts. Fortunately, the folks over at OpenZeppelin make ensuring you write good contracts easy. We’ll use their ERC-721 contract to help us get started.
First, in your terminal, create a new project folder.
mkdir mySpecialAsset && cd mySpecialAsset
Next, we’ll initialize our project directory using NPM.
npm init -y
Now, we can utilize Truffle to initialize our smart contract project.
Now, we need to get access to those sweet, sweet Open Zeppelin contracts. To do that, we’ll install Open Zeppelin’s solidity library like this:
We will need to think of a good name for our token. I’m going to call mine UniqueAsset because we are ensuring NFTs must be associated with unique underlying assets. You can call your contract anything you’d like. We want to house the contract in a contracts folder, so we’ll create our file like this:
We can now open that file and get to work. We need to specify the version (or versions of solidity that are compatible with our contract. We will also need to import the contract frameworks from Open Zeppelin. And we can start to implement the contract itself. Let’s take a look:
pragma solidity ^0.6.0;
We need to specify the version of Solidity we’re using. In this case, I’m using 0.6.0. You can make sure that Truffle compiles your contract using the correct version of Solidity by editing the truffle-config.jsfile. I am importing two contracts from Open Zeppelin: ERC721 and Counters. Counters is just helping us increment the token ids after issuance. Finally, in the constructor for our contract, we are defining our token name and symbol. Again, you can set this to be whatever you’d like.
We’re going to need to add some logic into our contract. Let’s do that now.
First, let’s think about what we’re trying to do here. We want to issue NFTs for specific assets. We want those assets to be verifiable as much as we want ownership to be verifiable. So a couple of things we need to consider here:
We are using Counters to help us increment the identifiers for the tokens we mint. We are also creating a _tokenIds variable to keep track of all of the tokens we’ve issued. And finally, for our top-level variables, we’re creating a mapping for the IPFS hashes associated with tokens. This will help prevent issuing tokens mapped to a hash previously associated with another token.
Your contract should now look like this:
We need to add a method to our contract that will allow us to mint an NFT for a specific IPFS hash if not token has been minted yet for that hash. We’ll do this just below our constructor.
function awardItem(address recipient, string memory hash, string memory metadata) public returns (uint256) uint256 newItemId = _tokenIds.current();
There’s a lot going on here, so let’s walk through this line by line. Our function takes two parameters: An address variable called recipient, a string variable called hash, and a string variable called metadata. The address variable is the person’s wallet address who will receive the NFT. The string variable for the hash is the IPFS hash associated with the content we are creating the NFT for. And the string variable for metadatashould refer to a link to the JSON metadata for the asset. The metadata might include the asset name, a link to an image referencing the asset, or anything else you want.
Then, after defining our function, we are making it public. This just means it can be called from outside the smart contract. We are also defining the return value of our function to be of type uint256.
Inside the function, we are using Solidity’s built-in require to automatically reject the contract call if the hash has been used to mint an NFT before. You’ll notice we are checking if our hashes mapping has a matching hash with the integer of 1. If so, that hash has been used.
If the hash has not been used, we add the hash passed through our function to our hashes mapping and set its value to 1).
Finally, we increment our _tokenIds variable because we’re about to create a new NFT and we mint our token, returning the token identifier.
That was a lot, so let’s quickly summarize without leaning on the code. Our contract right now takes in a person’s Ethereum wallet address and an IPFS hash. It checks to make sure that hash doesn’t match a previously minted NFT. If all is good, a new NFT is created specific to that IPFS hash.
Ok, we’ve written our contract. Now what?
Let’s compile it and deploy it. Remember I asked you to install Ganache. We’re going to use that now. Start Ganache either through the ganache-cli or by using the desktop client (I prefer the desktop client).
var UniqueAsset = artifacts.require(«UniqueAsset»);
Replace the references to UniqueAsset with whatever you are calling your contract.
Once that’s done and saved, in your terminal, within the project directory, run:
Assuming you didn’t hit any errors, your contract has been compiled and can now be deployed. Simply run:
If you get an error, you may need to manually set the port that Ganache is running on. The desktop client makes this easy to find. In your truffle-config.js file, you can find the networks section and set the development network port appropriately.
If all went well, you just deployed your NFT smart contract. Here seems like a good opportunity to remind you that I am not an expert smart contract developer. There are surely best practices I missed that you should research yourself if you are creating smart contracts.
You can test your contract by writing tests in Truffle against it, or you can head over to Remix and paste your contract in there and run tests. If you do test it, you’ll notice that you can mint an NFT associated with an IPFS hash, but if you try to mint another NFT for that same hash, the call to your contract will fail.
Now that we’ve taken care of the smart contract, we need to get our underlying asset onto IPFS and make sure it’s available when it’s time to mint an NFT associated with it.
Как создать NFT
Мы не зря вынесли основные особенности разных платформ в отдельную главу и не стали расписывать в ней процесс создания NFT для каждой отдельно взятой системы. Все дело в том, что он практически идентичен и отличается лишь небольшими особенностями интерфейса, поддерживаемыми монетами и криптокошельками.
Все начинается с простой регистрации в платформе с авторизацией через кошелек MetaMask или Trust Wallet. После регистрации или авторизации найдите на главной странице кнопку «Создать», загрузите свои цифровые объекты, которые вы хотите привязать к токену, и добавьте их описание. При этом у пользователей есть возможность создания как отдельных NFT, так и их коллекции.
После этого согласитесь с декларацией о борьбе с плагиатом и оплатите комиссию (при ее наличии). Токен может появиться в вашей коллекции и небольшой задержкой, необходимой для его проверки на плагиат. Ну а создав NFT, вы можете пользоваться им единолично, выставить его на продажу или передать другому пользователю. При этом в некоторых случаях за это придется заплатить комиссию, о чем мы уже писали в предыдущей главе.
Все о NFT
Незаменяемый токен (NFT) это индивидуальный цифровой жетон, существующий на блокчейне. В текущий период много невзаимозаменяемых токенов выпускаются по стандарту ERC-721, предназначенном для цепочки Ethereum. Но существуют и другие стандарты, например, ERC-1155 и ERC-998. NFT-токены также поддерживаются другими блокчейнами, включая BSC, MATIC, TRON, EOS, NEO.
В отличие от криптовалют и традиционных денег, например, того же биткоина или российского рубля, каждый NFT содержит уникальные данные, означающие, что эти токены не взаимозаменяемы друг с другом. Если обычный цифровой токен или бумажную купюру можно обменять на другой, равноценный по стоимости, то с NFT-токенами такой обмен абсолютно невозможен.
Невзаимодействующие токены используются для создания, поддающегося проверке цифрового дефицита в конкретных приложениях, которые требуют уникальных цифровых элементов. Например, для блокчейн-игр и коллекционирования. NFT также можно использовать для представления внутриигровых активов, которые контролируются пользователем, а не разработчиком игры. Такие токены или цифровые предметы могут на самом деле пережить игру, для которой они были изначально созданы, и найти включение в отдельные будущие игры. Еще одно применение — это цифровое искусство. NFT позволяет каждому автору доказать подлинность и право собственности на произведения искусства, расположенными на блокчейне. Каждая творческая личность может создать собственный NFT и продавать контент на децентрализованных рынках. NFT один из лучших способов заработать криптовалюту, не инвестируя в нее напрямую. Это почти тоже самое что открыть магазин на Ebay.
Есть масса причин для покупки НФТ. Каждый токен уникален, он единственный в своем роде. Вы не можете сделать другой NFT, который является тем же номером токена на том же смарт-контракте. Это гарантируется блокчейном и может быть проверено любым пользователем. Владелец NFT имеет все полномочия на использование этого изображения и актива. Вы будете единственным владельцем коллекционного предмета, который можно перепродать. Но, возможно, со временем, его ценность будет только расти. Покупая NFT для перепродажи, вы можете заработать тысячи долларов. Есть много людей, которые делают так каждый день и зарабатывают этим на жизнь. Никто не может изменить метаданные на токене, никто не может удалить ваше изображение или имя токена. Это означает, что он никогда не изменится, он никогда не будет удален, он не может быть снят с блокчейна. Именно это придает ему такую большую ценность.
Из чего можно сделать NFT?
Основой для создания невзаимозаменяемого токена может служить любой компьютерный файл (GIF, jpeg, mp3, PDF и практически любой другой формат). Блокчейн-технология обеспечивает новый вид «владения» цифровыми файлами, который ранее был невозможен. NFT можно покупать, собирать, продавать и даже уничтожать точно так же, как физические предметы.
Какой блокчейн лучше использовать
Самой распространенной базовой сетью для невзаимозаменяемых токенов является Ethereum, но перемещение NFT в сети ETH стоят дорого. Одна из лучших альтернатив это Binance Smart Chain или Polygon (MATIC) здесь услуги дешевле в несколько раз.
Существуют и другие блокчейн-проекты, например, Polkadot, Tron или Tezos. Если решили заработать на продаже своего творения, то перед тем как создать NFT картинку, определитесь на каком маркетплейсе будете продавать.
Краткое изложение
Одним из способов представления стоимости обмена в сети блокчейна является токенизация активов, при этом активы могут быть взаимозаменяемыми или невзаимозаменяемыми. Взаимозаменяемость означает, что их можно разделить и обменять на другие. С другой стороны, невзаимозаменяемые токены (NFT) нельзя разделить, и у них нет существующих дубликатов. В блокчейне, таком как Ethereum, существуют два популярных стандарта для создания NFT: ERC-721 и ERC-1155.

Building an ERC-721 Token using OpenZeppelin and Truffle
Now let’s build an ERC-721 token using the OpenZeppelin library and Truffle.
First, let’s setup Truffle:
mkdir simpletruffle initnpm install openzeppelin-solidity
Let’s create a new Contract for our SIMPLE Token:
pragma solidity ^0.4.24;import «/openzeppelin-solidity/contracts/token/ERC721/ERC721Full.sol»;import «/openzeppelin-solidity/contracts/ownership/Ownable.sol»;
Let’s see what we are doing here. We are inheriting two contracts; ERC721FULL and Ownable.
Ownable — Using this contract, we can manage ownership of our contract and are able to mint tokens from the contract owner’s account only.
ERC721FULL — This is a standard implementation of ERC-721 interface we have mentioned above. Let’s see what happens inside this contract:
ERC721FULL internally inherits 3 contracts. We will look mainly into ERC721 to understand the implementation.
Let’s go through the main function one by one. Before that, we will understand, how tokens are getting stored:
_tokenOwner — This mapping is needed to store a token against its owner. By using this we can know who is the owner for given tokenId.
_tokenApprovals — This mapping is needed to store tokenId, against an address which is approved by the token owner, to transfer a token on behalf of the owner.
_ownedTokenCount — This mapping is needed to know how many tokens an address owns. If we don’t create this mapping, we have to loop to get this information and looping takes lots of gas on EVM.
_operatorApprovals — Mapping of an owner and an operator (any address, mostly wallets, and exchanges) to check if the owner had given approval or not.
Now let’s see functions in this standard:
balanceOf — This will return the balance of an address. First, it checks for a valid address and then using _ownedTokensCount returns the count of the token.
OwnerOf — This will return the owner address for a given token using _tokenOwner mapping.
approve — This will approve an address to transfer a token on behalf of the owner. The function first checks if the owner called the function or if the call is approved by the owner to send all tokens. Then it updates the _tokenApprovals mapping if everything is correct.
safeTransferFrom — There are two functions with similar names, but with different arguments. These functions internally call transferFrom function. Though they also perform one more important duty. They check if the recipient address is valid for receiving the token or not. This helps in the security of the token.
transferFrom — This is the main function to transfer a token from one address to another address. Let’s see what is it doing:
1- Check if the token is either owned by called or approved to the caller. Also, checks of a valid address.
2- Clear approval, remove current ownership and reduce the token count of the current owner.
3- Add token to recipient account and increase the token count for the recipient.
_clearApproval(from, tokenId); _removeTokenFrom(from, tokenId); _addTokenTo(to, tokenId);emit Transfer(from, to, tokenId); }
setApprovalForAll — This function approves the address to transfer all tokens on behalf of the owner. It first checks if the called and to address are not the same, and then updates the _operatorApprovals mapping.
isApprovedForAll — This function checks if the owner approved the operator to transfer tokens or not.
getApproved — Returns the approved address for given tokenId.
You can check the other helper functions and inherited contracts.
If you don’t understand something, please ask in comments! We’re here to help!
How to Create an ERC-721 NFT – Summary
This article demonstrates that it’s possible to create an ERC-721 NFT by either using an established NFT marketplace such as OpenSea or creating an NFT minting dApp using the Moralis operating system.
So, if you’d like to accelerate your Web3 development journey, sign up with Moralis right now! Creating an account is free, and you can utilize the helpful tools of the platform immediately.
Какие могут возникнуть проблемы при создании NFT?
Медиафайлы хранить в блокчейне невозможно, так как иначе его размер достиг бы невероятных размеров. Например, копия Ethereum уже сейчас весит более 1 ТБ. Поэтому для хранения файлов, к которым привязаны NFT, используют офчейн-инфраструктуру.
Проблему частично решает протокол связи InterPlanetary File System (IPFS). Это система для децентрализованного хранения файлов, поэтому файлы, размещенные в IFPS, менее уязвимы для вмешательства извне. Множество хостов, а не только оператор сервера, гарантируют, что данные не будут изменены. Именно таким решением воспользовалась певица Grimes, когда продавала свою коллекцию неизданных треков в форме NFT.
How to Create an ERC-721 NFT with Moralis
This section of the article will show you how to create an ERC-721 NFT using the Moralis operating system. Unlike OpenSea, this will be a more decentralized process where you create your own NFT minting dApp. To provide you with an idea of what we’re working towards, this is what the dApp will look like once finalized:
Initializing Moralis
The remainder of the tutorial will revolve around a brief breakthrough of the code, which you can find at the GitHub repository that we initially linked to in the introduction. From there, you can simply clone the project and utilize the already prepared template to create your dApp. Moreover, you can customize the code to add your own spin to the project if you’d like.
Moralis.initialize(“”); // Application ID from moralis.io
Moralis.serverURL = «»; // Server URL from moralis.io
Finding a Smart Contract
An additional essential component for the dApp is a smart contract. It is possible to either create a contract from scratch or utilize an already existing one. To make the process easier, we have decided to provide you with an already prepared smart contract for this tutorial. As such, it is possible to avoid the tedious task of either finding one or coding your own contract. However, if you’re interested in creating smart contracts, check out our guide on how to create smart contracts.
const nft_contract_address = «»
/*
Available deployed contracts
Ethereum Rinkeby 0x0Fb6EF3505b9c52Ed39595433a21aF9B5FCc4431
Polygon Mumbai 0x351bbee7C6E9268A1BF741B098448477E08A0a53
BSC Testnet 0x88624DD1c725C6A95E223170fa99ddB22E1C6DDD
*/
Creating the dApp
Next up, we’re going to take a closer look at the ”logic.js” file, where most of the essential code for the dApp is allocated. What’s more, we’re going to direct our attention to the three main functions: ”login()”, ”upload()”, and ”mintToken(_uri)”.
However, before diving deeper into the functions, another important file is ”index.html”, which we need to mention. This file contains all the HTML code used to structure the content of the dApp. This is where you’ll find the code for the fields and buttons. We won’t be studying the file in more detail since it is up to you how the dApp should be structured, and this should be based on your preferences.
So, let’s instead move back to ”logic.js” and look closer at the ”login()” function.
Login()
The second function is ”upload()”, which ensures that the files inputted into the dApp are used to create a Moralis object which, in turn, is uploaded to IPFS through the ”.saveIPFS()” Moralis function. The object’s URI is then used to create a metadata Moralis object, which is again uploaded to IPFS in JSON format. Finally, the object’s URI is passed as a parameter when calling the ”mintToken(_uri)” function.
MintToken(_uri)
Маркетплейс не обещает пользователю стопроцентную гарантию продажи токена, поэтому ему придется самостоятельно рекламировать свой NFT и искать для него покупателей.
Если вам важно получить навыки именно в создании цифровых объектов, а не в торговле, то вы можете присоединиться к какому-либо NFT-проекту в качестве автора.
Многие компании, связанные с этим рынком, ищут специалистов для создания контента: художников, музыкантов, писателей и представителей других творческих профессий.
Как отправить НФТ другому человеку
Владелец NFT может переслать его другому лицу при условии, что у того человека есть кошелек, поддерживающий данный тип токенов. Рекомендуется отправлять неделимые монеты с помощью Trust Wallet и MetaMask. А вот добавить партнера в совладение будет сложно, большинство распространенных стандартов (ERC 721, ERC 1155, BEP 721, BEP 1155) не допускают наличия нескольких владельцев.
The ERC-721 Standard
Now’s let deep dive into the ERC-721 standard. The ERC-721 standard defines a set of methods which help in identifying and interacting with a Non-Fungible Token.
Events- events which get emitted on Transfer, Approvals.
balanceOf — Will return the balance of an address.
ownerOf — Will return owner address of a token.
safeTransferFrom —Transfer token from one address to another with checks performed to make sure the recipient can accept the token, so it doesn’t get burned/lost.
transferFrom — Transfer token from one address to another address (note: the use of this function is discouraged). The Caller of the method is responsible to put the correct recipient address.
approve — Approve any other address to send a transaction from token owner account to any other account.
setApprovalForAll — Allow or disallow an operator (any address, mostly wallets and exchanges) to send all tokens from owner address to any other address.
getApproved — Return an address which is allowed to transfer token for owners. Return 0 if no address is set.
isApprovedForAll — Return true if given operator (any address) is approved by a given owner.
pragma solidity ^0.4.20;event Transfer(address indexed _from, address indexed _to, uint256 indexed _tokenId);event Approval(address indexed _owner, address indexed _approved, uint256 indexed _tokenId);event ApprovalForAll(address indexed _owner, address indexed _operator, bool _approved);function balanceOf(address _owner) external view returns (uint256);function ownerOf(uint256 _tokenId) external view returns (address);function safeTransferFrom(address _from, address _to, uint256 _tokenId, bytes data) external payable;function safeTransferFrom(address _from, address _to, uint256 _tokenId) external payable;function transferFrom(address _from, address _to, uint256 _tokenId) external payable;function approve(address _approved, uint256 _tokenId) external payable;function setApprovalForAll(address _operator, bool _approved) external;function getApproved(uint256 _tokenId) external view returns (address);function isApprovedForAll(address _owner, address _operator) external view returns (bool);
Что лучше, ERC 721 или ERC 1155?
Оба стандарта токенов могут минтить NFT. Возникает вопрос: какой из них вы должны предпочесть? Все зависит от ваших личных предпочтений или варианта использования. В то время как некоторые коллекционеры произведений искусства покупают NFT ERC-721 только потому, что считают этот тип токена золотым стандартом, у других коллекционеров нет особых предпочтений. С другой стороны, ERC-1155 дешевле и эффективнее, поскольку снижает плату за газ, что делает его приемлемым и доступным способом создания NFT.
Bringing It All Together
NFTs are an important improvement in the way we handle ownership of all kinds of goods. They are easily transferable and simplify the process of creating ownership and proving ownership. The missing piece, though, has been the verification of ownership of a specific item.
By saving assets to IPFS and associating the IPFS hash with the asset’s NFT, we can expand the verifiable ownership of the asset to verification of the asset’s validity itself.
Pinata helps streamline this process by making the storage of assets on IPFS easy.
About QuikNode
Before understanding non-fungibility, we need to understand what is fungibility. There are two main properties of fungibility:
Interchangeability — You can interchange or replace units of a fungible asset. Your $20 bill and my $20 bill represents the same thing and can be interchanged. Another example that 1kg gold bar is equal to another 1k gold bar. They represent the same value and can be interchanged.
Quantity — You can merge units of a fungible asset to get a higher value in quantity. The example you can add up multiple KGs of grains and now you have the same thing but in a higher quantity.
Доступные платформы для создания NFT
В сети работает множество платформ для создания и торговли произведениями диджитал арта. Самой популярной NFT-платформой считается OpenSea Binance NFT. Здесь продаются любые виды уникальных токенов, а также есть информативный блог, в котором публикуются рейтинги продавцов и много других полезных данных.
Как создавать NFT на Opensea
Для создания собственного NFT не нужно быть программистом или блокчейн-инженером. Достаточно умения работать в интернете и обладания уникальным материалом.
Регистрация и настройка аккаунта
Потом нужно будет придумать никмейн, сообщить и подтвердить адрес электронной почты и подписать сообщение, присланное на ваш криптокошелек. Цифровая подпись сообщения не требует платы, она нужна чтобы удостовериться что вы владелец кошелька. На этом процесс регистрации на Opensea будет завершен.
Пример создание NFT токена
Чтобы приступить к созданию токена, нажмите «Create» и перед вами откроется страница загрузки файла. Можете взять картинку или другой медиаконтент с инета, но после создания каждый NFT проходит проверку на оригинальность и только по завершении NFT можно будет попытаться продать. Загрузите свое творение ( максимум 40 МБ), назовите, добавьте Description (не больше 1000 знаков) и нажмите кнопку создать. NFT-токен будет добавлен в личную коллекцию.
Когда вы создаете NFT, то кодируете адрес и эмиссию в идентификаторе токена. Таким образом, никто, кроме вас, не сможет чеканить этот NFT, и покупатели могут рассчитывать на жесткий лимит поставок, который обеспечивается кодом. Если хотите развернуть свои собственные контракты, управлять внешним видом на OpenSea или устанавливать валюту и комиссионные за продажу контрактов, заключенных на других платформах, таких как Mintbase или Rarible, можете сделать это через один и тот же интерфейс.
Комиссия платформы
А сколько стоит создать NFT — спросите вы. Невзаимозаменяемые монеты на OpenSea выпущены по стандарту ERC-1155, что сделало возможной беспошлинную чеканку. Если NFT делается не для продажи, то вы ничего не платите, а вот чтобы выставить его на маркетплейс придется раскошелиться на GAS FEE. Размер комиссии за транзакцию зависит от времени суток, деньги списываются с ETH-адреса криптобумажника. Если ETH на кошельке недостаточно, нужно пополнить баланс.
Создание NFT на Binance
Маркетплейс Binance планирует разрешить выпуск NFT на своей площадке всем клиентам, но по состоянию на 21.12.2021 года эта привилегия доступна только узкой группе предварительно утвержденных квалифицированных авторов.
Когда функция создания невзаимозаменяемых токенов будет активной, вы увидите в правом верхнем углу главной страницы раздела Binance NFT кнопку «Create». Нажмите на нее и перед вами откроется форма загрузки контента. Можно оцифровывать изображения форматов (JPEG, PNG, GIF), музыку (WAV, MP3) или видео (MP4, MPEG и AVI). Максимальный объем загружаемого файла 50 МБ. При выпуске одного экземпляра используется формат BEP-721.
Как создавать NFT на Juggerworld
Платформа Juggerworld поддерживает создание уникальных токенов на базе блокчейна BSC по стандартам BEP-721 или BEP-1155. Можете работать с маркетплейсом через то же Metamask, изменив в настройках сеть Ethereum на Binanсe Chain, или другой кошелек, совместимый с блокчейном BCS. Порядок работы:
Вы увидите всплывшее окно с просьбой оплатить комиссионный сбор. После оплаты, NFT будет добавлен во вкладку My Collection, и появится на маркетплейсе.
Создание NFT токена на OKEx
Первое, что нужно сделать, — это переключить вебсайт okex.com в режим работы с технологиями DeFi. Для этого кликните по ползунку «DeFi» в левом верхнем углу сайта.
После переключения режима понадобится создать или подключить собственный криптовалютный кошелёк. Например, Metamast. Это необходимо для использования режима DeFi. Далее необходимо выбрать опцию «NFT Marketplace», она открывает доступ к возможностям клиента для управления NFT-токенами.
NFT-токену необходим исходный материал, на основе которого он генерируется. Это может быть изображение, видео или аудиозапись. Вот поддерживаемые форматы исходных материалов на платформе OKEx:
Как создавать NFT на BakerySwap
Платформа BakerySwap позволяет токенизировать картины, гифки, видео и аудиофайлы. Для создания учетной записи используется кошельки Metamask или Trust Wallet. Комиссия за чеканку NFT составляет 0,01 BNB. Каждый автор подписывается под декларацией по борьбе с плагиатом.
Как создавать NFT на Treasureland
Treasureland является NFT-маркетплейсом работающим на базе дефи-платформы BSC Dego Finance. На данном ресурсе можно создавать неделимые токены бесплатно, все расходы ложатся на плечи покупателей цифрового арта. Но если автор захочет передать свое творение, то должен будет оплатить комиссионный сбор.
Для регистрации учетной записи нужен криптобумажник. Поддерживаются приложения Metamask, Trust Wallet, Match Wallet, Onto Wallet. Порядок создания NFT такой же, как и на других маркетплейсах. Подключаете кошелек, загружаете контент и чеканите собственный токен.
Что нужно для создания NFT
Конечно, в первую очередь вам потребуется сам объект, к которому будет привязан токен. И именно от его уникальности и эксклюзивности зависит итоговая цена NFT. Это может быть созданная вами гифка, изображение, креативное видео или песня. В общем, все то, что, как вы считаете, способно заинтересовать других пользователей.
Но объектом NFT могут стать не только цифровые предметы, а еще и вполне реальные вещи. К примеру, вы можете использовать токены для продажи собственной коллекции марок, скульптуры или реальной картины. Такая практика пока не особо распространена, но в будущем это наверняка изменится. Тем более, что примеры этому уже есть: не так давно на аукционе Christie’s был продан артобъект стоимостью выше 130 тысяч долларов.
Testing ERC-721 Token
This will give us the Truffle console.
Now let’s deploy our contract. Remember! You need to add a migration file. You can check the attached GitHub repo at the end of the article.
Now, let’s mint some tokens, and perform a test transfer & approval.
You can go ahead and test all methods (OpenZeppelin is a well-tested library so you don’t need to worry about the functionality provided by the library). You should instead be focusing on testing any functionality added by you 😎
Below, we’ll show you how you can create an ERC-721 NFT. However, there isn’t one universal way of making or minting these tokens. In fact, there are numerous different ways, and we don’t have the time to dive deeper into them all. We’re going to focus on how you can create an ERC-721 token by either utilizing an NFT marketplace or by creating an NFT minting dApp using Moralis.
The first alternative is pretty straightforward since you’ll be using a reputable NFT marketplace like OpenSea or Rarible. As such, you don’t need to be familiar with any coding practices. However, this comes with a drawback as you need to look past the centralized aspect of working this way.
On the other hand, if you are interested in decentralized aspects, have some JavaScript proficiency, and know the basics of Web3, then creating an ERC-721 NFT minting dApp with Moralis might be a more appropriate alternative for you.
Nonetheless, it doesn’t matter which alternative you opt for since we’ll take you through both options to make these processes as understandable as possible. But without further ado, let’s kick things off by taking a closer look at how you can utilize an established NFT marketplace to create an ERC-721 NFT!
Какую площадку для создания и продажи NFT выбрать?
Существует множество NFT-маркетплейсов. Однако не каждая площадка позволяет выпустить токен любому пользователю. Например, Nifty Gateway проводит серьезный отбор участников перед тем, как разместить цифровой объект, поэтому ее чаще выбирают известные деятели искусств.
Популярные платформы, в частности OpenSea или Rarible, являются полностью открытыми и предоставляют доступ к созданию и размещению токенов ввиде NFT любому пользователю.
На OpenSea проще всего найти покупателей. Главной особенностью платформы является разнообразие категорий для предметов, к которым привязываются NFT: искусство, спорт, коллекционные карточки, а также проекты от известных артистов. На OpenSea продают даже NFT для аудиофайлов, доменных имен и трехмерных объектов.