
Hi guys! I am new with chia, and u dont get how to make plots to the new 1.20 version with madmax what is working on pools. Exactliy iam intrested in poolcontractadress. What is it? That identifier of the pools ? I can use plots only at that pool when i make them with that PoolContactAddres ? Have to replot when i wanna change pool?
Sry if its a dumb question 🙁
Best regards !
Advertisement
Go to chia
r/chia
•
Posted by
hirotoyasutoko
- Great Guide by pool. garden on using MadMax Plotter for pools.
- comments
- Sync Your Chia Wallet
- Get free mojo from official Chia faucet
- Join the space pool or any other pool
- Installing MadMax Plotter Quick Guide
- Installing MadMax Plotter – Detailed Guide
- Check directories in the Chia GUI
- Описание программы Chia_Plotting
- Инструкция по использованию
- Обновления Chia_Plotting (подробное описание всех изменений в версиях)
- Contents
- Needed Items.
- Get Started.
- Install Byobu and Mousepad.
- Set up Swap Space for Ubuntu 20.
- Install The Chia Software on the Raspberry Pi Main Node. 👨🌾
- Set up your Plotting and Harvesting Computers.
- Installing our farmer CA files on our Harvester/Plotter.
- Initialize the harvesters with the CA file.
- Set up our Plotting software MadMax
- Start Plotting
- Troubleshooting
- Chia Commands Cheatsheet
- Wallet commands
- Plot commands
- Farm commands
- Key commands
- Платная функция в Chia_Plotting
- Как работает Автоматизация создания плотов
- Разработчик программы
Great Guide by pool. garden on using MadMax Plotter for pools.
Top posts of July 5, 2021 Top posts of July 2021 Top posts of 2021
comments
Feature: listing_below
partialAttributes: [object Object]
priority : low
htmlMode : partial
jsMode : external
loading : lazy
viewports : 3
feature : listing_below
key : listing_below
Raw data:
<faceplate-json value="{"shell":{"name":"shell"},"target":{"middleware":[null,null],"name":"comments"},"features":{"comments":{"feature":{"middleware":[null,null],"name":"comments"},"orchestration":{"partialAttributes":{},"priority":0,"htmlMode":1,"jsMode":1,"loading":"eager","viewports":[3]},"childFeatures":[{"feature":"header-small","htmlMode":1,"viewports":[0],"key":"header-small","priority":0},{"feature":"header-large","htmlMode":1,"viewports":[1,2],"key":"header-large","priority":0},{"feature":"post_details_page_post","htmlMode":1,"key":"post_details_page_post","priority":2},{"feature":"top_comments","htmlMode":2,"partialAttributes":{"className":"block min-h-[20rem]","children":{"_$litType$":1,"strings":[""],"values":[]}},"key":"comments_forest","priority":1}],"assets":[{"kind":1,"name":"en-US/pdp-client-js","url":"en-US/pdp-client-js-3456eb82.js"}]},"header-small":{"feature":{"name":"header-small"},"orchestration":{"partialAttributes":{},"priority":0,"htmlMode":1,"jsMode":1,"loading":"preload","viewports":[0],"feature":"header-small","key":"header-small"},"childFeatures":[{"feature":"hamburger-menu","key":"hamburger-menu","priority":3}],"assets":[{"kind":1,"name":"en-US/header-small-client-js","url":"en-US/header-small-client-js-ebed72fd.js"}]},"hamburger-menu":{"feature":{"name":"hamburger-menu"},"orchestration":{"partialAttributes":{},"priority":3,"htmlMode":2,"jsMode":1,"loading":"lazy","viewports":[3],"feature":"hamburger-menu","key":"hamburger-menu"},"childFeatures":[],"assets":[{"kind":1,"name":"en-US/hamburger-menu-client-js","url":"en-US/hamburger-menu-client-js-d1b82b28.js"}]},"header-large":{"feature":{"name":"header-large"},"orchestration":{"partialAttributes":{},"priority":0,"htmlMode":1,"jsMode":1,"loading":"preload","viewports":[1,2],"feature":"header-large","key":"header-large"},"childFeatures":[]},"post_details_page_post":{"feature":{"name":"post_details_page_post"},"orchestration":{"partialAttributes":{},"priority":2,"htmlMode":1,"jsMode":1,"loading":"lazy","viewports":[3],"feature":"post_details_page_post","key":"post_details_page_post"},"childFeatures":[]},"top_comments":{"feature":{"name":"top_comments","middleware":[null,null]},"orchestration":{"partialAttributes":{"className":"block min-h-[20rem]","children":{"_$litType$":1,"strings":[""],"values":[]}},"priority":1,"htmlMode":2,"jsMode":1,"loading":"eager","viewports":[3],"feature":"top_comments","key":"comments_forest"},"childFeatures":[{"feature":"listing_below","htmlMode":2,"partialAttributes":{"children":{"_$litType$":1,"strings":[""],"values":[]},"className":"hidden lb-lazy-preload"},"key":"listing_below","priority":3}]},"listing_below":{"feature":{"middleware":[null],"name":"listing_below"},"orchestration":{"partialAttributes":{"children":{"_$litType$":1,"strings":[""],"values":[]},"className":"hidden lb-lazy-preload"},"priority":3,"htmlMode":2,"jsMode":1,"loading":"lazy","viewports":[3],"feature":"listing_below","key":"listing_below"},"childFeatures":[]}},"assets":[{"kind":1,"name":"en-US/pdp-client-js","url":"en-US/pdp-client-js-3456eb82.js"},{"kind":1,"name":"en-US/header-small-client-js","url":"en-US/header-small-client-js-ebed72fd.js"},{"kind":1,"name":"en-US/hamburger-menu-client-js","url":"en-US/hamburger-menu-client-js-d1b82b28.js"}]}»>
However, 3 days ago the license on Max’s repository was changed to the Apace 2.0 license. This is awesome for a couple reasons. First, Chia has no licensing constraints from including it in their software package. Second, anyone else can too. There are no more restrictions on how to use the Mad Max plotter anymore.
The only questions that are left in my mind are when will see this built in, and what will happen to FlexPool’s sponsorship blurb. If you want to check out Chia Network’s work on their version you can see here.
Update: In a post on reddit Harold-B, developer of BladeBit, has announced version 1.2 which includes Windows support and also a change to the Apache2 license. This suggests to me we are getting close to seeing a major update to the Chia official plotting software, with support for the official plotter as well as Mad Max and BladeBit
Any help is greatly appreciated, ive been having a hell of a time the past couple days with BSOD’s and stability issues on my plotting and farming machines.
Im trying to replot with madmax, im having issues with both 0.1.1/2. Stability issues aside, i was able to replot in about 78minutes. My farmer unfortunately doesnt see the plot as valid. Farmer is running latest chia build and is currently syned. I created an NFT plot contract address and copied it from the CHIA software and input it into madmax. Here is where i think the problem is:
Madmax states the contrace address needs to be 64 characters, yet what i copied from CHIA is only 62 characters. I decided to let my farmer build a plot in the GUI and it sees and can farm that plot. Coincidentally it also seemed to be «farming» the plot i made with madmax, but it still flagged it as invalid, so im not sure if it was actually farming it or just counting it in the farms total arbitrarily.
Any thoughts?
ps- Stabilty has been a nightmare for me. Ive got a farmer running a Ryzen7 PRO 4750G, with a SAS3 adapter and 2 NVME drives, and plotting with the gui is slowwww. Ive been getting random reboots and bsod in the middle of the night. It would appear memory related, but CHIAs software keeps getting called out in event viewer. My memory is corsair vengenace lpx XMP@ 3200mhx. Pretty common stuff and ive never had issues with it before.
Mad Max, of the Mad Max plotter fame, has recently launched his own cryptocurrency that is sort of based on Chia, but not really. It is definitely not a Chia Fork, but it is still based on Proof of Space and Time. Interested? I know I am.
The currency is called MMX and it is based on Chia’s Proof of Space system along with Solana’s VDF. It is still very early on, but you can build and deploy a node and start plotting. Plots are not compatible with Chia, and the requirement is for K30 plots. You can use K32 plots with MMX but they still won’t be compatible with Chia.
The focus here seems to be on performance. There is no Python here with the entire repository written in C++. The target here seems to be orders of magnitude faster than Chia, and a lot of choices here seem to be made directly in response to the problems a lot of us in the community see with Chia.
There are no BLS2 signatures here to hold up Exchange support, the VDF function does not need a separate kind of node to run but simply runs as OpenCL on the node’s GPU. This seems laser focused on being used as a currency exchange, and for trading and not so much as a smart contract platform.
I am super curious about this, and will be checking it out myself. I have a ton of respect for Mad Max, as do we all, and I personally think that this is one of the most interesting developments to come out of Chia yet – including Chia itself.
Update: We have instructions written on how to build MMX from source here and I have written up my thoughts after a day of using this here.
2021-10-12T20:57:27.976 harvester chia.plotting.manager : ERROR Failed to open file \\192.168.0.150\gx17-24\plot-k32-2021-10-12-20-40-5ce6571561133df0c444dd45a1bc28fdd1ed4660f2dd9a25d22b8154465959fe.plot. Invalid file \\192.168.0.150\gx17-24\plot-k32-2021-10-12-20-40-5ce6571561133df0c444dd45a1bc28fdd1ed4660f2dd9a25d22b8154465959fe.plot Traceback (most recent call last): File "chia\plotting\manager.py", line 290, in process_file
ValueError: Invalid file \\192.168.0.150\gx17-24\plot-k32-2021-10-12-20-40-5ce6571561133df0c444dd45a1bc28fdd1ed4660f2dd9a25d22b8154465959fe.plot
2021-10-12T20:57:28.934 harvester chia.plotting.manager : ERROR Failed to open file \\192.168.0.150\gx17-24\plot-k32-2021-10-12-19-59-55017ed58998f847f3b48c0acb7054cf885322d4fb4d50bb86e27b2f153999aa.plot. Invalid file \\192.168.0.150\gx17-24\plot-k32-2021-10-12-19-59-55017ed58998f847f3b48c0acb7054cf885322d4fb4d50bb86e27b2f153999aa.plot Traceback (most recent call last): File "chia\plotting\manager.py", line 290, in process_file
ValueError: Invalid file \\192.168.0.150\gx17-24\plot-k32-2021-10-12-19-59-55017ed58998f847f3b48c0acb7054cf885322d4fb4d50bb86e27b2f153999aa.plot
YouTuber Darwing has just posted an excellent step-by-step guide to plotting to an NFT for pools with the Mad Max plotter. He goes through the entire process, from start to finish and doesn’t miss a single requirement from what I can tell. He even mentions that you must have your wallet fully synced before starting this process, which is a change from the old plotting process and I haven’t seen a lot of chatter about.
This is truly excellent and important work, and will help get a lot of people who aren’t experienced with Chia get up and going with high performance plotting. We need to support educational content like this as a community, so please check out his video below and visit his channel to subscribe.
- Go download madmax: Releases · stotiks/chia-plotter (github.com)
- extract to c:\madmax
- open Powershell window and navigate to c:\madmax
- Grab your contract address: Gui – select pool and hover the ? and copy the address to your notepad
- grab farmer pool key, Gui – keys and select the eye and copy the farmer public key
- determine your temp folder for -t, in this case d:\
- determine your temp2 folder if it is different -2 , in this case it is not
- determine your final output -d, in this case d:\complete
- determine your thread count -r, in this case 8
- determine bucket count -u, in this case 256
- now we paste those into our Madmax string:
.\chia_plot -n 1 -c [contract_ID] -f [Farmer key] -t d:\ -2 d:\ -d d:\complete\ -r 8 -u 256
https://youtube.com/watch?v=pKNmRmvFSdI%3Ffeature%3Doembed
Update: Custom Computing has put out a guide for Mad Max plotting with NFT / Portable Plots for Chia Pools
Now that it has been a few weeks it is time for an update to the Mad Max plotter and the question to “is it safe?”. The answer seems to be yes. It has received a ton of scrutiny, the Chia team have been looking over it directly and have recommended it in certain situations. Mad Max himself has been publicly available and showing his face in interviews. But is it better?
The answer is, it depends. If you have a server system with many low clockspeed cores it will almost certainly be much faster. If you have a CPU optimized for gaming you may be better off running the built in plotter with multiple instances instead. If you have 128GB of ram or more it can be a lot better, as it can reduce the wear on your plotting drive 2/3. If you have a national laboratories supercomputer it might be much, much faster.
The main issue I was concerned about what the quality of the plots, as it uses a slightly different mechanism. Bram himself, although not the final authority, knows a lot more about this than I do and says that they aren’t exact but the differences are so minor it wont make a difference. Considering how many values are stored in a plot missing a couple wont make a difference.
The choice is yours. I am still plotting with the built in plotter because I am a dinosaur. But when portable plots finally launch I may switch. We will be developing a Mad Max plotting guide in next couple days, so check back for that. In the mean time, check out this YouTube guide by Custom Computing.
https://youtube.com/watch?v=DEvrN3Hg25g%3Ffeature%3Doembed
На конфигурации с AMD RYZEN Threadripper 3970X и 128 ГБ ОЗУ создание плота заняло чуть более 16 минут.
Недавно энтузиасты криптомонеты Chia (Чиа) получили в свои руки новый мощный инструмент — плоттер от madMAx43v3r. Использование данного плоттера в разы ускоряет создание новых плотов Чиа. И если буквально несколько дней назад мировой рекорд скорости создания плота составлял 24 минуты, то на сегодняшний момент рекорд улучшили почти до 16 минут. Данная информация появилась на форуме криптоэнтузиастов ChiaForum.
Описание сети Чиа на главной странице проекта chia.net
Для этого криптоэнтузиаст с ником larzzon использовал высокопроизводительный компьютер с 32-х ядерным процессором AMD RYZEN Threadripper 3970X, 128 ГБ ОЗУ и двумя SSD PM983 в RAID0. В ОЗУ был создан RAM-диск объемом 110 ГБ, на который была перенаправлена большая часть операций дискового ввода-вывода. Данная конфигурация позволяет создавать до 89 плотов Чиа в сутки. larzzon считает, что если заменить SSD диски на более производительные, то время создания плота скорее всего получится уменьшить до 15 минут.
Но конфигурация с процессором AMD RYZEN Threadripper 3970X, несомненно, не является самой оптимальной с точки зрения стоимости.
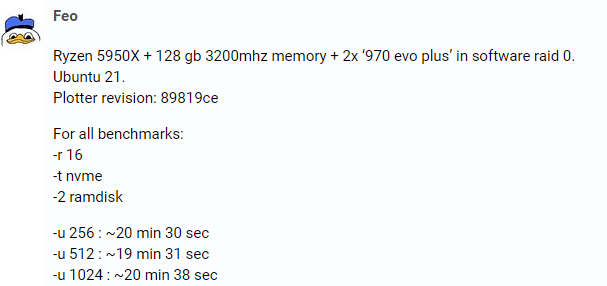
Для примера, более бюджетная конфигурация с 16-ти ядерным процессором AMD Ryzen 9 5950X, 128 ГБ ОЗУ и двумя SSD Samsung 970 Evo Plus в RAID0 обеспечивает создание одного плота за 19 минут 31 секунду (73 плота в сутки). Для этого в ОЗУ также создавался RAM-диск на 110 ГБ, а количество участков (buckets) при создании плота в плоттере устанавливалось в 512.
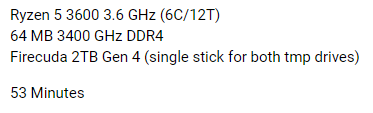
Для сравнения, время создания одного плота Чиа на сборке с народным 6-ти ядерным процессором AMD Ryzen 5 3600 с 64 ГБ (без RAM-диска) и с одним NVME SSD Seagate Firecuda 2ТБ составляет 53 минуты (27 плотов в сутки).
Несомненно, в свете таких новостей многие криптоэнтузиасты монеты Чиа постараются укомплектовать свои компьютеры ОЗУ объемом 128 ГБ, что, весьма вероятно, увеличит цены на модули памяти объемом 32 ГБ. Так что, если вы планировали прибрести такие модули, думаю, стоит это сделать в ближайшее время.
Ну а возможным плюсом данной ситуации является то, что цены на NVME SSD диски объемом 1 ТБ и более, которые сильно выросли за последние два месяца, могут упасть.
Единственным препятствием перед падением цен на ёмкие NVME SSD диски может явиться непомерная жадность продавцов, которые могут наоборот, поднять цены на SSD объемом 256-512 ГБ в два-три раза (до уровня более ёмких NVME SSD).
анонсы и реклама
Пиши на наш сайт и зарабатывай
12700KF за копейки в Ситилинке
Вдвое подешевела 6700XT MSI
3060 MSI за 44тр в Регарде
3050 дешевле 30 тр в Регарде
Рухнула цена i9 12900K на треть
3060 Ti задешево в Ситилинке
RX 6600 за 30тр в Регарде
3070 Ti MSI за копейки в Регарде
3080 Ti Gigabyte Gaming дешевле 90 тр
Компьютеры дешевле 10 тр в Ситилинке
Также весьма вероятно, что цены за услугу плоттинга Чиа, которые сейчас составляют в среднем от 70 до 250 рублей за один плот в скором времени должны будут упасть.
Этот материал написан посетителем сайта, и за него начислено вознаграждение.
Over the last day and a bit I have built the full node on Windows under WSL, plotted out about a TB of K30 plots using Mad Max’s plotter (again under WSL) and have been farming happily away. When not plotting I might even be running the fastest Timelord, as I have it built on my gaming PC and not my Chia farm for the time being.
At this point I should mention that this software is an extreme alpha. Max has not even really released anything, we found it and started talking about. He is doing extremely active development on it with new features having launched multiple times in a day right now. He even open sourced the VNX middleware yesterday after a few people expressed concern with the closed source component.
As for the farming, plots are not compatible with Chia plots. You have to use the Mad Max plotter with a specific MMX switch specified in order to produce plots for the coin. Right now the testnet supports over K26 but he is planning on K30+for mainnet. The software uses a different wallet format than Chia, so when you create your wallet you will get a wallet.dat file instead of a database. This means that it does not have the very lengthy wallet syncing process that Chia undergoes when creating keys, It is very Bitcoin-like, because it uses the Bitcoin wallet signature ciphers.
Farming rewards are variable, keyed to netspace so that it creates some stability. Max is planning on keying the price to around where Chia and Chives sit. He theorizes that eventually proof of space and time coins will all sit around the same in terms of farming value returned. This is a really interesting concept and as the netspace has grown today I have noticed that the rewards have been increasing.
I think because of the use of ECDSA signatures MMX will not suffer the difficulties bringing it onto exchanges that Chia and the Chia forks have seen. It should be very similar to Bitcoin and hardware wallets should support it with very little work, if any.
На двухпроцессорном сервере с Xeon(R) E5-2650v2@2.60GHz с 256GB ОЗУ и с тремя SATA SSD 800GB в RAID0 создание плота Чиа заняло 42 минуты.
В последние пару недель хайп вокруг новой монеты Чиа (Chia) немного приутих. Во многом в этом виноваты сами разработчики данной монеты, которые не ожидали от своего детища такой огромной популярности. Они не стали сразу реализовывать возможность майнинга на пулах, который гарантирует регулярное получение дохода для добытчиков данной криптомонеты. Отсутствие официальных пулов затормозило процесс роста сети, так как по информации от разработчиков, подключение к официальным пулам потребует пересоздания всех ранее созданных плотов.
Но даже несмотря на это, сеть Чиа продолжает сильно увеличиваться в размерах. На текущий момент её объем превысил 22 миллиона Терабайт. Для понимания масштаба — этот объем примерно соответствует 2% от годового объема всех производимых дисковых накопителей в мире.
Объем сети Чиа на момент старта торгов 3 мая 2021 года
Объем сети Чиа с момента старта торгов за 41 день вырос в 13 раз
Так как новостная поддержка запуска данной монеты была проведена на образцовом уровне, люди заметили эту монету, и многие решили вложиться в её добычу. В результате в магазинах были раскуплены практически все жесткие диски объемом более 4 ТБайт. Цены на такие жёсткие диски при этом взлетели в 3 раза.
Цена на 8 ТБ жесткий диск в июне 2020 года Для примера, если в июне 2020 года я купил в Ситилинк
жесткий диск объемом 8 ТБ за 16890 рублей, то сейчас
этот же диск в этом же магазине стоит немалые 43990 рублей (и это с учетом скидки в 8000 рублей).
Цена на 8 ТБ жесткий диск в июне 2021 года
Пока разработчики монеты заняты добавлением функционала добычи монеты с использованием пулов, сообщество энтузиастов данной монеты не дремлет. Разработчик с ником madMAx43vr выложил в открытый доступ свой Чиа плоттер, который позволяет создавать плоты Чиа гораздо быстрее официального плоттера.
Так, по результатам тестирования самим разработчиком, на двухпроцессорном сервере с Intel Xeon E5-2650v2@2.60GHz с 256GB ОЗУ и с тремя SATA SSD 800GB в RAID0 создание плота Чиа заняло 42 минуты. Плоттер при этом использовал всего 16 процессорных потоков. Следует отметить, что для достижения такого результата потребовалось создать временный диск в ОЗУ (RAM диск) объемом 110 ГБайт. В качестве дополнительного бонуса от использования RAM диска на 75% было снижено общее количество записей на диски при создании плота.
Разработчик и другие участники проекта
Разработчик заявляет, что плоты, созданные с помощью его плоттера, проходят проверку на корректность с использованием инструмента Proof of Space от chiapos.
Youtube канал Sloth Tech TV провёл тесты с использованием нового плоттера и установил новый мировой рекорд — плот был создан всего за 24 минуты. Для этого плоттер запускался на двухпроцессорном сервере с Intel Xeon E5-2690v2, использовалось 40 процессорных потоков и всего 64 ГБ ОЗУ.
Для понимания насколько это быстро: на компьютере с процессором AMD Ryzen 5 3600 создание одного плота с использованием официального плоттера занимает в среднем 284 минуты.
Разработчик нового плоттера сообщает, что планирует в дальнейшем добавить в плоттер поддержку OpenCL для переноса большей части вычислений с CPU на GPU. Если это произойдёт, добытчики Чиа начнут создавать дополнительный спрос на видеокарты, что, вероятно, не сможет не сказаться на их стоимости.
анонсы и реклама
Пиши на наш сайт и зарабатывай
12700KF за копейки в Ситилинке
Вдвое подешевела 6700XT MSI
3060 MSI за 44тр в Регарде
3050 дешевле 30 тр в Регарде
Рухнула цена i9 12900K на треть
3060 Ti задешево в Ситилинке
RX 6600 за 30тр в Регарде
3070 Ti MSI за копейки в Регарде
3080 Ti Gigabyte Gaming дешевле 90 тр
Компьютеры дешевле 10 тр в Ситилинке
Этот материал написан посетителем сайта, и за него начислено вознаграждение.
- Переходим по ссылке на сайт «GitHub» по ссылке https://github.com/HiveProject2021/chives-blockchain и скачиваем последнюю версию клиента (на данный момент Chives 1.2.11, см. скриншот 1);

2. Устанавливаем скачанный клиент «Chives», после чего он запустится на вашем компьютере автоматически. Входим в свою учетную запись (см. скриншот 2);

3. Переходим на вкладку «Пул» («Pool»), ставим «галочку» напротив строки «Подключиться к пулу» и вводим в строке «Pool URL» следующий адрес пула «https://xcc.igipool.one» и нажимает на кнопку «Изменить». Ожидаем завершение процесса подключения (см. скриншот 3, 4). !!!ВНИМАНИЕ!!! ДЛЯ ПОДКЛЮЧЕНИЯ К ЛЮБОМУ ПУЛУ ВАС НЕОБХОДИМО ИМЕТЬ НА СЧЕТУ 0,00000001 ХСС!!!
На данный момент представлено два официальных пула:
— IGI POOL – комиссия не взымается, вебсайт — https://igipool.one/, группа в Discord — https://discord.com/invite/fS8fj5VZKX , в группе присутствует «КРАН» (осуществляется раздача монет для подключения к пулу);
— Chives Pool – комиссия 1%, вебсайт — https://www.chivespool.com/en/home, группа в Discord — информация не представлена и в будущем будет дополнена.


4. Для смены пула необходимо нажать на кнопку «СМЕНИТЬ ПУЛ» и ввести адрес другого пула и нажимает на кнопку «ИЗМЕНИТЬ» (см. скриншот 5, 6).


5. Если вы хотите майнить в «СОЛО» (в последствии есть возможность подключиться к любому NFT пулу), необходимо поставить «галочку» на «Свой пул. Когда вы выиграете блок, вы получите награду в ХСС» и начать на кнопку «СОЗДАТЬ» (см. скриншот 7);

5. Для создания «NFT» участков переходим во вкладку «Участки» и нажимаем на кнопку «ДОБАВИТЬ УЧАСТОК» (см. скриншот 8).

6. Выполняем настройки плоттинга согласно возможностям Вашего ПК для создания участков и переходим к графе №6. В открывшимся меню выбираем пункт «Peach Planarian» (Имя пула генерируется случайным образом и может отличаться от представленного на скриншоте ниже! Является учетной записью в составе вашего «Кошелька» к которому привязываются участки. Количество записей может несколько и их возможно в дальнейшем «пополнять» участками и подключать к разным пулам) и нажимаем на кнопку «СОЗДАТЬ». После создания участка он автоматически будет подключен к майнингу на выбранном Вами пуле в пункте №3 данной инструкции (см. скриншот 9, 10).


7. Ниже представлен пример списка учетных записей выполняющих майнинг на разных пулах одновременно

7. Для создания участков посредствам программы «madMAx Plotter» необходимо узнать Ваш «Farmer public key» и «Pool contract address» (Pool contract address СТАНЕТ ДОСТУПЕН ТОЛЬКО ПОСЛЕ ПОКЛЮЧЕНИЯ К ЛЮБОМУ ПУЛУ СОГЛАСНО ПУНКТУ №3 ДАННОЙ ИНСТРУКЦИИ!!!). «Farmer public key», как и «Pool contract address» являются единым для Вашего «Кошелька» (мнемоники). Для получения данной информации выполним следующие действия (см. скриншот 12):
— сочетанием клавиш «Win+R» откройте окно команды «Выполнить». Введите команду «cmd» и нажмите клавишу «ОК».
— для получения «Farmer public key» вводим следующую команду
«pushd %localappdata%\chives-blockchain\app-*\resources\app.asar.unpacked\daemon\
chives.exe keys show», копируем «Farmer public key» (окно не закрываем, оно нам еще пригодится в следующем пункте);
— для получения «Pool contract address» в открытом окне вводим следующую команду
— «chives.exe plotnft show
pause», копируем «Pool contract address» и закрываем окно.

8. Команда в файле «plot.cmd» для «madMAx Plotter» будет выглядеть следующий образом:
«.\chia_plot.exe -k 31 -x 9699 -n 10 -r 8 -u -v 256 -t C:\1\ -d D:\FP\ -c xcc1cl2snh3xvlfrv6k9whzhrzyjpy436erqudj2rg7gvnnqfn4l7mzqcp8ceh -f 93aaf82b794f14ab7e80444ce6dfeea638e6496f72553b431b6e86f9762acb38d1001e633d4e0e91fa4cafcfcda19e57»
где:
-k 31 – размер участка;
-х – порт подключения к блокчейну Chives;
-n – количество участков, создаваемых последовательно;
-r – количество потоков процессора выделяемых для создания участка (по умолчанию 4);
-u — количество корзин (по умолчанию 256);
-v — количество корзин для 3+4 фазы при создании участка (по умолчанию 256);
-t, — временный каталог (размер потребления зависит от размера участка: К 29 – 29,87GiB, К 30 – 59,75GiB, К 31 – 119,5GiB);
-d, — конечный каталог (каталогу где хранятся участки участвующие в майнинге и прописанные в клиенте «Chives» во вкладке «Участки»);
-с — «Pool contract address» полученный в пункте 7 данной инструкции;
-f — «Farmer public key» полученный в пункте 7 данной инструкции.
9. Запускаем выполнение команды «plot.cmd»
Спасибо что дочитали нашу инструкцию до конца!
Если у Вас есть идеи и предложения по дополнению этой инструкции — пишите в комментариях !
ПОДПИСЫВАЙТЕСЬ НА НАШ КАНАЛ В youtube, ЧТОБЫ БЫТЬ В КУРСЕ.

- Install latest Chia Blockchain Version
- Sync Your Chia Wallet
- Get free mojo from official Chia faucet
- Join a pool
- Install MadMax Plotter
- Check directories in the Chia GUI
There’s been so much talk about the NFT and non-NFT plots and installing . NFT plots are also called portable or poolable plots. NFT plots are the new form of the plots that use the -c argument during plotting and are tied to a plot-NFT, which can be used for solo farming, or joining them to a pool. These are the “portable” plots. The NFT or portable plots are not interchangeable because the NFT is added during the creation. However, in this post we are going to discuss how to utilize the Mad Max plotter for windows with the new NFT or singletons because there is so much useful information about it that you need to understand.
- The first thing you need to do is to go and download chia blockchain latest version 1.2.+ from https://www.chia.net/download/
- Click install and install it
- The next thing it’s going to ask you to create a wallet if you have not.
- Sync the full node with the database or wait for it to sync

- Then once you log in it’s going to be trying to sync with the database and the blockchain. copy the DB file from C:\Users\Goose\.chia\mainnet\db to your new install

- This can take up to two days for it to sink
Sync Your Chia Wallet
- The next thing you need to do is you need to make sure that the wallet is synced. This takes probably another day or even more for some people.


- It takes a while you have to make sure that both the wallet is synced and your full node is synced before you proceed.
Get free mojo from official Chia faucet
- Once all that is done. The next step you need to do is to join a pool.
- The only way you can join a pool is you need to get some chia into your wallet.
- You need about .0000005 more or so Chia or mojo. You can claim that from a faucet.

- Go to a faucet website like the official Chia faucet’s https://faucet.chia.net/. Click I am not a robot
- Then paste in your wallet address
- Submit it will then send you XCH0.0001
Join the space pool or any other pool
The next step you have to do is to select a pool. You can join Space, Huobi or any other pool you want to join.

- There is a list of the pools available at https://miningpoolstats.stream/chia you can select which pool you want to join. Some of them are not following the official Chia pooling protocol so it’s better if you are joining the space pool etc.
- Then navigate to the website of the pool of your choice
- Click on ‘How do I join.’ Most of them will be similar.

- Scroll down to the bottom and there’s going to be 3 or 4 Geolocation URLs.

- Select your your URL North America and copy it
- Go back to your GUI. Click on pool.
- Click add a pool

- Click connect to a pool and paste

- Click create
Once that’s created. It will take a few minutes to sync.
Once that has been synced. It will show your name here. That’s what going to give you your contract address as shown in the image below which we are gonna be using a little bit later.

Now you can go ahead and click plots NFT you want to add. Click add a plot NFT. As shown in the images below.

Then click the D:/ or any drive for the temporary and final directory. Then select the pool and finally click create.

Then it will start plotting with the space pool, Huobi or any other pool you have joined on it.

You can take a look at the process by clicking the view log. That would also show your pool contract address.

so this is one of the addresses that you are going to need in order to use MadMax which we suggest you use. So now that is plotting against a pool.
Installing MadMax Plotter Quick Guide
- Go download madmax: https://github.com/stotiks/chia-plott…
- Extract to c:\madmax
- Open Powershell window and navigate to c:\madmax
- Get your contract address: Gui – select pool and hover on “?” –copy the contract address to your notepad
- Copy your farmer pool key, Gui – keys and select “View” and copy the farmer public key
- Paste both in Win powershell Madmax string:
Installing MadMax Plotter – Detailed Guide
The next thing you need to do is to go and download Mad Max plotter. You should download the latest version of Mad Max plotter if there’s been any update. Then select the windows zip and extract that into C:/ drive Mad Max.

Now you need to go to C:\ drive Mad Max and that’s where you are going to be having everything executed. Once it’s installed all you have to do is type power shell into windows, navigate to C:\MadMax\

Once you are in the directory of MadMax the first thing you are going to need to get your contract address. Click on the chia GUI you need to click on pool, hover over to “?” icon and copy the contract address to the clipboard. That’s your contract address. Then take that contract address and paste it into a notepad next to -C.

The second thing you need is your farmer pool key. Go back to Chia GUI, click keys, click view it’s going to pull up all of your keys as shown in the pictures below. Then copy the farmer public key go back to the notepad. Press “-f” space and then paste in that farmer public key that is all you need from the Chia Gui at the moment.


After that you need to type your first plotting for Mad Max “PS C:\Madmax> .\chia_plot space _n 1” this is the number of plots that you want. You can type “-1 instead of 1” it means that it’ll go forever or in your case you are just going to hit “1” that means you only want 1 plot.

Then you need to paste in your contract address. Since you have already copied that you need to just paste, right click space then next you need to put your farmer pool address, copy it from the notepad where you stored it right click space to paste it in the powershell.


Then add your temporary directory “1” which is “-t” in your case. You are going to use
- D:\ drive for temporary directory “1”
- Then the second temporary directory “2” you need to use the same drive just because that’s what we have done in the above example. It’s kept as simple as basic.
- -d destination drive – The next you need to find the destination drive which is going to be in the “d:\complete”
- The next thing you need to add “space -r”
- The next thing you to add is the number of threads of your computer.


- Click on Task Manager, check the cores you are going to use add them.
- Then hit “space -u” 256. Where “-u” is for buckets and 256 is the default. You can change that to like 128 or 512. Whereas the 256 seems is the consensus then hit “Enter.”
- It’ll start to plot immediately once you hit enter
Check directories in the Chia GUI
Now you have everything you need. It’ll go to the D:\ drive complete the last thing. You need to check in Chia as you need to make sure that the chia has your plot directory.

- Open Chia GUI
- Click plots
- Click on 3 dots
- Click add plot directory and make sure that Your “d:\complete” is in the plot directory as shown in the above image. Otherwise it won’t pick it up.
You can see how quick was the procedure to install Chia, pool plot and configure MadMax. Once you get plots generated into your location it will show you have 1 plot in the space or any other respective pool. This was it, you have learn how to quickly install everything and install farming pools with MadMax.
Top

Описание программы Chia_Plotting
Поддержка: NFT плоты, создание плотов плоттерами Chia, MadMAx, Chives. График откликов от плотов. Уведомления от Telegram Bot, переплоттинг, автоматизация заполнения плотами множества дисков, управление нагрузкой на процессор, тестирование плотов.
Система управления плоттингом позволяет максимально эффективно использовать мощности вашего компьютера для достижения максимальной производительности плотов CHIA в час.
Благодаря интуитивно понятному интерфейсу и набору дополнительных настроек, создание плотов максимально упрощено:
для создания плота, выберите нужные вам параметры для нового плота, выберите плоттер «Стандартный Chia» или «madMAx» и нажмите «Создать задачу«.
Если нужны дополнительные параллельные задачи, тогда нажмите кнопку «Создать задачу» столько раз, сколько нужно вам параллельных задач. Вся информация о выполнении всех задач, будет отображаться в таблице в реальном времени.
Есть возможность автоматизации, для автоматического заполнения множества дисков плотами.
При необходимости, можно включить Телеграм бота, который вас будет уведомлять о проделанной работе, заканчивающемся месте на дисках или возникших ошибках.
Приложением можно пользоваться бесплатно, платная только опция для автоматизации.
Инструкция по использованию
- Возможность создавать плоты двумя плоттерами на выбор:
1. Стандартный Chia Blockchain — официальный плоттер, работает медленно, но он надежный и распределяет ресурсы компьютера четко по вашим заданным параметрам, можно запускать множество параллельных задач. Если вам не важна скорость создания плотов, этот вариант самый лучший.
2. madMAx — неофициальный плоттер, его используйте на свой страх и риск, но у него есть огромный плюс, это скорость создания плота в 4 раза быстрее, чем у официального Chia плоттера. Но ресурсы компьютера распределяются не совсем точно по тем параметрам которые вы задали. Высокая нагрузка на процессор. Параллельные задачи запускать можно, но нужно следить за нагрузкой, на обычных компьютерах, 2 параллельные задачи еще нормально работают, а вот более двух параллельных задач уже может не потянуть. - Telegram Bot — может отправлять вам личные уведомления в Telegram о проделанной работе, по тем событиям которые вы выберите в настройках программы.

Для включения уведомлений в Telegram нужно перейти на закладку «Telegram Bot» и нажать «Подключить Бота(Telegram)».Или можно через Telegram, самостоятельно найти бота по имени: @chia_plottingbot
Открыть этого Бота и нажать кнопку «Запустить».
Бот Вам напишет «Telegram код» — этот код нужно будет ввести в программу Chia_Plotting, на закладке «Telegram Bot», вот и все, теперь Бот по этому коду знает как с вами связаться.
Теперь можно отметить галочками, какие вы хотите получать сообщения от бота:
«Завершение всех задач» — Бот сообщит когда абсолютно все задачи будут выполнены и работа остановлена.
«Завершение каждой задачи» — Бот сообщит когда будет завершаться каждая задача и еще напишет всю статистику по выполненной этой задаче(время начала, завершения, время в каждой фазе и т.п.).
«Ошибки» — Если по какой-то причине закрылся процесс плоттинга и задача не полностью завершилась, бот уведомит вас об этом. Задачи с ошибками будут в программе помечены красной иконкой.
«Свободное место на текущих дисках» — Бот сообщит сколько осталось свободного места на дисках, где расположены временная и конечная папки.
«Отправлять изменение баланса в кошельке» — Телеграм бот может Вам отправлять информацию об изменении баланса в вашем кошельке. Для этого, включите опцию «Проверять баланс каждые … мин» и установите таймер в минутах, например 15 минут, в таком случае, Бот будет каждые 15 минут запрашивать баланс вашего кошелька и сравнивать его с предыдущим значением баланса, если баланс изменился, то Бот вам пришлет сообщение, на сколько изменился баланс с момента предыдущей проверки.
Опция «Отправлять полный баланс» дополнительно добавит в сообщение, общий баланс в кошельке.
В опции «Fingerpring» нажмите на кнопку с тремя точками и выберите из списка кошелек, для которого будут выполняться запросы баланса.
При каждом выполнении запроса баланса, на экране будут появляться черные окна на несколько секунд, не закрывайте их, т.к. в этот момент выполнятся запрос баланса. - Функция переплоттинга — чтобы взамен не нужных вам плотов постепенно создавались новые плоты. (Это работает только в платной версии).
 Для этого на закладке «База данных по всем плотам», выделите галочкой плоты которые нужно переплотить, строки этих плотов выделятся красным цветом и слева появится иконка «корзина» в этой строке. Далее, переплоттинг будет выполняться автоматически по мере необходимости, когда будет нехватка свободного места.
Когда будет создаваться новая задача и в этот момент нет свободного места в конечной папке, программа будет брать значение которое вы указали в опции «Выполнять создание плотов, пока на диске у каждой активной задачи свободно более ХХ GB» — на этот объем в GB будут автоматически удаляться плоты для переплоттинга, появится свободное место и на это свободное место будут создаваться новые плоты.
По правой клавише мыши есть еще опция «Удалить с дисков плоты, которые помечены галочками (требуется подтверждение)» — опция для физического удаления всех выбранных плотов для переплоттинга, программа покажет диалог, еще раз покажет все строки которые программа будет удалять, покажет количество плотов для удаления, попросит несколько раз от вас подтверждение и обязательного ввода вручную слова «DELETE» это чтобы исключить случайное удаление, что вы осознаете, что делаете и только после этого все плоты для переплоттинга сразу удалятся. - Возможность автоматически создавать плоты на разные диски, до тех пор, пока не закончится место на дисках. Можно добавить список дополнительных конечных папок на других дисках, которые будут автоматически заполняться плотами, когда закончится место в конечной папке у каждой задачи. Дополнительные конечные папки может использовать любая активная задача, у которой закончится место на диске.
- Запуск плоттинга с задержкой: Программа автоматически поддерживает указанную вами задержку между задачами, чтобы равномерно распределить все активные задачи по фазам для снижения нагрузки на ресурсы компьютера. При первоначальном создании задач, первая задача запускается сразу, остальные задачи программа запустит по таймеру с учетом указанной задержки. Задачи, которые программа должна запустить по таймеру, будут с иконкой «часы» и рядом с иконкой будет указана дата и время, когда будет запущена эта задача.
- В табличной части программы фиксируется вся статистика по созданию плотов в реальном времени. Статистика в таблице автоматически сохраняется.
Через контекстное меню, по правой клавиши мыши «Взять настройки» — можно быстро брать все настройки из любой предыдущей задачи и быстро создавать новые плоты. - Возможность просмотра и выбора ключей (Farmer public key, Pool public key):
Для старого типа плотов (Original Plots) есть возможность создавать плоты на чужие ключи или создавать плоты на ключи пула, для этого укажите обязательно два ключа: «Farmer Public Key» и «Pool Public Key«. - Возможность просмотра и выбора Pool contract address:
Новый тип плотов Chia (Plot NFT) привязывается к вашему «Pool contract address«, для всех плотов которые вы создаете на один «Pool contract address» можно будет выбирать фарминг в пул или фарминг в соло.
Если вы создаете плоты на разные «Pool contract address», тогда для каждого «Pool contract address» нужно будет выбирать отдельно, фарминг в пуле или фарминг в соло.
Для создания «Plot NFT», нужно обязательно указать «Pool contract address» и «Farmer Public Key«.
В программе, рядом с этими полями есть кнопка с тремя точками, которая считывает все ключи которые установлены на вашем компьютере, нажмите на нее и выберите ключи из списка или введите ключи вручную. - Для нового типа плотов (Plot NFT) есть возможность создавать плоты для разные «Pool contract address» чужие ключи или создавать плоты на ключи пула, для этого укажите обязательно два ключа: «Farmer Public Key» и «Pool Public Key«.
- Тестирование плотов, заполнение коэффициента удачи плота «Proofs» и «Тип плота» в таблицу
 — через контекстное меню (правой клавишей мыши) можно запускать тестирование плотов, есть несколько вариантов:
«Показать коэффициент удачи плота Proofs» — тестирование для одного плота.
«Показать коэффициент удачи Proofs для всех плотов в этой папке» — тестирование множества плотов в текущей папке, где лежит этот плот.
Тестирование выполняется средствами Chia, результаты тестирования вы увидите в черном окне. Можно перенести из этого черного окна в программу коэффициенты Proofs, для этого нужно мышкой выделить абсолютно весь текст в этом черном окне и нажать CTRL+C. Далее нажмите кнопку «Загрузить Proofs«. Полученные текстовые результаты Proofs, вставьте в окно CRTL+V и нажмите кнопку «Загрузить». Программа сама вытащит из этого текста все необходимое и в таблицу загрузятся значения в колонки «Proofs» и «Тип». Пока только такой ручной вариант загрузки Proofs, автоматически не получилось это сделать, т.к. по другому Chia не отдает эти данные. - В программе используется параллельный плоттинг, но если указывать задержку в поле «Автоматически делать задержку
между запущенными задачами», то можно сделать очередность для плоттинга. - База данных по всем плотам — Позволяет загрузить все плоты с разных дисков, чтобы увидеть полную картину по всем вашим плотам.
 Можно для каждого плота установить комментарий, есть возможность заполнения в таблицу коэффициента удачи плота Proofs. Сортировка по любой колонке таблицы. Возможность узнать как часто Chia использует плоты из текущей таблицы или можно увидеть какие плоты вообще не используются Chia — значит с ними что-то не то. Если вы переносите плоты из папки в папку, в данном разделе ничего не потеряется, вам достаточно нажать кнопку «Обновить информацию о всех файлах» и программа по id плота найдет новое место положение плота и сама изменит путь в таблице.
 - Монитор ресурсов — позволяет в реальном времени наблюдать за использованием ресурсов компьютера:
нагрузк а и температура ядер процессора, Использование оперативной памяти, Информация с датчиков температуры на материнской плате, информация о свободном и использованном месте на HDD, SSD дисках.
 - Интерфейс программы на Русском и Английском языках
Обновления Chia_Plotting
(подробное описание всех изменений в версиях)
Pools for the Chia Blockchain [cryptoicons icon=”PPC” color=”#3fa30c”] have begun and released to the mainnet as of a few days ago. As i have been setting up and replotting like everyone else i found that while i am plotting as fast as i can with two computers using MadMax Plotter, my response times are suffering because of the CPU power required to produce a plot using madmax resulting in fewer partials being submitted. Fewer partials submitted is obviously a bad thing because we are not getting 100% of the points we are supposed to get. Today i will fix that using a Raspberry Pi 4 to ensure times are submitted quickly and we get a good stream of points to our pools.
Contents
- Needed Items.
- Get Started.
- Install Byobu and Mousepad.
- Set up Swap Space for Ubuntu 20.04.
- Install The Chia Software on the Raspberry Pi Main Node.
- Set up your Plotting and Harvesting Computers.
- Initialise the harvesters with the CA file.
- Set up our Plotting software MadMax.
- Start Plotting.
- Troubleshooting.
- Chia Cheat Sheet
Needed Items.
- Raspberry Pi 4 – 4GB or 8GB – Running a Chia farmer is quite CPU intensive so you will need one of the 4 or 8gb models
- Any SSD hard drive, the faster the better. We will use this to boot the Raspberry Pi.
- USB to SATA SSD cable. Not all are the same. STARTECH USB 3.1 to SATA. Confirmed Working USB Cable. **Not all work** ❗
- Your plotting computers which will also be your harvesters. We will be using MadMax Plotter as it is easily the fastest plotter. It can be ran in ram only and some plots take only 6 minutes. More on that later. Your plotting computers need to be your fastest computers, gaming computers work great and are normally already capable of fast plotting without much tweaking.
Below is a diagram of the network we will be creating

Get Started.
First and foremost we will need the Chia Blockchain and wallet synced on the Raspberry Pi. We will start with the Raspberry Pi as it takes the most configuration.
We will be running Ubuntu 20.04 Server on our Raspberry Pi and using the CLI to manage our farmer. There are some commands that will allow you to see the status of your network without even using the GUI (version 1.2 has quite a few bugs in the GUI but the CLI seems fine. UPDATE: 1.2.3 fixes a LOT of GUI issues.
Download and install Ubuntu 20.04 on the Raspberry Pi 4, Other versions can be used but i will be using Ubuntu 20.04 for this tutorial. There are various ways of getting a working bootable 20.04 image but here is a link to the Raspberry Pi forums with a prebuilt image. When you are done ssh into the pi or open a terminal.
Install Byobu and Mousepad.
sudo apt install byobu mousepadSet up Swap Space for Ubuntu 20.
If you wish to use the GUI you will need to modify the swap. If you only need the CLI you can skip this step but sometimes the GUI can come in handy so its a wise choice to have it set up. This applies whether you install the GUI from the chia-blockchain folder or from the .deb file.
sudo dd if=/dev/zero of=/swap bs=1M count=1024
sudo chmod 600 /swap ; sudo mkswap /swap ; sudo swapon /swap
Install The Chia Software on the Raspberry Pi Main Node. 👨🌾
You should always install direct from the GitHub repo. And check all links. Do NOT install .deb files from unknown sources ever. Someone once managed to change the download link for the software on ghithub so make sure you only download from the main website and check all your link urls match. The code below is from the Official Chia-Network Github page.
# Go to root
cd
# The line below will check for updates then install if there is any
# then install git.
sudo apt-get update && sudo apt upgrade && sudo apt install git -y
# Checkout the source and install the Chia Software
git clone https://github.com/Chia-Network/chia-blockchain.git -b latest --recurse-submodules
# Change into the chia-blockchain directory
cd chia-blockchain
# The command below will begin the install
sh install.sh
# Once finished we activate the Virtual Environment with
. ./activate
# Start the farmer to get it syncing with the blockchain
chia init
chia keys generate
chia start farmer
There we go. For now leave the Raspberry Pi the Install is complete. Now we need to install the same on all our harvesters/plotters. Assuming your plotters and harvesters are regular PC’s you wont need to do the swap space configuration.
Set up your Plotting and Harvesting Computers.
So we can make sure our plotters are running at full speed we need to run the harvesters directly on the plotting machine.
Open up a terminal on the plotter/harvester machine. Assuming you are also using Ubuntu 20.04 first we will install Chia so we can use it to harvest our new plots. Then we will
# Go to your root directory
cd
# The line below will check for updates then install if there is any
# then install git.
sudo apt-get update && sudo apt upgrade && sudo apt install git -y
# Checkout the source and install the Chia Software
git clone https://github.com/Chia-Network/chia-blockchain.git -b latest --recurse-submodules
# Change into the chia-blockchain directory
cd chia-blockchain
# The command below will begin the install
sh install.sh
# Once finished we activate the Virtual Environment with
. ./activate
Installing our farmer CA files on our Harvester/Plotter.
Adding the certificates from our farmer to our harvesters is extremely important. If you skip this part the harvester will not work at all. Also make sure that sometimes you will need to re init the ca folder after updating the chia software. Always take the ca folder from the main node/farmer. In our case this is the Raspberry Pi.
We need to install our certificate files from our farmer to our harvester so that they will sync. There are various ways of doing this but i am simply going to use a USB stick to make a copy of the ca folder from the Raspberry Pi
If you cannot see the .chia folder press CTRL+H to show hidden files and folders.
The folder you need is located on the Raspberry Pi at the location:
/home/<your-user>/.chia/mainnet/config/ssl/caCopy the folder to your USB stick. If you have to update the main node you may need to copy the certificates again. If you are getting invalid partials then you may need to re-init the ca files.
Initialize the harvesters with the CA file.
We are nearly completed, all we need to do now is init the ca folder on our harvesters. Type the following command on your harvester.
# init the ca folder on our USB stick
chia init -c /media/location-of-ca-folder-on-usb-stick/
# example
chia init -c /home/dazeb/ca
The output should be as follows:
Deleting your OLD CA in /home/dazeb/.chia/mainnet/config/ssl/ca
Copying your CA from /home/dazeb/ca to /home/dazeb/.chia/mainnet/config/ssl/ca
/home/dazeb/.chia/mainnet/config/ssl/ca/private_ca.cr
/home/dazeb/.chia/mainnet/config/ssl/ca/chia_ca.crt
/home/dazeb/.chia/mainnet/config/ssl/ca/private_ca.key
/home/dazeb/.chia/mainnet/config/ssl/ca/chia_ca.key
Found private CA in /home/dazeb/.chia/mainnet, using it to generate TLS certificates
And now our harvester is using the keys from our main node/farmer. We may need to generate some default keys on our harvester machines. You can do that by typing
chia keys generateWe don’t want our main wallet key to be used on our harvesters, just generate a new one instead. It is advisable to only have your keys for your wallet on the main node .
The last command we need to do is to set our harvester IP address and port. You can do this from the CLI or by editing the config.yaml file.
Method 1
- Use CLI and type the command below
# Set the IP and port of the main farmer node.
chia configure --set-farmer-peer IPADDRESS:PORT
Method 2
Find the following block of text starting at harvester: and edit the harvester peer
harvester: chia_ssl_ca: crt: config/ssl/ca/chia_ca.crt key: config/ssl/ca/chia_ca.key farmer_peer: host: localhost <--- CHANGE THIS TO MAIN NODE IP port: 8447Save the file then close it and restart the harvester with:
chia start harvester -rAt this point we can try to see if our harvester is connecting with our farmer. On our Raspberry Pi open the terminal window from earlier and type:-
chia farm summaryThe output should be similar to below
Farming status: Synced
Total chia farmed: 0.0
User transaction fees: 0.0
Block rewards: 0.0
Last height farmed: 0
Local Harvester 0 plots of size: 0.000 MiB
Remote Harvester for IP: 192.168.0.19 147 plots of size: 14.549 TiB
Remote Harvester for IP: 192.168.0.100 99 plots of size: 9.798 TiB
Plot count for all harvesters: 246
Total size of plots: 24.348 TiB
Estimated network space: 31.776 EiB
Expected time to win: 9 months and 2 weeks
Note: log into your key using 'chia wallet show' to see rewards for each key
Set up our Plotting software MadMax
We now have our main node and farmer set up and also a harvester. Let’s install MadMax so we can start plotting on our harvesters.
MadMax’s plotting software is by far the best plotting software out there and is certainly the quickest at creating plots and at the time of writing i believe the quickest plot time is 6 minutes.
Go the github repo if you need to verify it, all the commands below will be exactly the same but with some explanation for each command.
Open a new terminal window separate from your chia terminal
# Install some dependencies
sudo apt install -y libsodium-dev cmake g++ git build-essential
# Clone the repo
git clone https://github.com/madMAx43v3r/chia-plotter.git
# Change to the downloaded directory
cd chia-plotter
# Update application submodules
git submodule update --init
# Make the binaries
./make_devel.sh
# Example command - shows help and options
./build/chia_plot --help
And we are done installing MadMax.
Start Plotting
Now depending on your hardware will depend on what commands to use but an example is below
# Change directory to the MadMax binaries
cd chia-plotter/build
# Start the plotting processes
./chia_plot -n -1 -w -c xch1j40ekpdgzxvtzqaygaf07jzrpaiihqeye6sruc0erxzzq6q8e72q8rl0lh -f a370be1accda3962ad333be3dd674d3ffe03685d7f0162fe4d8b880a28d3dd6fb4e9073779a81ed26ad86864cf443b39 -t /mnt/1tbSSD/chia-temp/ -d /mnt/12tb/chia-pools-folder/
# Here we are using the following options
-n -1 = Do unlimited amount of plots
-w = Wait until copy has finished before starting a new plot
-c = Contract Address for pools
-f = Farmer key
-t = Temp SSD for plotting
-d = Destination HDD
# Do chia_plot --help to show options
At this point we are fully set up and producing plots. The Chia main node (farmer) picks up on the new plots when they are created. When one drive is full change the location to the new drive and start again.
Troubleshooting
There is a few common problems people have when using this setup and it mostly indicates problems with the ca file. Make sure to use the ca folder from the main raspberry pi farmer node and you should be ok.
Set upnp to false to get more connections. Some upnp software has a connection limit. you are best just disabling upnp and forwarding the port. The command below will disable upnp on the Raspberry Pi
chia configure --upnp falseYou can also enable upnp
chia configure --enable-upnpSet your log level via the command line. This can be handy in debugging your setup.
chia configure --set-log-level INFOChia Commands Cheatsheet
Basic commands list
chia init – migrates files from an old version to the latest version after an update
chia start node – starts node only
chia start node -r – restarts the node
chia start farmer – starts the farmer, harvester, bode, and wallet
chia start farmer -r – restarts everything
chia plots check – checks plot files
chia show -s – show status of node
chia farm summary – Show summary of the farmer
chia wallet show – Show wallet data
chia keys generate – Generate keys
chia keys add – Add keys / seed
chia stop -d all – turn off all Chia services
chia netspace – show the current size of the network
chia version – shows the current chia version
Wallet commands
chia wallet get_address – Get a receiving address
chia wallet get_transaction – Obtain a transaction
chia wallet get_transactions – Show all transactions
chia wallet show – Show wallet data
chia wallet send – send chia to another wallet
Plot commands
chia plots add -d PATH – adds a directory as plot directory
chia plots check – checks the existing plot files
chia plots create – creates a new plot (see above)
chia plots remove – removes a plot directory from the configuration
chia plots show – shows the currently stored paths for plots
Farm commands
chia farm challenges – displays recent challenges
chia farm summary – displays a summary of the farmer
Key commands
chia keys add – add a key by seed
chia keys delete -f NUMBER – deletes the key with the fingerprint NUMBER
chia keys delete_all – deletes all keys
chia keys generate – generates a new key
chia keys generate_and_print – generates a new key WITHOUT saving it
chia keys show – shows all saved keys
chia keys sign – signs a message with the private key
chia keys verify – verifies a signature
Thanks to LautenBacher for the cheatsheet.
Hello there! My name is Darren and i am a hobbyist/homelab/crypto enthusiast. If you liked this post please consider signing up for a Digital Ocean account using my link and you will receive $100 in free credit while at the same time helping me to cover the costs of my servers. Thank you!
XCH: xch1hrumdza9u6slw5hz343p3yh954wvjs4rqnqdkq6huanctf0vytzqqkahxk
BTC: 1BVwmPMt6kxRe88EKhThJviFp3M4MhubTA
ETH: 0xa958d40518d76168BB795947Bf96AafD6bccc177
LTC: MBJdCsnZXDuXBYme6Ur7VFAeYw4LTFM9CP
BAT: 0xab574A09fFf2aa391658D3D048265ad1401cA7AF
DOGE: DBCchyovcTXSioWM392kKydJxY5nyECYFB
If you want some free Crypto why not sign up for a Coinbase account and get $10 free!
Платная функция в Chia_Plotting
- Автоматическое создание плотов
Позволяет автоматизировать создание плотов на один или множество жестких дисков. Программа будет автоматически создавать плоты, пока не заполнит указанные вами диски плотами.
При необходимости, функция переплоттинга в автоматическом режиме, поможет постепенно заменить старые плоты на новые. Например, можно в автоматическом режиме, постепенно переплотить все ваши плоты, на новый тип плотов NFT.
Платная только закладка «Автоматизация«, стоимость активации 500 руб. для одного компьютера, все остальные функции программы бесплатны.
Приобрести полную версию
Стоимость полной версии 500 ₽
Как работает Автоматизация создания плотов
- Включите сначала опцию «Автоматическое создание плотов«.
- Установите значение в поле «Автоматически делать задержку между запущенными задачами». Задержка нужна для равномерного распределения всех запущенных задач по фазам. Если пока не знаете, какая должна быть задержка, оставьте значение по умолчанию = 60 мин. Задержку можно исправить в любой момент и она будет применяться для всех новых задач.
- Установите опцию «Повторять активные задачи, пока на диске у каждой активной задачи свободно более … GB» — Эта опция указывает, когда программе нужно прекратить создавать новые задачи.
- Запустите максимальное количество параллельных задач кнопкой «Создать задачу«. Первая задача запустится сразу, остальные задачи запустятся автоматически по таймеру, с учетом указанной задержки. Точное время запуска задачи будет написано справа от иконки «Часы».
- Когда активная задача завершится, программа будет создавать автоматически новую, точно такую же задачу, с точно такими же параметрами и каждый раз, при запуске, программа будет соблюдать между задачами указанную вами задержку. Новые задачи будут запускаться автоматически, до тех пор, пока не закончится место на дисках куда сохраняются плоты. Есть возможность использования дополнительных конечных папок для заполнения одной задачей множества дисков.
- Когда закончится место на диске у активной задачи, задача завершится и далее повторяться уже не будет. Телеграм бот может сообщить вам об этом событии.
Если вы запустили например 3 задачи, то далее программа будет всегда поддерживать работу не более 3 активных задач которые будут работать параллельно, пока есть свободное место на дисках.
На закладке «База данных по всем плотам» можно отметить галочками плоты которые нужно переплотить(заменить на новые), такие строки будут выделены красным цветом. Переплоттинг работает в автоматическом режиме, когда на диске закончится свободное место, программа будет постепенно удалять старые плоты и вместо них на этот же диск будет создавать новые плоты, более подробно об этой функции, читайте в описании.
Разработчик программы
Виктор.
Программист: 1С, C#, PHP, Java(Android). IT специалист.
Telegramm: @Victorprogram