
PAGE NOT FOUND
Profit Crypto Games
PCG — Library
Jeff Pratt provides a step-by-step tutorial on how to set up a MetaMask wallet in the first installment of his NFT Cheat Sheet series.
If you’re looking to get into the NFT game, you’re in the right place. As someone who was in your shoes not too long ago, I understand how helpful step-by-step guides can be in this industry.
Now that you know what MetaMask is, let’s walk through a brief step-by-step tutorial on how to set up your wallet.
In case you are new to the Metaverse, check out my quick breakdown on what NFTs are and how they work.
non fungible tokensApril 22, 2021
This tutorial is Part 3/3 in the NFT Tutorial series, where we view our newly minted NFT. However, you can use the general tutorial for any ERC-721 token using MetaMask, including on Mainnet or any testnet. If you’d like to learn how to mint your own NFT on Ethereum, you should check out Part 1 on How to Write & Deploy an NFT smart contract!
Congrats! You’ve made it to the shortest and simplest part of our NFT tutorial series — how to view your freshly minted NFT on a virtual wallet. We’ll be using MetaMask for this example since it is what we used in the previous two parts.
As a prerequisite, you should already have MetaMask on mobile installed, and it should include the account to which you minted your NFT — you can get the app for free on iOS or Android.
- Set your network to Ropsten
- Come join us
- What is a MetaMask Wallet?
- How to Set Up a MetaMask Wallet on a Browser Extension
- How to Set Up MetaMask Wallet on a Mobile Phone
- How does MetaMask work?
- Download and Install MetaMask
- Create an Account
- Create a Wallet
- Import Wallet
- Configure Settings
- Add Funds
- Receiving Tokens From an Exchange
- Purchasing ETH via Wyre
- Moving to Mobile
- Buying NFTs
- Pick your choice NFT Marketplace
- User Verification
- Token Fractionalization
- Other Incentives
- Link your Wallet to your project website
- Set up your MetaMask NFT wallet
- 404
- Out of nothing, something.
- Best Practices
- Fund your NFT Wallet
- Conclusion
Set your network to Ropsten
At the top of the app, press the “Wallet” button, after which you’ll be prompted to select a network. As our NFT was minted on the Ropsten network, you’ll want to select Ropsten as your network.
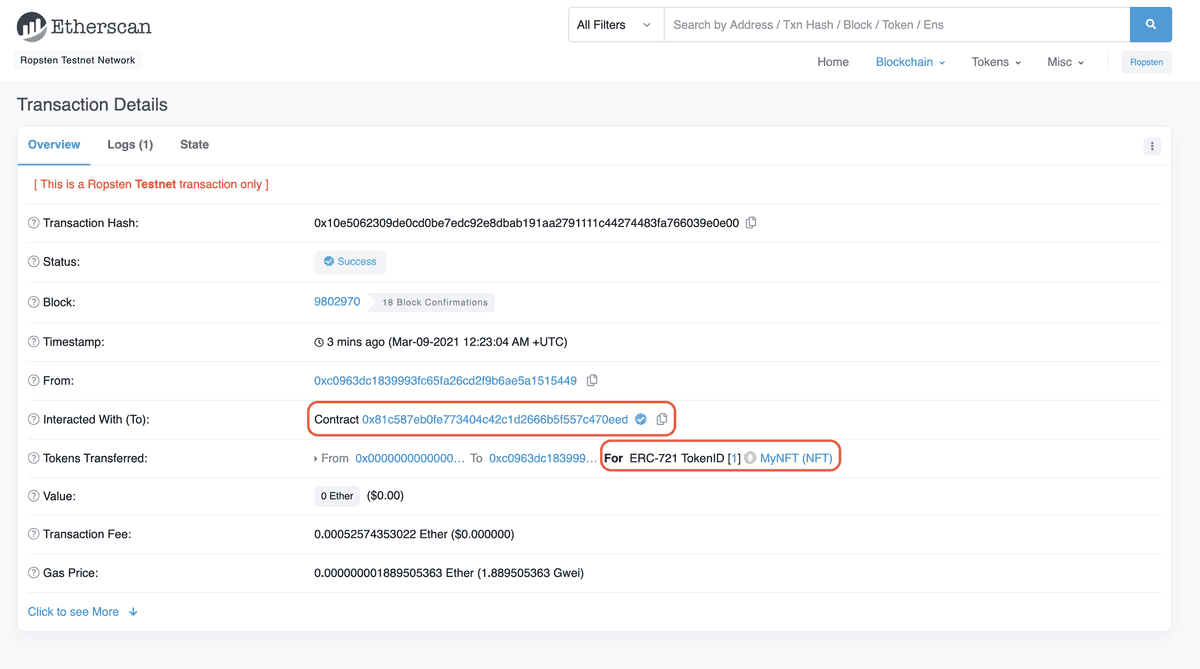
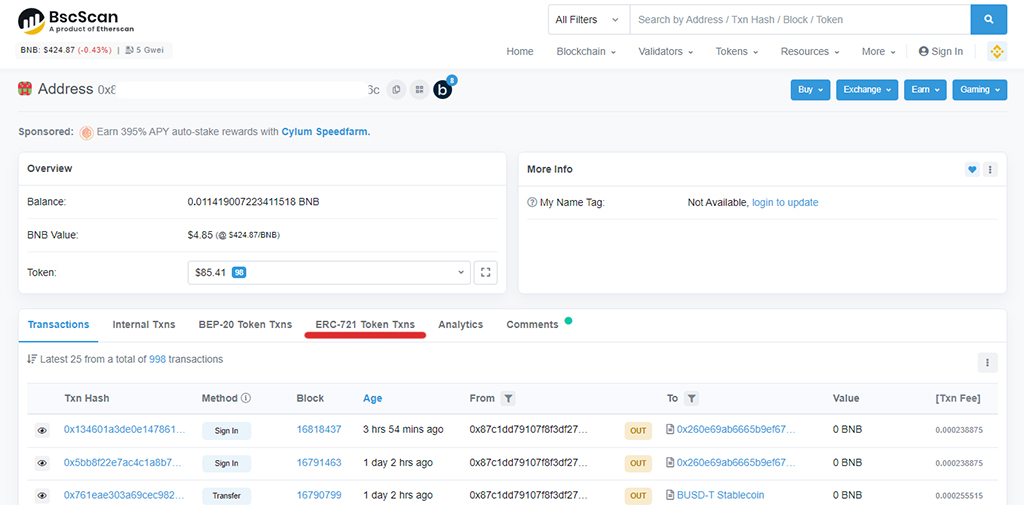
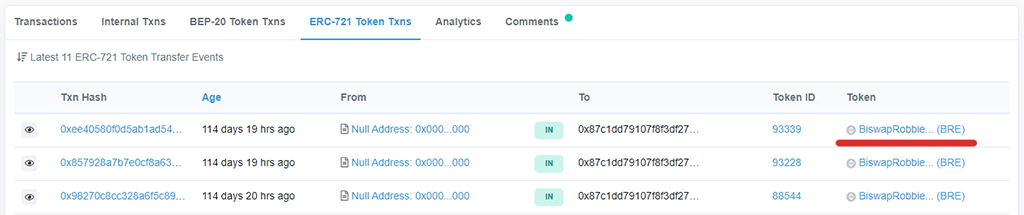
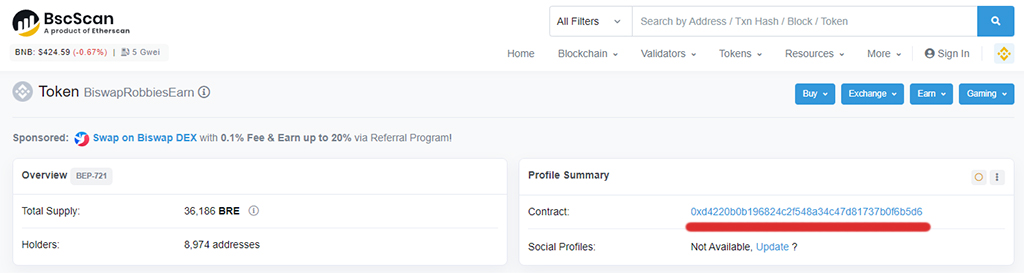
Once you’re on the Ropsten network, select the “Collectibles” tab on the right and add the NFT smart contract address and the ERC-721 token ID of your NFT — which you should be able to find on Etherscan based on the transaction hash from your NFT deployed in Part II of our tutorial.
You may need to refresh a couple times to view your NFT — but it will be there !
Congrats! You have successfully minted an NFT, and you can now view it! We can’t wait to see how you’ll take the NFT world by storm!
Was this page helpful?
non fungible tokens22 апреля 2021 г.
Была ли эта страница полезной?
Non-fungible tokens, also known as NFTs, are garnering an increasing amount of attention in the cryptocurrency industry. This is due to the fact that a growing number of creators are venturing into the generation and development of their very own Non-Fungible Tokens.
As we speak, NFTs are being sold for tens and hundreds of thousands of dollars on various marketplaces and platforms, and there has never been a better time than now to gain an understanding of how best to take advantage of this market and invest in it.
Next, we’ll be taking you through using MetaMask, which offers a tool for minting and transacting NFTs that is just as simple to use as OpenSea.
Come join us
Если вы сделали все правильно, то в вашем кошельке появятся ваши NFT-токены.Как отправить NFT токены другому пользователю?После того, как ваши NFT-токены были добавлены в кошелек, вы сможете ими распоряжаться так же, как и другими обычными токенами, просто нажмите на токен и выполните необходимые действия.
MetaMask released a new 10.18.0 update to the wallet this week, which includes a change to the way that the software presents a requested setApprovalForAll permission. Granting that permission allows the —the code that powers NFTs and decentralized apps—the ability to access and transfer out all NFTs and tokens in a wallet.
MetaMask Software Engineer Alex Donesky wrote on GitHub on June 22 that “there is some urgency to get something out there since this method is so commonly used.” He also added that the “timeline is compressed,” and admitted that it wasn’t how he would approach the change if there was more time to develop it.
co-founder of MonkeDAO, Nom, last night tweeted about how his wallet was drained in an attack when he interacted with a smart contract that he thought was safe to use. Nom wrote that he lost about 500 SOL (about $20,200) and NFTs including one from Solana Monkey Business, which the attacker then sold for 197 SOL
What is a MetaMask Wallet?
The MetaMask wallet is a cryptocurrency wallet developed to store and trade NFTs, fungible tokens, and DApps. This digital hot wallet was developed by to store and trade Ethereum-based tokens like OMG, BNT, ETH, and NFTs, to mention but a few.
MetaMask is exclusive to tokens built on Ethereum alone which means it can’t store other cryptocurrencies such as Bitcoin, unless it is wrapped. The MetaMask wallet is available on browsers as an extension and on mobile devices as a mobile app.
How to Set Up a MetaMask Wallet on a Browser Extension
A browser extension is a modest software component that adds some features and also raises the bar of how a browser functions, i.e., it extends the browser’s functionality.
The MetaMask browser extension offers the functionality of the MetaMask wallet on web browsers. Since MetaMask can’t be installed on desktop computers and PCs, its alternative is the browser extension. The MetaMask browser extension is only compatible with Chrome, Brave, Edge, and Firefox browsers.
However, the steps are slightly different if you already have a wallet you want to import.
How to Set Up MetaMask Wallet on a Mobile Phone
Want more? Connect with NFT Plazas
*All investment/financial opinions expressed by NFT Plazas are from the personal research and experience of our site moderators and are intended as educational material only. Individuals are required to fully research any product prior to making any kind of investment.
Whether you’re transitioning away from an existing software wallet or looking to buy ETH and build an NFT collection for the very first time, this step-by-step guide will walk you through everything you need to know about the MetaMask wallet — including how to set one up.
How does MetaMask work?
Hardware wallets are physical devices similar to a USB drive, but they only store crypto assets and nothing else. Because they store digital assets offline, they’re considered far safer than software wallets. Ledger and Trezor are popular hardware wallet choices. Although it’s a software wallet, MetaMask’s desktop extension supports Trezor, Ledger, Lattice, AirGap Vault, and Keystone hardware wallets. This means you can use MetaMask as an interface to request crypto and NFT transactions to the hardware wallet of your choice, which is a safe way to manage your assets. MetaMask’s mobile app currently only supports the Keystone hardware wallet, though the company claims it’s working to add more to that list.
Download and Install MetaMask
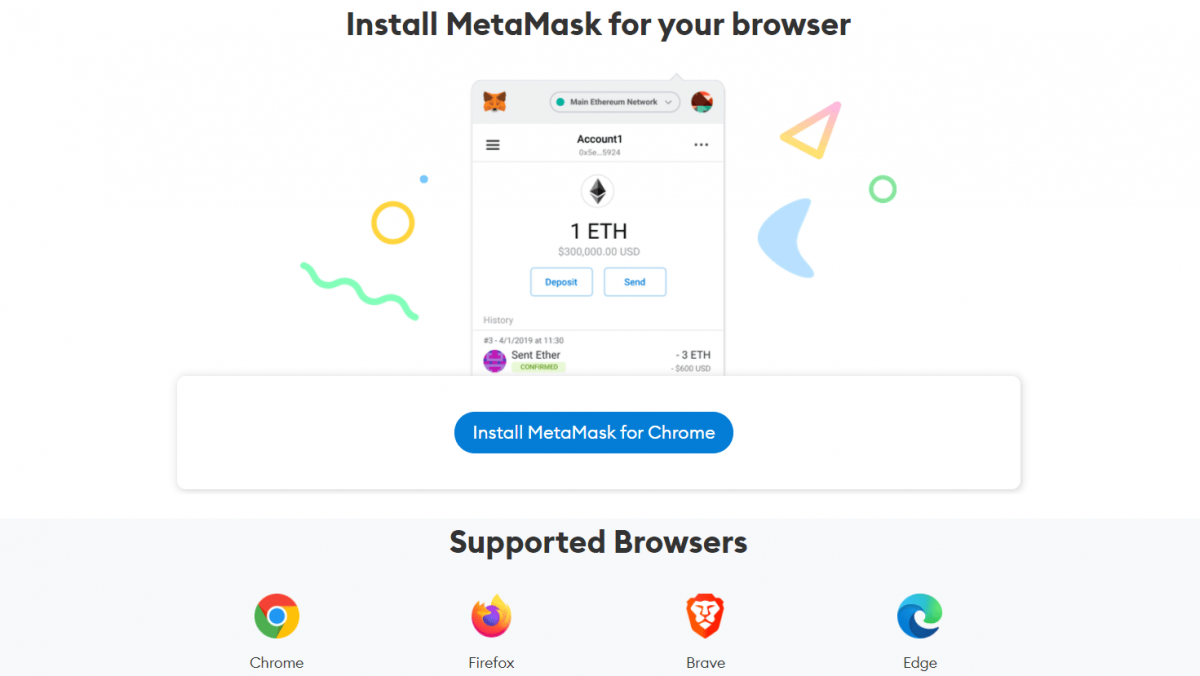
Start at the MetaMask website, where you’ll find instructions on how to download the wallet as well as a list of browsers compatible with the MM browser extension. Currently, MM can be used only on Chrome, Firefox, Brave, Microsoft Edge or as an app via an Apple or Android device.
If you’re hoping to primarily use MM on mobile, the easiest way to get started would still be to set up an account via a PC or Mac. Although you can jump straight into setting up a MM wallet from your phone, browsing and collecting NFTs can be a bit difficult via mobile considering many projects and interfaces aren’t built for a handheld interface. Once you have the browser extension fully set up, you can then create an account that can be imported onto the Apple or Android app.
Create an Account
Once you’ve downloaded and installed the browser extension (for this tutorial, we’re using Chrome), you’ll arrive at the first selection screen.
If this is your first time setting up a software wallet, you’ll want to start with the “Create a Wallet” option. If you have an existing software wallet (Atomic, Exodus, Rainbow, etc.) and are wanting to transition over to MetaMask, select the “Import wallet” option.

Create a Wallet
After you’ve selected the option to create a new wallet, you’ll be asked to agree to — or opt-out of — MetaMask’s usage data gathering. You can always opt-out later in the MM wallet settings.
Next, you’ll get a prompt to create a password. You’ll use this password to sign in to your MM account via the browser extension or the mobile app. Although this is not your private key/seed phrase, you’ll want to save it in a safe place, just as with any password.
The next step after selecting a password does involve your seed phrase — or “secret backup phrase” — so act with care. You’ll receive a randomly generated string of words and will be asked to confirm this phrase by entering it back into the app. Once confirmed, you’ll arrive at the main page of your MetaMask wallet.
Note: Two secure ways to consider storing your seed phrase are to physically write it down in a notebook or on a notepad and save it somewhere safe and offline, or use a password manager to encrypt your password and phrase. Saving your phrase anywhere on your computer (Word doc, text file, etc.) could leave you vulnerable to hacks and scams. Since the initial 2021 NFT boom, there have been numerous prominent NFT artists and collectors who have been scammed and hacked via their seed phrase.

This is the main wallet page you’ll see once your account is successfully set up or imported.
Import Wallet
If importing an existing wallet, you’ve most likely navigated a software wallet interface before and have a general idea of how MetaMask will function. Upon selecting the “Import wallet” option, you’ll get a prompt to enter a private key (seed phrase) or upload a JSON file (basically a snapshot of your existing wallet’s info) for the import, so have one or the other ready!
Once you’ve imported your existing wallet, you — as with anyone new to MetaMask — should continue on to Step 3 to ensure your MM wallet is set up to your ideal preferences.
Configure Settings
Take a moment to explore and configure your new wallet’s settings. This may seem like an arbitrary step to some, but familiarizing yourself with MetaMask’s settings and assorted menus can be a big help should you ever run into any trouble.
To access the general settings page, click the account photo in the top right of the page next to where it says “Ethereum Mainnet.” Fields such as your account name, notification settings and contact list can be edited from the settings page.
After you’ve looked through MetaMask’s settings and verified that your wallet is in the correct language and displaying your preferred currency conversion, you can move on to using your wallet to interact with tokens.
Add Funds
The two most common ways to add a token to your MetaMask wallet are by either A) sending it from an exchange (Coinbase, Gemini, etc.), or B) purchasing ETH directly through Wyre, MM’s default payment interface.
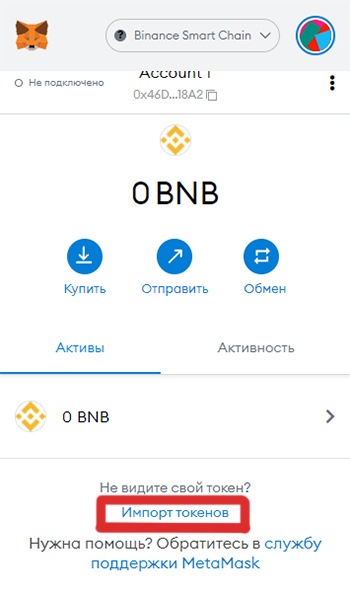
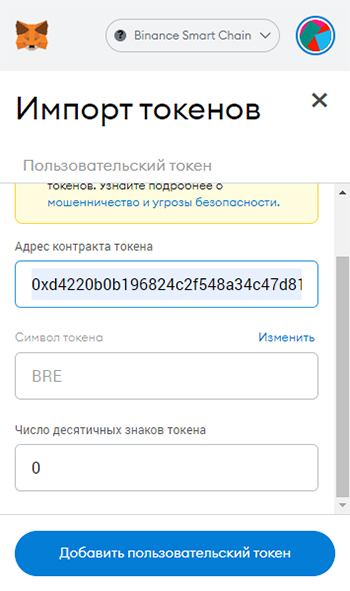
Before purchasing or receiving a token in your wallet, be sure to click the “Add Token” button at the bottom of your main wallet page. Although ETH is the default token, as MetaMask is an Ethereum wallet, here you can search for a variety of commonly traded tokens.
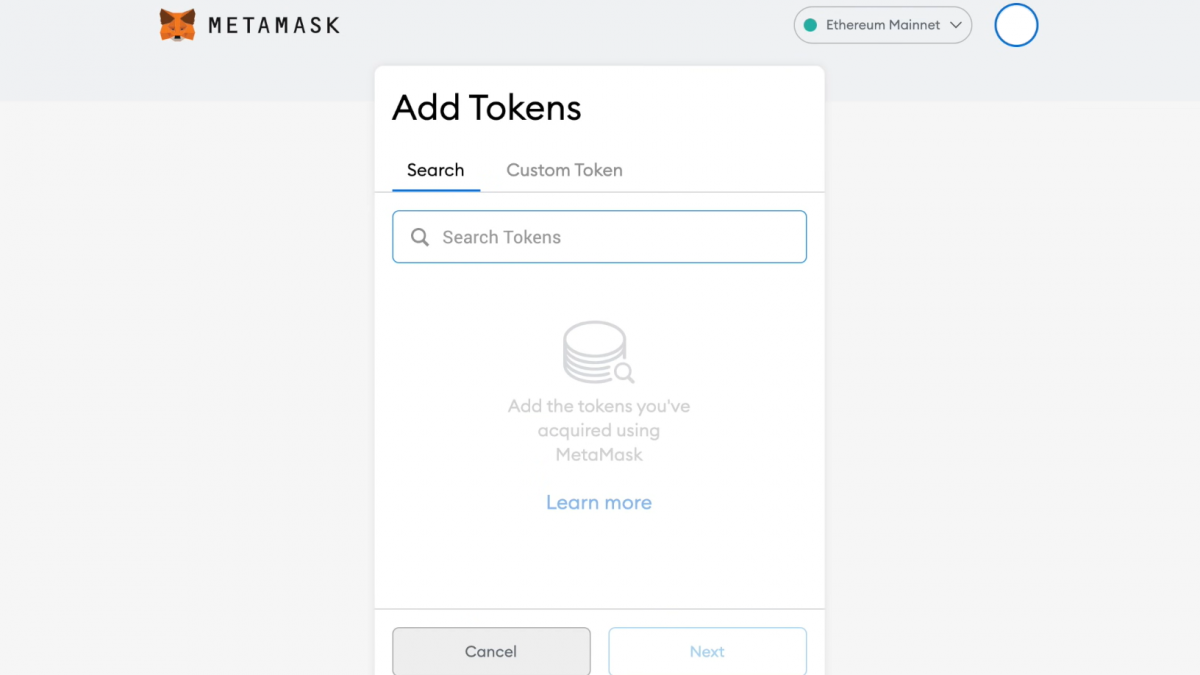
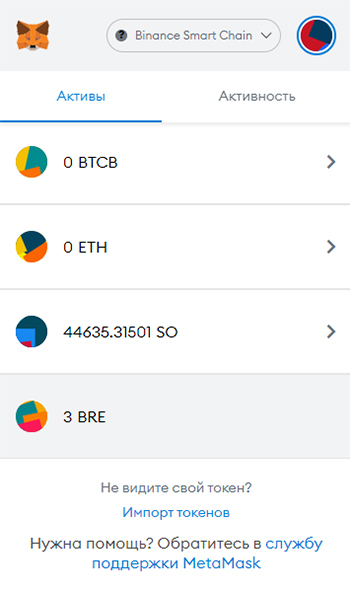
After you’ve added your desired token, it will be easier to import. The coin’s symbol (shorthand identifier: ETH = Ethereum, BTC = Bitcoin, etc.) will appear under “Assets” on the main wallet page just below ETH.
Receiving Tokens From an Exchange
If you’re already an experienced crypto trader, importing from an exchange will be the most direct option for you to transfer tokens into MetaMask. Copy your MetaMask wallet address (that long string of numbers below “Account 1”) before heading over to your preferred exchange and plug that address into the “send” feature.
Similarly, if you’re receiving ETH or another token from a different wallet (be it your own or someone else’s), you’ll need to input your unique Ethereum address into the transaction details on the sender’s wallet.
Purchasing ETH via Wyre
Another way to obtain tokens is to purchase ETH via Wyre. Purchasing ETH through Wyre on MetaMask will allow you to directly receive the funds into your wallet to keep, trade or swap for a different token. This feature can be accessed by simply clicking “Buy” on the main MM wallet page.
Once you’re on the Wyre purchasing interface, there will be a prompt to enter an amount, then billing details. To purchase ETH through Wyre, you’ll need to use a debit card. Credit cards are not accepted.
Note that Wyre’s exchange rate may vary from that of other exchanges (as is common between platforms), and that the company charges a fee to use its services. A detailed calculation of Wyre’s fees can be found on its website.

Moving to Mobile
To use your new wallet on your phone, you’ll need to download the MetaMask app through Apple’s App Store or the Google Play Store. Once downloaded, open up the app, which will guide you through a set of prompts similar to when you first set up your wallet.
This time, you’ll want to choose the “Import Using Seed Phrase” option and input the private key you previously saved during your initial MetaMask setup. You’ll then be ready to use your MM wallet on the go.
Buying NFTs
Once you’ve set up, explored, and populated your wallet with tokens, you can connect one of the many NFT marketplaces and buy, sell and trade NFTs!
Make sure that you’re signed into your MetaMask before navigating to OpenSea, Rarible, Zora and other NFT marketplaces. Similarly, when prompted to connect your wallet to a website, be it a marketplace or project hub, be sure the site is credible and that the transaction you receive in your wallet was sent by the site you’re currently on and not a third party.
Buying NFTs and crypto doesn’t have to be complicated. Web3 tools like MetaMask are designed to make the process relatively straightforward. Now that you’ve got a handle on how to get going with this software wallet, make sure you check out our NFT 101 Guide and our advice on how to keep your digital assets safe by avoiding scams in Web3.
Pick your choice NFT Marketplace
MetaMask is primarily a crypto wallet (the most popular crypto wallet) and is fully compatible with NFTs and all ETH-based transactions.
User Verification
Employing authentication methods helps cut down on the use of unscrupulous NFT trading strategies and transactions of pirated non-fungible tokens.
Token Fractionalization
This is advantageous to sellers because buyers are more willing to buy at an affordable rate and lowered prices, and more people can transact at fractionalized costs.
Other Incentives
There is a wide variety in costs and minting rates between the various marketplaces. It’s possible that some will also provide referral bonuses, discounts, and increased royalties. Discovering marketplaces and making selections that are most beneficial to you demands testing out a variety of options and determining the specific aspects unique to each platform that are useful to you.
Link your Wallet to your project website
/cdn.vox-cdn.com/uploads/chorus_asset/file/23148164/Screen_Shot_2022_01_05_at_4.41.03_PM.png)
2. After you have installed MetaMask, you will be taken to a screen that says Welcome to MetaMask. Hit the blue Get Started button.
3. In the Yes, let’s get set up box, hit the blue Create A Wallet button.
Join the queue, buy or sell and browse the collection of the hottest NFTs.
4. Create and confirm the password for your new account, then agree to the Terms of Use and hit the blue Create button.
5. After creating your password, you will be taken to the Secret Backup Phrase page, as shown below. After clicking to reveal your secret words, it is crucial to copy and store them in a safe location. If you lose this phrase, you will lose access to your wallet. Once you have copied and stored your secret backup phrase, click the blue Next button.
6. You will be taken to a page where you must confirm your secret backup phrase. Click on the boxes with words in the correct order to confirm your phrase and hit the blue Confirm button.
Set up your MetaMask NFT wallet

Set up NFT Wallet
Funding your MetaMask Wallet
404
After you have added funds to your digital wallet on MetaMask, you will be able to begin minting NFTs from the projects that interest you.
Also, keep in mind that you need to account for transaction fees. The fees for the Ethereum network are between US$60 and US$100 on average, and they can go even higher during times of heavy traffic volume.
The transaction expenses that you are required to pay in addition to the cost of the NFT are referred to as “Gas Fees.” You may also be able to change the gas fee, and the greater the gas fee that you choose to pay, the higher priority you will be given in being able to acquire your NFT. You would consequently need to take into account the transaction costs as well as the cost of each NFT as a result of this.
Out of nothing, something.
You can find (just about) anything on Medium — apparently even a page that doesn’t exist. Maybe these stories about finding what you didn’t know you were looking for will take you somewhere new?
Best Practices
1. Never click on links from unknown parties that ask you to sign contracts in MetaMask.
3. If minting from a website, make sure to disconnect the site after completing.
Join the DraftKings Marketplace conversation on DK Social.
The DraftKings Marketplace is currently only available in the United States and Canada.
You must be 18+* located in any of the 50 US states or Canada to buy and sell NFTs on DraftKings Marketplace.
*Must be 19+ in Alabama and Nebraska.
*Must be 21+ in Iowa, Louisiana and Massachusetts.
Additional requirements for accessing:
You must have a verified DraftKings account.
You must agree to our DraftKings Marketplace Terms of Use and DraftKings Marketplace Privacy Policy before transacting on DraftKings Marketplace.
Fund your NFT Wallet
You shouldn’t have any trouble buying Ethereum because it is listed on virtually every cryptocurrency exchange (it is, after all, the second-largest cryptocurrency), so don’t worry about that. You can buy Ethereum (ETH) with a credit card or debit card through your Binance account and then transfer it to your MetaMask wallet.
To buy ETH on Binance, you will need to:
It is also possible to buy Ethereum directly on your MetaMask; but, due to commission fees that are greater than those charged by exchanges, we do not advise using this method.
Conclusion
And that’s it! You will now be able to successfully mint your NFT because we have provided you with a straightforward and detailed explanation of how to. These steps will guide you to making NFT transactions and minting your asset on MetaMask without any hassle.
Hopefully, you’ve found this tutorial informative and helpful, and you go on to generate lots of value from minting NFTs! You can also check out our tutorial on how to buy land in the metaverse! We’ll be providing more helpful information on how to understand and take the best advantage of virtual assets.