
You may notice right away that we are still dealing with a wallet on the Ethereum network, which will not work with decentralized applications (dApps) based on Binance Smart Chain. Moreover, you could lose funds if you send them to the wrong addresses.
Hello, Erthians! It has only been a few days since the release of the ERTHA marketplace, and HEX NFTs are already flying off the shelves at incredible pace!
However, we still get a lot of questions about how to use the marketplace and purchase the land. This article will serve as a complete guide to purchasing ERTHA land NFTs using METAMASK.
I got an error when visiting opensea.io/assets/ethereum/0x495f947276749ce646f68ac8c248420045cb7b5e/115164123973657504203840922654734922713997602732614855445458087683605860974593.
Ray ID: 7761ff36ec359193
Data center: fra08
MetaMask – простой и удобный горячий кошелек для хранения криптовалюты. Он работает с сетями на базе блокчейна Ethereum. По умолчанию кошелек настроен именно на сеть Ethereum. Но вы можете добавить и другую сеть самостоятельно.
MetaMask доступен как расширение для браузера и как мобильное приложение для IOS и Android. Ниже мы приведем подробную инструкцию по добавлению сети Binance Smart Chain (BNB Chain) в метамаск с ПК или смартфона.
В этом посте решил собрать все сети для кошелька Метамаск в один список. Обзор кошелька смотрите здесь, инструкцию по его установке и настройке здесь.
Если есть вопросы связанные с пополнением кошелька и переводами, многие ответы на них можно найти здесь. Прочитайте список угроз для пользователей Метамаска здесь и проверьте себя.
Если не нашли нужной сети в списке – пишите в комментариях, добавлю!
Последние обновление – 15 июня 2022


После этого мы увидим список всех добавленных сетей, кликаем на кнопку «Добавить сеть».


Поздравляю, вы добавили Binance Smart Chain в ваш MetaMask и теперь можно приступить к покупке NFT токена Nanohash.
Written by
Updated over a week ago
- Add BSC network to your mobile Metamask app2. Add Wizardia NFT to your app3. Example how it looks when you added it to your app
- Choose Settings
- Choose Networks
- Click on «Add network» button
- Fill in information to the form
- Tap Add, back to the main page, now your wallet is on BSC network
- How to find your Wizardia NFT token ID?1. Copy your wallet address
- Copy Token ID and paste it to your mobile Metamask app
- Table of Contents
- Requirements
- How to use NFTs with Metamask BSC configuration
- How to create your own NFTs on BSC
- Conclusion
- OpenSea, MetaMask Mobile and MetaMask Extension
- Download a Set Up Your MetaMask Wallet Address
- Find the NFT Smart Contract Address
- Tap on “Add NFts” on the MetaMask Mobile App
- Find the NFT’s ID
- Paste the NFT’s Address and ID on Your MetaMask Account
- How To View Your NFTs in MetaMask
- Как пополнить MetaMask токенами Binance (BNB)
- Проблемы с некоторыми NFT
- Adding the NFT to Metamask
- (1) Adding BUSD Token
- (3) Mainnet (This is the one you are probably looking for)
- Удаление сети из MetaMask
- Purchasing ERTHA land
- Способ 2. Автоматическое добавление сети
- Тестовые сети Ethereum в Метамаске
- (2) Adding KOI Token
- Способ 1. Добавление сети вручную
- (1) Installing and setting up MetaMask
- How to Add Binance Smart Chain to MetaMask
- Open BSCscan
- Click “Add Network”
- Confirm the Connection Request
- Open MetaMask Browser Extension
- Enter BSC Details
- Click the “Save” Button
- Open Your MetaMask Mobile App
- Click “Settings”
- Save Changes
- Funding Your MetaMask Account
- Josiah Makori
- How to install Metamask?
- Добавление NFT из мобильного приложения MetaMask
- (2) Configuring the wallet
- FAQ
- Wallet Configuration
- Сети которые не работают в Метамаске, но о которых часто спрашивают
- Что делать, если в вашем кошельке появился Неожиданный NFT?
- Добавление NFT из расширения браузера
- Как добавить другую сеть в Метамаск
- Список сетей для Метамаска
Add BSC network to your mobile Metamask app2. Add Wizardia NFT to your app3. Example how it looks when you added it to your app
Tap on the symbol icon at the top left corner of the interface

Choose Settings

Choose Networks

Click on «Add network» button

Fill in information to the form

Tap Add, back to the main page, now your wallet is on BSC network

1. Make sure you selected Smart Chain
2. Click on Tab NFTs
3. Click on Import NFTs

1. Add Wizardia contract address: 0x2e52c6c9e0a6d19d281f0cf452b5d0b88057074d
2. Add Wizardia NFT token ID 3. Check below how to find Wizardia NFT token ID?

How to find your Wizardia NFT token ID?1. Copy your wallet address


Copy Token ID and paste it to your mobile Metamask app


Table of Contents
Binance Smart Chain (BSC) is currently the second biggest smart contract network after Ethereum. It has gained significant market traction as an Ethereum alternative because of its low-cost gas fees and high settlement speeds. Furthermore, it has EVM and smart contract features that support NFTs and other DeFi use cases.
Let’s explore how to add Binance Smart Chain to MetaMask.
MetaMask один из самых популярных крипто-кошельков в мире, на сегодняшний день количество установок пользователями более 7 миллионов. Подробный обзор кошелька с пошаговой инструкцией по установке и настройке читайте здесь. В этой статье я расскажу как добавить в МетаМаск Binance Smart Chain (BSC), чтобы получить возможность использования токенов работающих в стандарте BEP-20, в том числе нативного токена биржи binance — монеты BNB.
Сегодня на BSC построены множество приложений: децентрализованная биржа PancakeSwap, биржа и платформа NFT BakerySwap, маркет децентрализованных финансов Venus и многие другие. MetaMask с добавленной BSC отлично подходит для работы с этими платформами.
Чтобы добавить сеть BSC нужно разблокировать кошелек МетаМаск и кликнуть по логотипу аккаунта в правом верхнем углу.
Далее выбираем в меню пункт «Настройка»
Прослистываем вниз до раздела «Сети» и кликаем на него.
Перед нами форма для добавления сети с пустыми полями, заполняем по образцу.
Имя сети: Binance Smart Chain BEP-20
Символ валюты: BNB
Имя сети можно задать любое.
После заполнения всех полей, нажимаем «Сохранить».
Поздравляю, вы добавили Binance Smart Chain в ваш MetaMask и теперь в нем можно хранить токены стандарта BEP-20.
Возможно, NFT существуют уже несколько лет, но бум, который они переживают сейчас, нереален. Каждый изо всех сил пытается съесть кусочек этого пирога, и это уже не только крипто-гики.
Но как бы вы ни были рады стать частью этого мира, верно и то, что это может быть немного ошеломляюще, учитывая их сложную природу. Есть много вещей, которым нужно научиться, когда вы новичок. А учитывая, насколько уязвимой может быть вся установка, важно правильно понять основы.
Но независимо от того, новичок вы или нет, важнее всего безопасность. И кошелек поможет вам в этом. MetaMask — один из таких кошельков, который делает мир web3 доступным для вас на нескольких устройствах. Вы можете использовать кошелек в мобильном приложении, а также в браузере на компьютере. Это идеальное место для хранения ваших цифровых активов.
Но также верно и то, что у вас могут возникнуть небольшие проблемы с определенными видами цифровых активов (пссс! мы имеем в виду NFT) на MetaMask. Но не волнуйтесь. Мы поможем вам решить все эти проблемы.
Управлять взаимозаменяемыми токенами в кошельке очень просто. Но невзаимозаменяемые токены могут быть совсем другим делом. Не взаимозаменяемые токены — это не то же самое, что взаимозаменяемые токены. А еще на рынке NFT много мошенников.
Независимо от того, покупаете ли вы NFT, обмениваете его или кто-то дарит его вам, вы обращаетесь к своему кошельку, чтобы узнать, безопасен он или нет. В конце концов, это одна из основных целей использования хорошего криптокошелька; он должен надежно хранить ваши активы.
И MetaMask — отличный кошелек для NFT. Он поддерживает NFT на основе ETH, но также может быть настроен для поддержки NFT из других блокчейнов, таких как Binance Smart Chain. Ваши NFT из блокчейна Ethereum должны автоматически появиться в вашем кошельке — MetaMask использует opensea.io и IPFS для извлечения своих данных NFT. Но это не всегда так. Вы обнаружите, что некоторые из ваших NFT могут некорректно отображаться в кошельке, а иногда и вовсе не отображаться.
Примечание. Браузерное расширение MetaMask не поддерживает просмотр NFT. Хотя вы можете добавить их в качестве пользовательских токенов (что мы узнаем, как это сделать), вы не сможете просматривать их изначально в пользовательском интерфейсе. Мобильное приложение MetaMask на данный момент является лучшим решением для управления вашими NFT, хотя команда работает над тем, чтобы перенести его и в расширение для браузера.
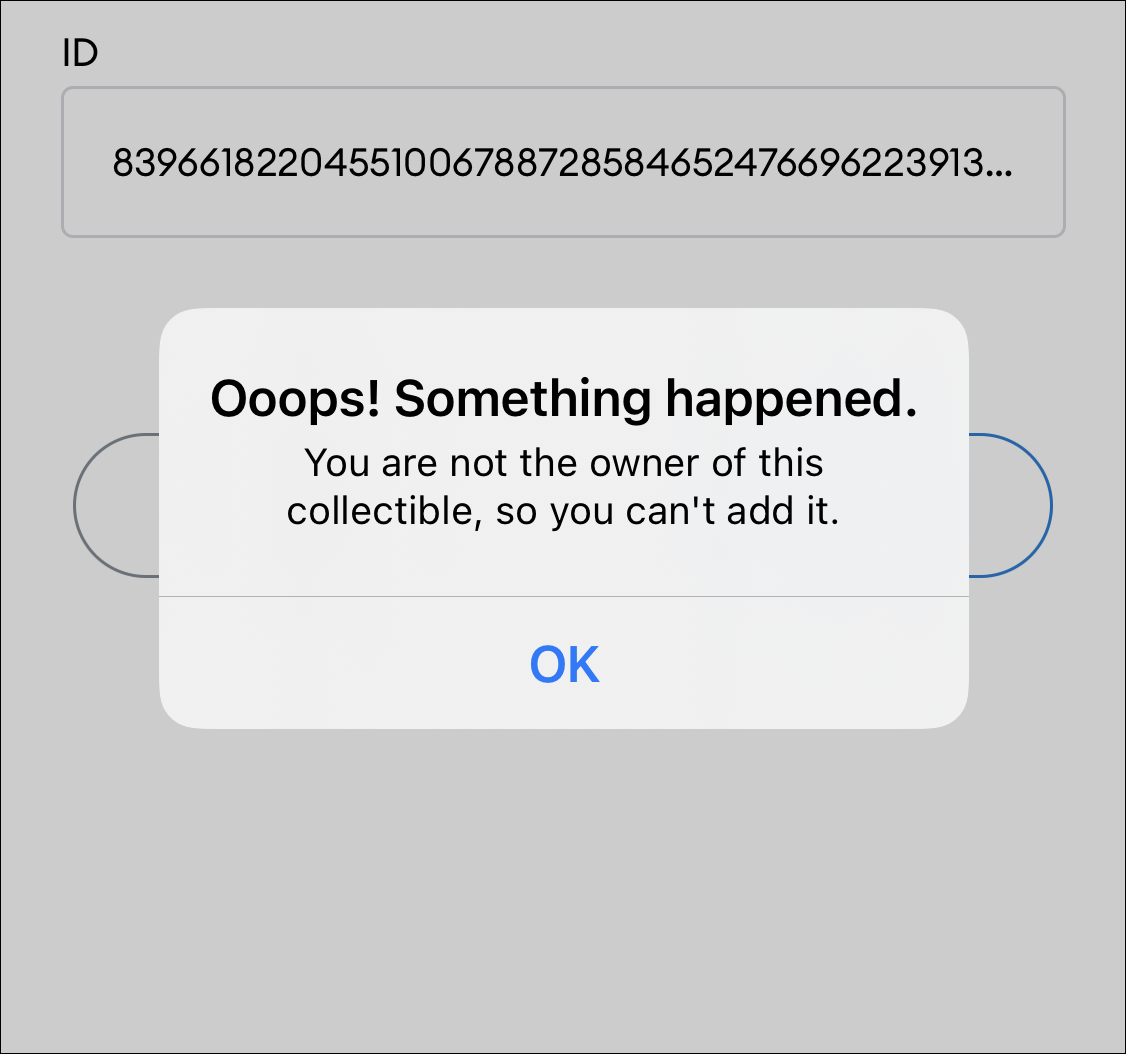
Ваши NFT всегда хранятся в вашем кошельке. Добавление NFT просто позволяет вам увидеть токен там. Именно поэтому вы можете добавлять в MetaMask только принадлежащие вам NFT. Потому что это просто способ просмотреть невзаимозаменяемые токены, которые у вас уже есть в кошельке. Попытка добавить NFT, которым вы не владеете, приведет к ошибке.
Добавление NFT в ваш кошелек не эквивалентно его покупке. В вашем кошельке уже хранятся NFT, которые вы покупаете с адреса, независимо от того, видите ли вы их там или нет. Но возможность просматривать их там дает душевное спокойствие, так что давайте, как именно вы можете это сделать.
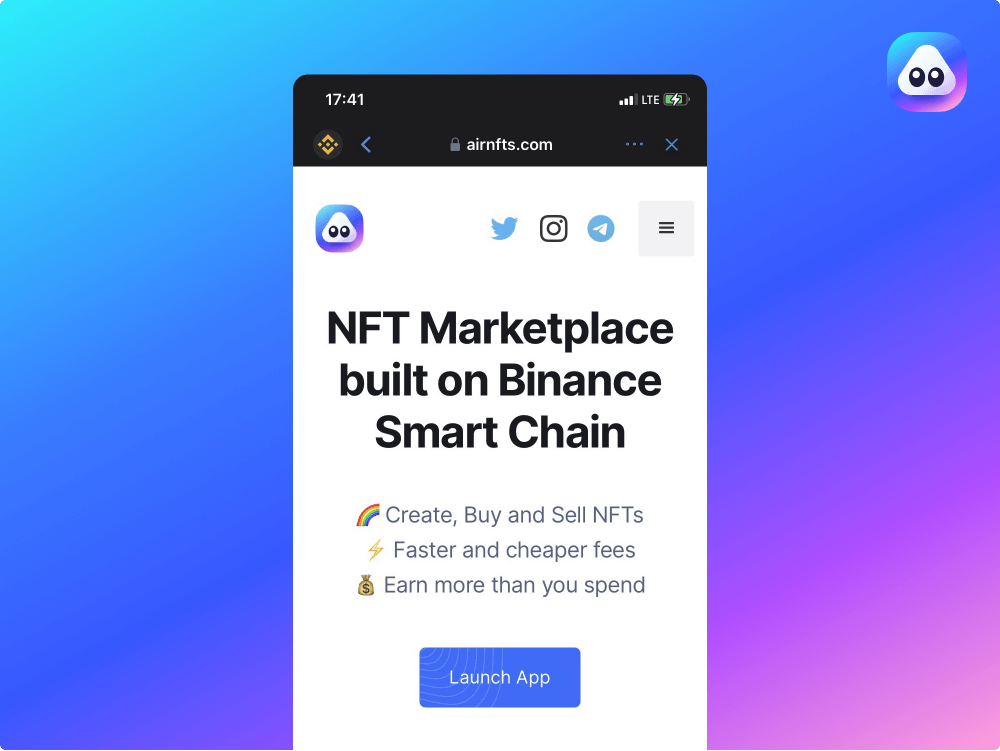
Minting NFTs on Binance Smart Chain (BSC) can be very profitable and AirNFTs is here to make the process even easier.
Minting NFTs on Binance Smart Chain (BSC) can be very profitable and AirNFTs is here to make the process even easier. Discover the smoothest way to create NFTs on BSC.
In the unending series of mouth-opening headlines on NFTs, we have seen numerous digital artists make enormous returns from their artworks. From the 18-year-old artist who sold his piece for half a million dollars to the famous digital artist, Beeple, who sold one of his pieces for almost $70 million just last month, it is clear that the NFT business is a very lucrative one.
While Ethereum-based NFT marketplaces have made waves over the years, BSC, with its insane transaction speed and ridiculously cheap gas fees, is poised to propel the NFT market even further. This short piece will guide you on how to mint NFTs on BSC.
Requirements
There are two BSC-compatible wallets with in-built web 3.0 browsers you can use to access the marketplace — MetaMask or Trust Wallet. Your wallet connects, and your BNB balance automatically reflects on AirNFTs as soon as you visit the page using either dApp browser.
AirNFTs currently allows digital creators to mint artworks, memes, punks, or even screenshots of tweets. As long as the file can be uploaded in JPEG, PNG, or GIF format, you are good to go. The maximum size is 10MB.
How to use NFTs with Metamask BSC configuration
Note: Trust Wallet doesnt have to be configured you just join app.airnfts.com from Trust Wallet Browser and start creating NFTs.
How to create your own NFTs on BSC
1. Go to www.airnfts.com and click on Launch App.
2. Click on ‘Create.’


4. Add the Name and Fill in the Description box
5. Enter the price (in BNB), the platform automatically shows the current USD equivalent.
6. Hit Approve, pay storage fee (the smaller image the less you pay, try to use tinypng.com) and hit create to mint.

There you have your first tokenized asset!
Thanks to increasing liquidity on Binance Smart Chain, you can list your asset on the marketplace and potentially sell it to a willing buyer in no time.
Note that there is a meager 2.5% service fee that is charged only after you sell your NFTs.
Conclusion
The perceived value of NFTs on the rise and there is no telling how many digital creators can be enriched. As you have seen above, you can easily tokenize your artworks with AirNFTs in under a minute to potentially gain massive returns.
What’s more, AirNFTs plans to roll out auctions for all assets. Very soon, you will have the option of listing your NFT for auctions and placing bids for your desired NFTs.
Keep a tab on our website and socials to remain up-to-date with the latest information.

Get 5% rebate on crypto trades with Binance
The NFT world is growing at an unprecedented pace and nobody wants to be left behind.
That’s why if you have a new wallet address on MetaMask, you surely want to know how to add Non-Fungible Tokens to it.
MetaMask is a very popular wallet in which you can store custom tokens, add ETH, and have all your digital assets in a safe, non-custodial environment.
Thus, it makes sense to store your precious NFTs in a virtual wallet that grants you the safety and security you need for each transaction.
Table Of Contents
Non-Fungible Tokens are taking the crypto industry by storm.
Wherever you go, you see people talking about the NFTs they hold (or want to hold in the near future).
That’s why we can’t allow this train to pass by — if you have a desktop or mobile installed MetaMask wallet, then you surely want more information about this topic.
Well, the good news is that you can certainly add NFTs to MetaMask, and we will show you how.
But first, let’s take a look at some limitations that you will surely face.
Pro Tip: You can use your debit card or bank account to receive ETH on your Ethereum Address on MetaMask after paying a network fee and gas fee.
Nonetheless, if you want to
Withdraw Money from MetaMask, you need to send the funds to a centralized exchange first, such as Binance.
OpenSea, MetaMask Mobile and MetaMask Extension
MetaMask does offer NFT support, but only on their version for Android and iOS mobile devices.
If you install MetaMask browser extension, you won’t be able to add your NFT correctly.
Yes, MetaMask works with several browsers, but they state that NFTs support for a browser (specifically, Google Chrome)
will come soon enough.
Read Also: You can
Add Binance Smart Chain to MetaMask so you get more tokens on your MetaMask Wallet.
If you want to know how to do this, we recommend reading our related 101 guide about this topic!
Now you know it — adding an NFT works mainly on MetaMask mobile and not the MetaMask extension.
Luckily, the process is straightforward, so doing so won’t take you major efforts.
Download a Set Up Your MetaMask Wallet Address
The first step consists of installing and setting up your MetaMask wallet address on your device.
Doing so is effortless — the signup process is pretty self-explanatory, so you probably won’t need significant guidance during this specific point.
Find the NFT Smart Contract Address
Now, let’s assume that the NFT you want is on OpenSea’s market.
If that’s the case, you need to find the NFTs contract’s address before being able to move it to your wallet.
You can find the contract address of the NFT by clicking on “Details” on OpenSea.
It’s quickly identifiable as a blue hyperlinked value labeled on the platform.
A box marked with the information will open after a dropdown menu — copy the address of the NFT and keep it somewhere.
Tap on “Add NFts” on the MetaMask Mobile App
Now, go back to MetaMask and tap on “Add NFts.” You need to paste the previously copied NFT address on the Address Box.
Do it and then proceed as stated.
Pro Tip: If you have a wallet set up in Trust Wallet, you can
Import Trust Wallet to MetaMask in case you need to have all your assets stored in just one place.
This is an advanced feature offered by the wallet that you can certainly take advantage of.
Find the NFT’s ID
No two NFTs are the same — that’s why there’s a unique identifier for each NFT that exists.
That’s what makes NFTs special! The ID can also be found under details at OpenSea.
Copy the ID and then go back to MetaMask.
Paste the NFT’s Address and ID on Your MetaMask Account
The next step is to paste the ID of the NFT right on the NFTs ID box on MetaMask.
Without the ID, you won’t be able to prove that you fully own the NFT.
Finally, tap on “ADD,” and you will be ready to go — the NFT will appear on your collectibles tab.
You can verify the transaction hash of the specific operation by going to
EtherScan.
How To View Your NFTs in MetaMask
There’s an NFTs tab on MetaMask’s main menu where you can see all the NFTs you own.
The NFT tab shows you all the information you need regarding a specific NFT.
Keep in mind that the process must be performed correctly if you don’t want to experience ownership errors on your MetaMask wallet.
At the end of the day, remember that you are the rightful owner of the digital asset you just acquired.
That’s all for today.
This is a guide for understanding how to mint and transfer BEP-721 NFTs to MetaMask wallet. We wanted to make the process super simple and, thus, will walk you through how to start exploring these Defi applications in seconds. So let’s dive in.
MetaMask has been basically an Ethereum wallet, but with minimal effort, you can configure it to integrate Binance Smart Chain. This way, you can use a familiar UI when interacting with BSC-based NFTs, namely the BEP-721 and BEP-1155 tokens.
Ethereum may be losing the DeFi battle against Binance
As the hype around the non-fungible tokens has been increasing, so too was the number of alternative ecosystems popping up. That trend has accelerated after exorbitantly high fees and delayed transaction processing times on the Ethereum network have limited functionality and made many defi protocols barely usable.
Retail traders were also priced out and became unable to participate in decentralised finance or NFT activities. For many of them, it’s simply too much to pay $40 per transaction or up to $100 per asset conversion.
Within this context, Binance Smart Chain has risen up to the occasion to alleviate these issues. It has increasingly gained traction through offering low fees and near-instant transaction processing time.
Part 1: Connecting MetaMask to Binance Smart Chain
Most NFTs and Defi platforms, including Binance Smart Chain, require buyers to have a digital wallet and use cryptocurrencies to pay for their token purchases. So if you don’t have a MetaMask wallet, the first step is to set up one to interact with BSC applications.
MetaMask is one of the easiest mobile/web-based wallets to adopt BSC. If you want to use Binance’s native chain from your pocket, you can install MetaMask extension on major browsers, or on iOS and Android devices.
For the purposes of this tutorial, we’ll explain how to install the app on Chrome and Brave browsers, but the instructions will be more or less the same for any other apps.
MetaMask Wallet Chrome Extension
Using Metamask wallet in Brave browser
If you encounter issues while trying to use MetaMask on the Brave browser, you can simply set MetaMask as your default web3 provider:
Your MetaMask wallet Brave extension is now set up. You should now see your wallet, ready to send and receive whatever tokens you want to transact.
Part 2: Configuring the wallet
At this stage, you are still dealing with an Ethereum wallet, which means you can’t interact with Binance Smart Chain applications yet. You also risk losing your assets as this confusion could prompt you to send them to addresses you don’t own.
Step 1: To change that, select Settings from the dropdown menu and point the wallet towards Binance Smart Chain nodes.
On the Settings page, locate the Networks menu.
Step 2: Since the Binance Smart Chain doesn’t come originally packaged with MetaMask, you need to click Add Network in the top-right corner to manually add it.
Step 3: Once done, you will be forwarded to the BSC testnet. Hover over the account name at the top of the window, then click to copy your address to the clipboard.
Finally, move to Binance Smart Chain Faucet and paste your address in the recipient field in the application where you are sending your tokens from.
Step 4: Keep in mind that once you’re on the Binance ecosystem, you’ll need to pay for transactions with their native token, BNB.
Select the BNB amount you want to receive, along with any other necessary steps to complete and submit the transaction.
Step 5: Once the transaction has been processed, the balance in your account in MetaMask should update.
Part 3:Verify transactions on BSCScan
If you want to verify that your BNB transaction worked, copy your transaction ID from Binance Smart Chain and plug it into BscScan.
Step 1:Go to BSC Explorer or Testnet Explorer
Step 2: Click on “Verify and Publish”
Step 3: Fill in the correct information of your transaction.
Step 4: Click on “Verify and Publish” to finish this process. Now you are all set!
Part 4: Top BEP-721 Minting Platforms
As the BSCs’ NFT space is rapidly developing, many platforms and launchpads are showing up as many tokens have bloomed toward a variety of new use cases.
Juggernaut proudly describes itself as being the first BSC exclusive NFT exchange in crypto industry. The platform enables token projects to have real and modular business models with the power of DeFi.
Juggernaut has over 20,000 NFTs available for trading on JuggerWORLD, with 840 different cards already listed.
BakerySwap is a DeFi protocol built on the Binance Smart Chain and works as a decentralized exchange. The DEX platform adopts the automated market maker (AMM) model and is one of the few BSC projects that offer altcoin liquidity pools.
About Blind Boxes
Blind Boxes is a gamified curation platform and launchpad for NFTs (non-fungible tokens). This highly scalable dApp enables brands and creators to diversify their revenue streams, increase the liquidity of their creative assets, and to become leaders in decentralized global economies, while engaging fans and buyers to discover and collect rare, limited edition NFTs.
Via the Blind Boxes Marketplace, buyers experience the thrill of time-released curated NFT collections. Here collectors unlock sealed packages of exclusive items, curated by tastemakers across the arts, music, & entertainment. Curation is at the core of our value proposition. The platform offers a commission structure that incentivizes independent contributors to produce bespoke blind box collections that feature top-tier talent and emerging artists and designers from around the world.
For all recent announcements and updates, connect with us:
Как пополнить MetaMask токенами Binance (BNB)
Пополнить кошелек монетами BNB можно несколькими способами:
Самый простой и безопасный способ — купить BNB на официальном сайте биржи Binance, а после этого сделать перевод на свой МетаМаск. На бирже покупку можно совершить при помощи кредитных и дебетовых карт (Visa, MasterCard) или в P2P (от пользователя к пользователю) платформе в которой биржа выступает гарантом сделки.
Полезный пост? Отблагодарить автора можно здесь.
Проблемы с некоторыми NFT
Возможно, что после того, как вы добавите некоторые из ваших NFT, вы можете получить ошибку в MetaMask. В сообщении об ошибке может быть что-то вроде: «У нас возникли проблемы с загрузкой баланса ваших токенов».
Если это произойдет, не нужно паниковать. Если вы перейдете к разделу сведений о рассматриваемом NFT в OpenSea, вы обнаружите, что стандарт токена для него — «ERC-1155».
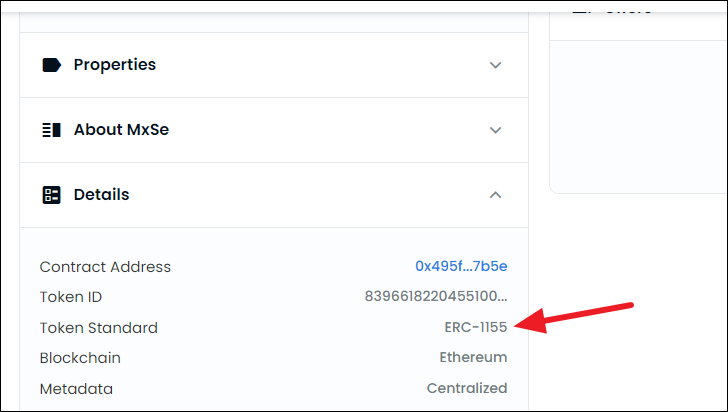
В настоящее время MetaMask поддерживает хранение токенов ERC-1155. Но нет возможности взаимодействия или управления. По сути, вы не можете увидеть NFT в расширении или мобильном приложении и не можете отправить их кому-либо. Тем не менее, ваш кошелек надежно держит его.
Если вы хотите просмотреть его или даже отправить кому-то в подарок, вы можете сделать это из OpenSea.
Adding the NFT to Metamask
This step is optional — you already have the NFTs in your wallet, but they’re not visible yet.
To make them show up, you must use the Metamask app — it will not work on the browser extension!
LINK your Metamask browser extension wallet to the Metamask App (Don’t create a new account!), select “NFTs” and select “Import NFTs”
Click on “Import NFTs”
Importing an NFT
Add the HEX ID (Token ID) you see on BSCSCAN. (333772 in this example, yours will be different)
Click “Import” and you’re done! The NFT will now appear under the NFT section of your Metamask App.
If you need help or support, the best place to ask is the ERTHA Discord Server.
Ertha is an MMO 4X (eXplore, eXpand, eXploit, eXterminate) game with extensive opportunities to satisfy one’s need for curiosity, competitiveness, and social recognition through roleplaying in a vast geopolitical map.With three distinct characters to select from and endless possibilities to alter them, players themselves will be the creators of their own narrative and wealth both in virtual and real worlds.Welcome to Ertha
(1) Adding BUSD Token
A. Select the Smart Chain main network at the top of the wallet and click the “Add Token” button
B. Find the contract address of BUSD (0xe9e7cea3dedca5984780bafc599bd69add087d56) in the bscscan.com browser, copy it to the Token Contract Address, and click NEXT
C. Click “Add Token” to add the BUSD token displayed in the wallet
(3) Mainnet (This is the one you are probably looking for)
Network Name: Smart Chain
Удаление сети из MetaMask
Вы также можете удалить неиспользуемую сеть. Для этого нажмите Настройки – Сети. В открывшемся окне выберите ненужную сеть.
Подтвердить удаление сети, нажав кнопку Удалить.
Поздравляем! Теперь вы знаете, как добавить сеть BSC в MetaMask. По аналогии вы можете добавлять любые другие сети, совместимые с блокчейном Ethereum (Polygon, Avalanche и др.)
Больше интересной и полезной информации у нас на сайте и в Telegram!
Purchasing ERTHA land
NOTE: Currently the store can only be accessed from Desktop. If you’re experiencing lag, make sure to enable Hardware Acceleration in your browser settings.
When it loads, you will see the ERTHA globe.
Log in with your Metamask by clicking LOG IN at the top of the screen.
Click LOG IN.
A Metamask window will pop up, authorize the connection and you will be logged in.
Look for HEX you want to purchase. The ones that are currently available are colored teal (light blue). Click on them to see their resources and price.
Selecting a HEX
After you decide which HEX you want to purchase, click “Add to Cart”.
Your shopping cart will appear on the right-hand side. Click “Place Order” to reserve your HEXs and start the payment process.
Order placed, HEX reserved
Select the currency you wish to pay with. In this guide, USDT is selected, but every currency works the same way.
Metamask automatically prepares the transaction and a new window pops up.
Metamask Payment Screen
If the payment is successful, the NFT minting process starts automatically.
BSCSCAN search bar
Once it finds your wallet, click on Erc721 tokens.
The NFT on BSCSCAN
Usually, purchased NFTs show up on BSCSCAN in less than 15 minutes.
Congratulations, you successfully purchased ERTHA NFT land!
Способ 2. Автоматическое добавление сети
На главном экране нажимаем на бургер-меню в левом верхнем углу.
Далее переходим во встроенный браузер метамаска.
Листаем немного вниз и нажимаем кнопку Connect Wallet.
Теперь с помощью строки поиска ищем нужную сеть.
Как только сеть найдена, нажимаем Add to MetaMask.
Кошельку потребуется подтверждение – нажимаем Одобрить.
Далее вы можете сразу активировать BSC, нажав кнопку Сменить сеть.
Теперь возвращаемся в кошелек для проверки смены сети. Нажимаем на бургер-меню в левом верхнем углу.
Переходим в кошелек.
Убеждаемся, что сеть добавлена.
Тестовые сети Ethereum в Метамаске
В комментариях часто спрашивают как добавить в Метамаск сеть Rinkeby, сеть Kovan и другие тестовые сети, в кошельке по умолчанию отображается только сеть Ethereum Mainnet – это основная сеть блокчейна, но помимо её есть ещё несколько, а именно:
Для того чтобы пользоваться этими сетями нужно просто включить их отображение в настройках кошелька.
Для этого переходим в настройки кошелька, далее заходим в дополнительные настройки, пролистываем до пункта «Show test networks» и переводим переключатель в положение «вкл».
Чтобы добавить BSC в MetaMask автоматически, необходимо перейти на сайт Chainlist. В правом верхнем углу нажимаем Connect Wallet.
После этого MetaMask сразу потребует подтверждения подключения. Нажимаем Далее – Подключиться.
Теперь вы можете через поисковую строку найти нужную сеть, либо выбрать из предложенных на главной странице. Далее нажимаем Add to MetaMask.
Кошелек снова потребует подтверждения. Нажимаем Одобрить – Сменить сеть.
Готово – сеть BSC добавлена.
(2) Adding KOI Token
A. Click Add Token at the bottom of the wallet
B. Find the contract address of KOI (0x49158d0c9d39d74b57c3dcb14a442211745777f4) in the bscscan.com browser, copy it to the Token Contract Address, and click NEXT
C. Click “Add Token” to add the KOI token displayed in the wallet
D. Both BUSD and KOI were successfully added to MetaMask’s wallet.
Способ 1. Добавление сети вручную
Далее выбираем пункт Настройки.
Необходимая нам настройка – Сети.
В открывшемся окне необходимо нажать Добавить сеть.
Откроется форма для заполнения параметров сети.
Форму необходимо заполнить по образцу ниже.
После этого нажимаем Добавить.
Готово – нам удалось подключить сеть Binance Smart Chain.
(1) Installing and setting up MetaMask
And that’s it! You should now see your wallet, ready to send and receive funds.
The freshly-initialized MetaMask wallet.
How to Add Binance Smart Chain to MetaMask
If you are using a web browser, you can add BSC to MetaMask automatically through BSCscan or manually through MetaMask.
Open BSCscan
Visit BSCscan’s website.
Click “Add Network”
After visiting BSCscan, navigate to the bottom of the web page. You will see a MetaMask icon adjacent to the tab “Add BSC Network” on the left side of your screen.

You will be prompted to log in after clicking the button.
Confirm the Connection Request
Press the “Switch network” button to allow the BSCscan to change your default MetaMask wallet to BSC automatically.

That’s how easy it is to add the Binance Smart chain to MetaMask through BSCscan!
Open MetaMask Browser Extension
Open the MetaMask browser extension by pressing the MetaMask icon on the top right-hand side of your screen.

After logging into your MetaMask account, visit the network selection menu on the upper right side of your screen.
The menu reads “Ethereum Mainnet” if it’s your first time switching networks. Click it to access a drop-down menu and hit the ‘Add Network” tab to proceed to the next step.

Enter BSC Details
After clicking the “Add Network” button above, a new window will open.

Enter the BNB address below into their relevant fields:
Tip: You are more likely to make errors typing the details into the fields. Therefore, do copy and paste them to eliminate typing errors.
Click the “Save” Button
After filling in the fields accordingly, the “Save” tab on the bottom of your screen turns blue. Press it to add Binance Smart Chain to your MetaMask wallet.

You will realize that your mainnet network has turned into “Smart Chain.”
If you wish to change back to the Ethereum network, simply press on the “Smart Chain” menu on the top.
Connecting to Binance Smart Chain using the MetaMask mobile app differs from the BSCscan and browser extension options. Also, BSCscan lacks the option of interacting with the MetaMask mobile app.
Here is a step-by-step process of adding BSC to the MetaMask app.
Open Your MetaMask Mobile App
Navigate to the MetaMask App on your smartphone, and open it. If you don’t have the app yet, visit the Play Store or iOS to download it.
Click “Settings”
After opening the app, press the three dashes on the top left side to open a new window.
Click the “Settings” menu in the lower half of your screen.

After a new window opens, navigate down and select “Networks.”
Press “Add Network” then “Custom Networks” to add the Binance Smart Chain network.
Like in the browser extension, a window with five empty fields will appear.

Copy and paste the details below into their relevant fields:
Save Changes
After pasting the details appropriately, press the “Save” tab at the bottom to add BSC to your MetaMask wallet.
Your Mainnet network menu will now read “Smart Chain.”
Again, you can switch back to Ethereum by clicking the network menu. That’s it!
Funding Your MetaMask Account
After successfully adding BSC to MetaMask, you need to fund your account with some BNB tokens. You will use the tokens to pay for transaction costs, swap for other tokens, or hold them as an investment.
To fund your MetaMask account with BNB:
Remember to select “BSC (BEP20)” in the network field and avoid sending funds to the wrong network.
You can also send other BSC custom tokens to your MetaMask account. However, you must manually add the tokens for them to reflect in the “Assets” section. This is how to go along:
Click the “Import tokens” tab in the bottom middle section of your screen.

Visit CoinGecko’s token page to find the token contract.

Go back to MetaMask and paste the contract in the “Token Contract Address” field. The MetaMask engine will automatically fill the other two fields.
After that, click on the “Add Custom Token” to complete the process.

Congratulations, you have successfully added BSC to MetaMask and funded it. Now you can start swapping tokens, holding NFTs, or interacting with various dApps at low transaction fees.
Tell us how much you like this article!
Josiah Makori
Now the world is yours! You are in luck because at Stadioplus.com you have NFT starting at $1.99 to invest in your first NFT.
Just go to the home page, select category, sport, artist or just browse around until you find one that awakens the collector soul in all of us.
Click on the buy button and in its tab select the edition you want to buy.
Here you can choose the edition or buy it directly from the “Buy this edition” button.
Now you just select the payment method:
When you complete the payment by crypto, you can see your already NFT in the “my collection” section.
With payment by credit card, you have to send us an email and we will ask you for your metamask number to send you the NFT in about 48h.
In any case, from my collection you will be able to see all the works (stadioplus or not) that you have in that wallet.
If you have any questions, we are just away 😉
How to install Metamask?
In this example, we will use the Firefox version, but the directions are similar from platform to platform.
And that’s it. You should now see your wallet, ready to send and receive funds.
Initial view of a newly created Metamask Wallet
Добавление NFT из мобильного приложения MetaMask
Установите мобильное приложение MetaMask из App Store или Play Store на свое мобильное устройство. Если вы настроили свой кошелек MetaMask из расширения браузера, вам придется импортировать кошелек, используя свою секретную фразу восстановления. Импортировать кошелек так же просто, как ввести секретную фразу восстановления и установить новый пароль для кошелька.
Затем нажмите «Кошелек» в меню.
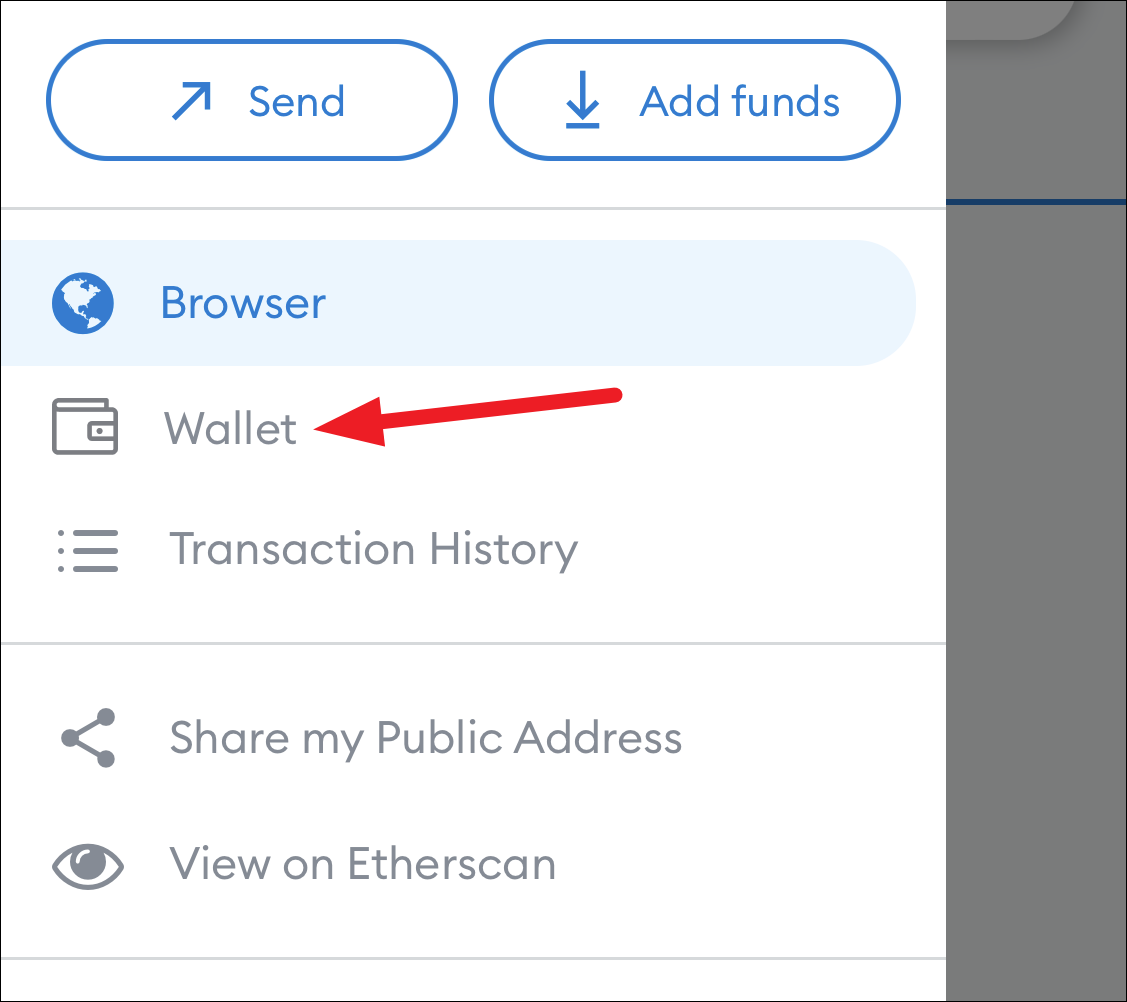
В кошельке перейдите на вкладку «NFT».
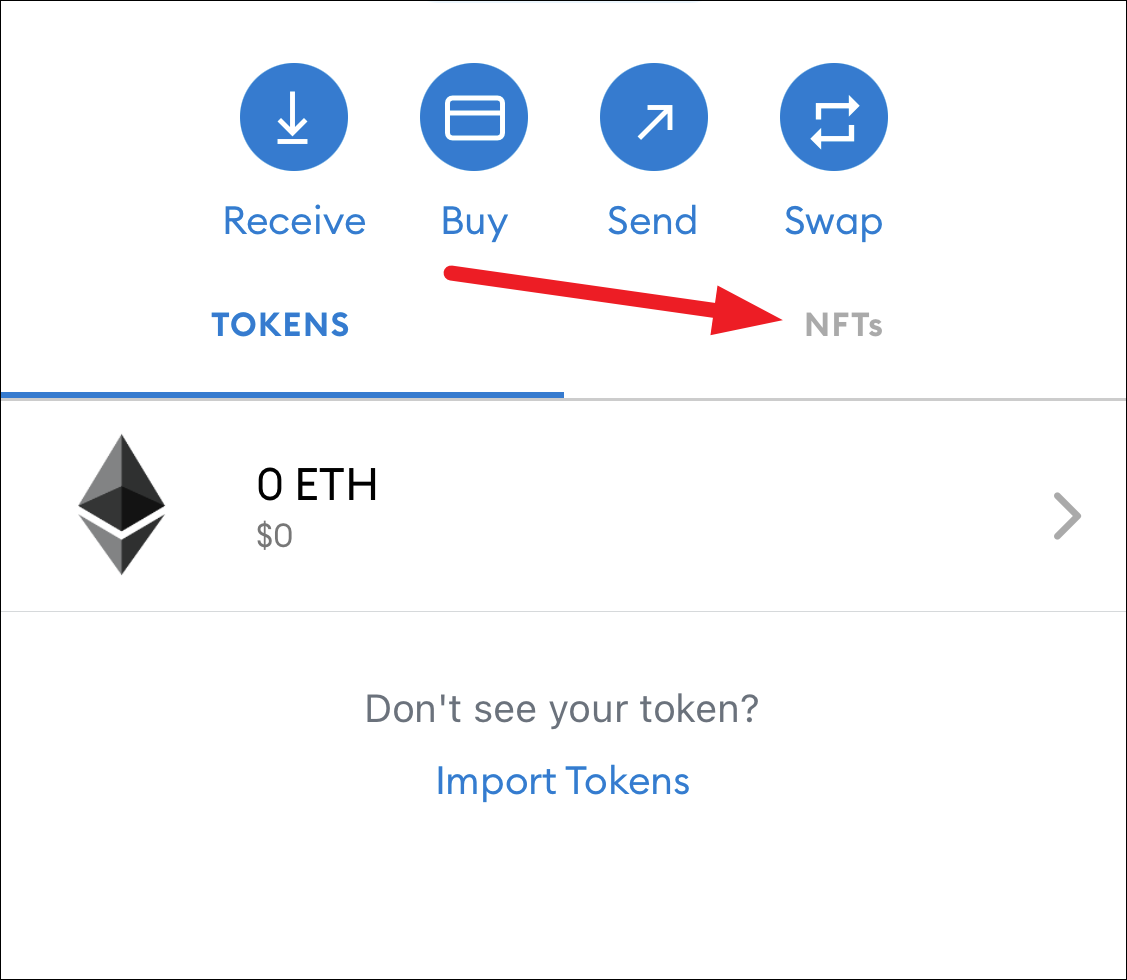
Вы можете просмотреть свои NFT здесь. Чтобы добавить NFT, прокрутите вниз и коснитесь параметра «Импорт NFT».
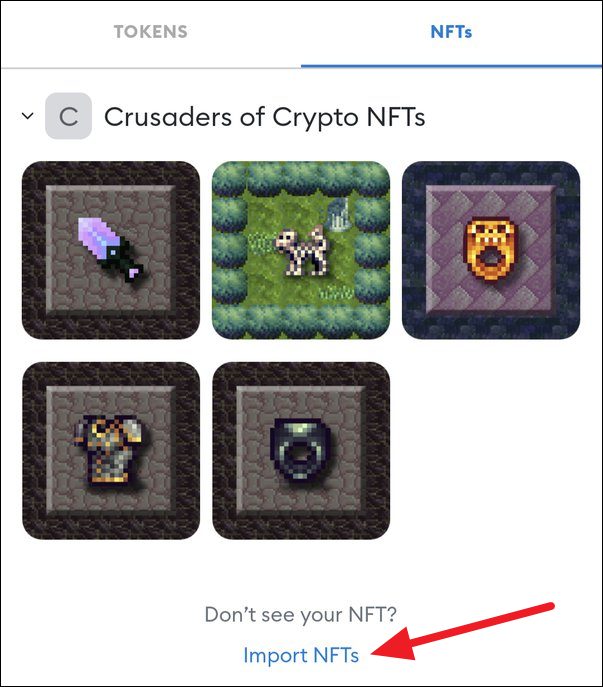
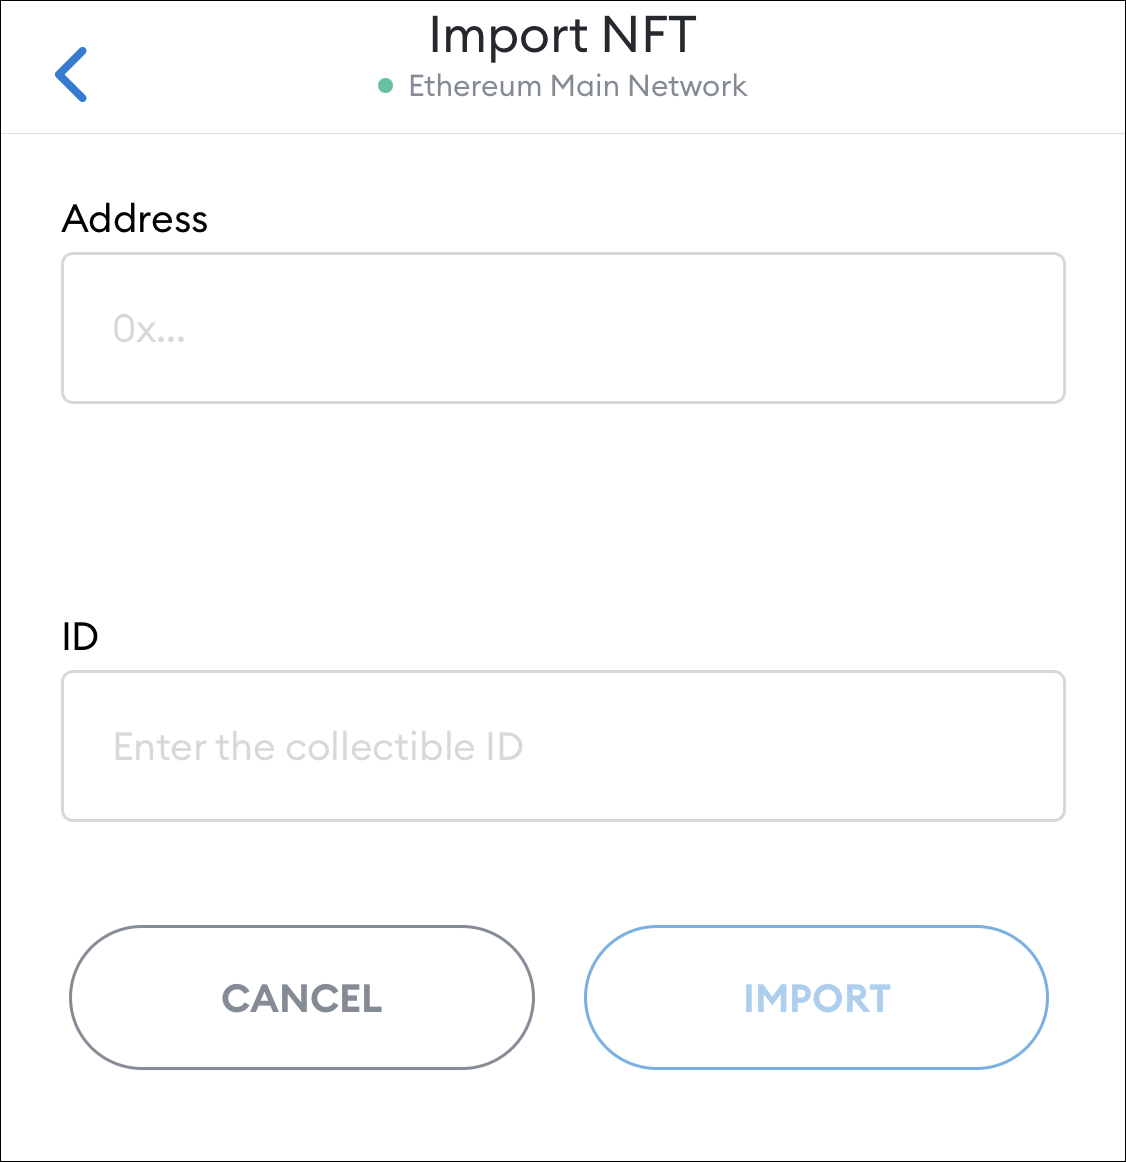
Откроется экран для импорта NFT. Чтобы импортировать NFT, вам нужен адрес NFT вместе с его идентификатором.
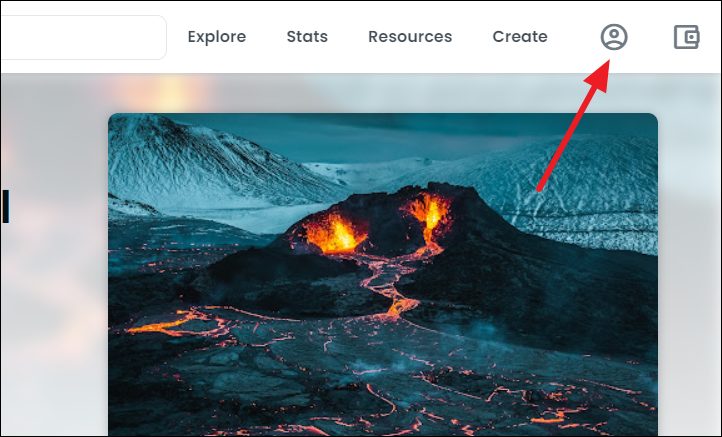
Чтобы найти адрес NFT, перейдите на opensea.io. Убедитесь, что ваш кошелек подключен к торговой площадке. Если это не так, щелкните значок кошелька в правом верхнем углу, чтобы подключить его.
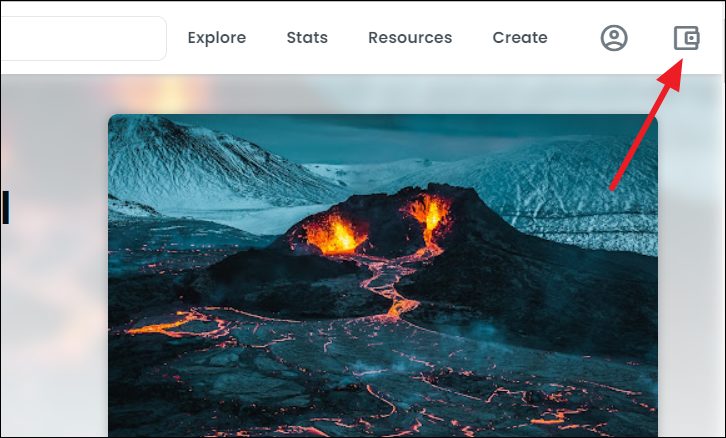
Затем перейдите в свой профиль, щелкнув значок «Профиль» в правом верхнем углу, чтобы просмотреть все свои NFT.
Совет: вы всегда можете использовать OpenSea для просмотра всех ваших NFT в любое время из вашего браузера.
Нажмите NFT, который вы хотите добавить в свой кошелек. Откроется страница листинга NFT. Прокрутите вниз и выберите опцию «Подробности».
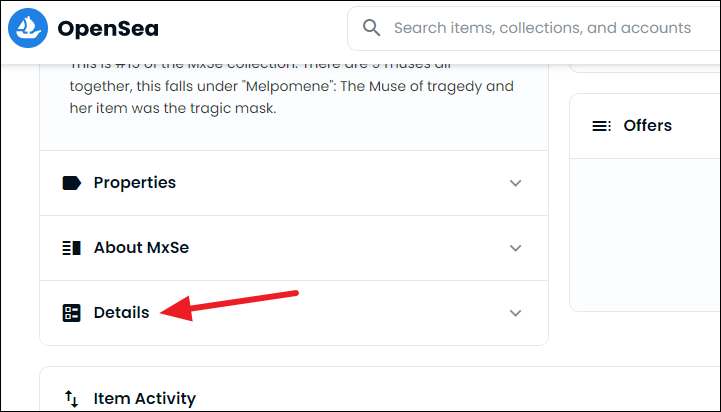
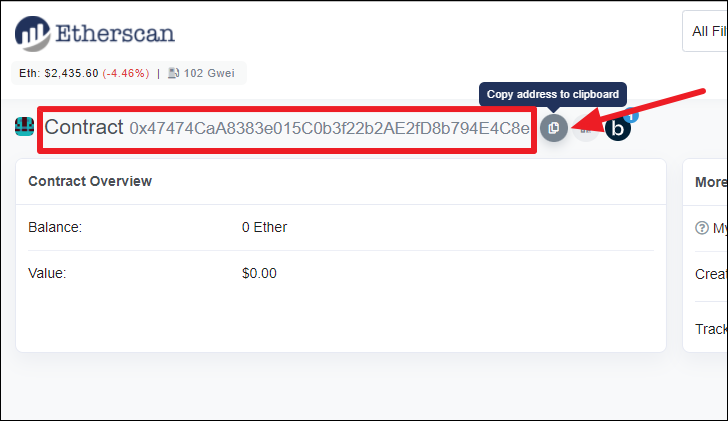
Опция будет расширяться. Щелкните «значение синей гиперссылки» рядом с «Адрес контракта».
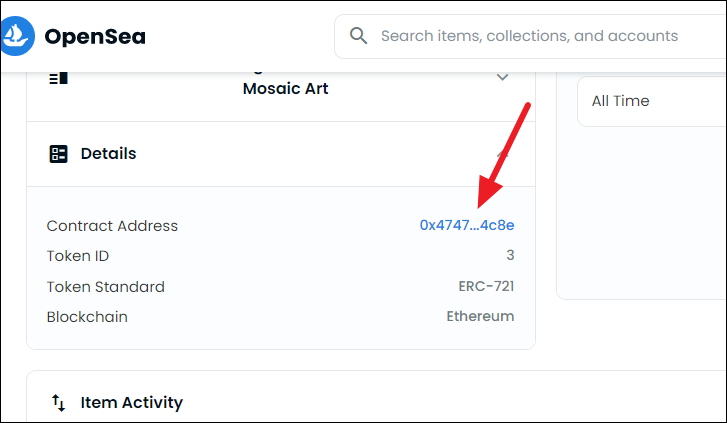
Это откроет адрес контракта на Etherscan. В верхнем левом углу страницы вы найдете опцию «Контракт» с длинной строкой букв и цифр рядом с ней. Это адрес смарт-контракта, создавшего NFT. Нажмите кнопку «Копировать» рядом с ним.
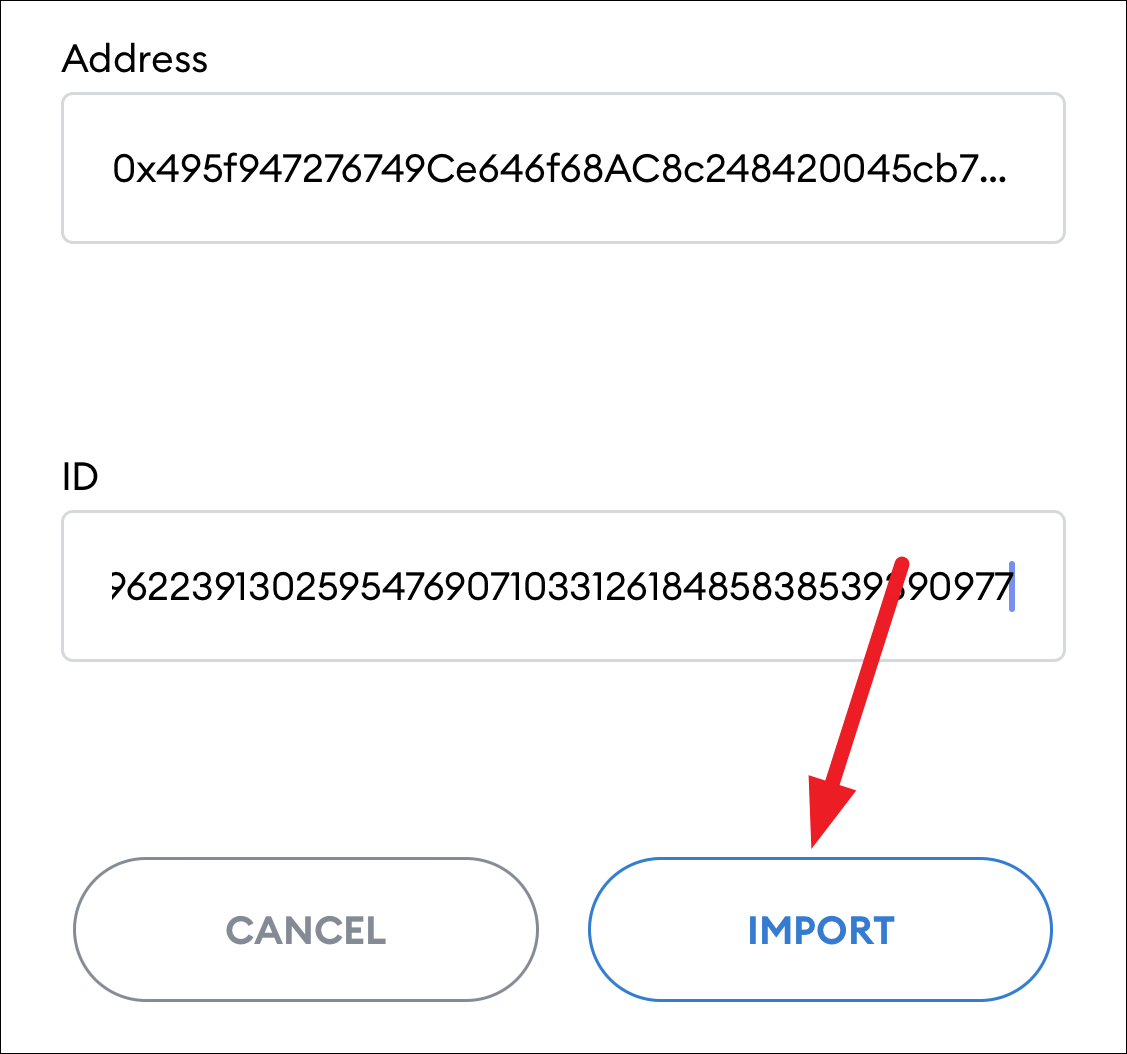
Затем вставьте адрес в текстовое поле «Адрес» в мобильном приложении на экране «Импорт NFT».

Теперь вам нужен идентификатор для NFT. Поскольку все NFT уникальны и нет двух одинаковых, каждый предмет коллекционирования имеет уникальный идентификационный номер, т. е. ID. Вернитесь в раздел «Подробности» на странице листинга NFT в OpenSea. Там вы найдете «Идентификатор токена»; введите этот номер в текстовое поле идентификатора в мобильном приложении.

Наконец, нажмите кнопку «Импорт», и ваш NFT появится в вашем кошельке.
(2) Configuring the wallet
You might notice straight away that we’re still dealing with an Ethereum wallet. At best, this won’t work with Binance Smart Chain DApps. At worst, you could lose funds by sending them to addresses you can’t actually use.
Let’s change that. We want to access the Settings to point the wallet towards Binance Smart Chain nodes.
Select Settings from the dropdown menu.
On the Settings page, we want to locate the Networks menu.
We want to click Add Network in the top-right corner to manually add the Binance Smart Chain one — it doesn’t come packaged with MetaMask. It’s important to note that there are two networks we can use here: the testnet or the mainnet. Below are the parameters to fill in for each.
FAQ
Perhaps you are not doing the procedure as you should.
In order to find your secret recovery phrase or seed phrase, you need to tap on the fox icon and look for it.
Wallet Configuration
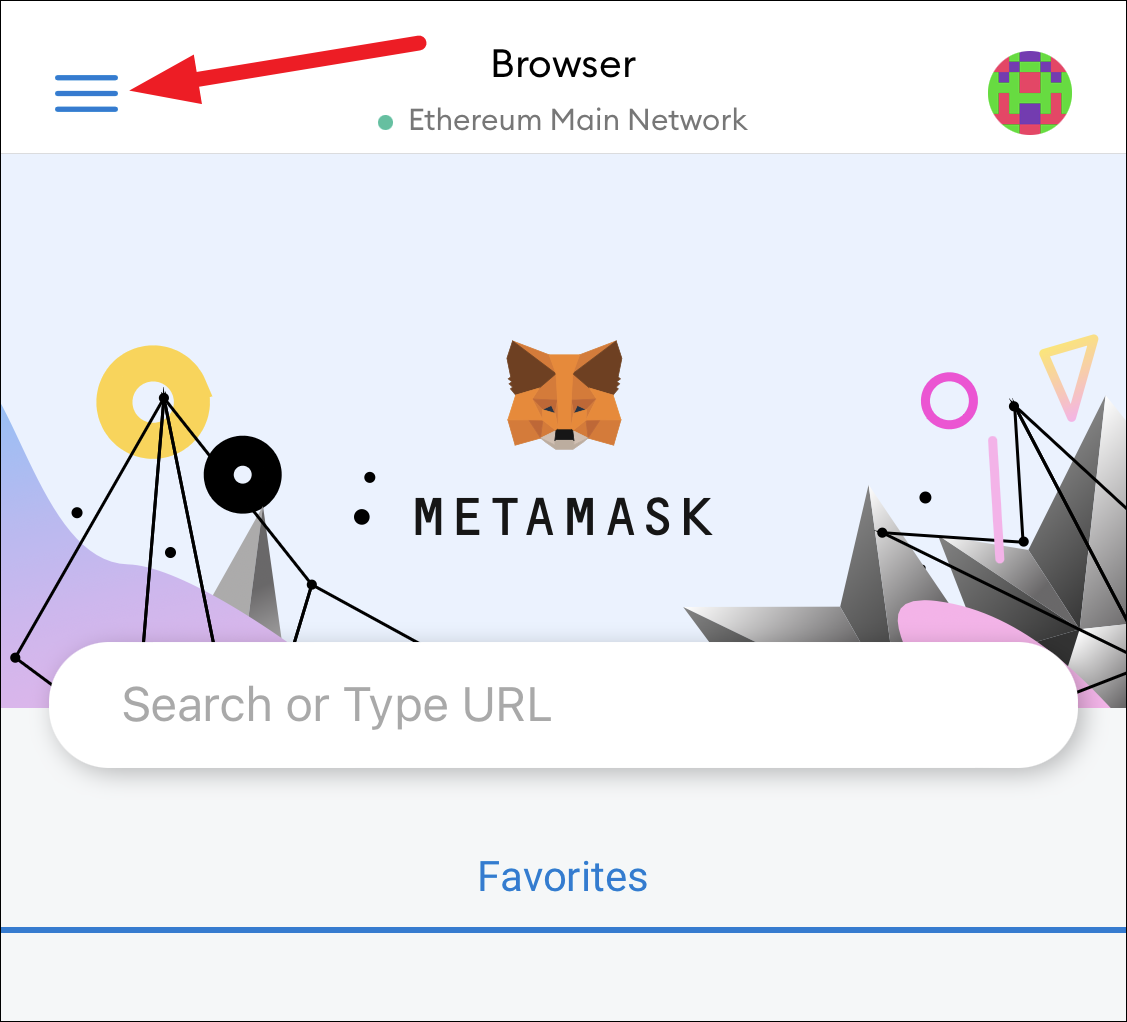
On the top right you will see a selectable indicating that you are operating with an Ethereum wallet. This is the one that is created by default, but we have to change it by accessing the settings to direct the wallet to Binance Smart Chain nodes.
Select Configuration/ Settings from the drop down menu.
We must click on Add Network in the upper right corner to manually add the Binance Smart Chain network as it is not packaged with MetaMask.
We will use the main net network. Fill in the fields with these parameters:
Once you save the network and return to the main view, you will notice two things: the network has automatically adjusted to the one you just entered, and the units are no longer denominated in ETH, but in BNB.
Сети которые не работают в Метамаске, но о которых часто спрашивают
Метамаск изначально разрабатывался для сети Ethereum, но при этом он поддерживает и другие «эфироподобные» блокчейны совместимые с EVM (Ethereum Virtual Machine). Ниже соберу список сетей о которых часто спрашивают в комментариях.
Сеть Tron (TRX) и токены TRC20 в Метамаске
Не смотря на то, что сеть Tron это почти полная копия Ethereum, Tron не поддерживает EVM, а это значит, её нельзя добавить в Метамаск. Соответственно монеты TRX и все токены стандарта TRC20 Метамаск не поддерживает. Но при этом в метамас можно добавить токен TRX выпущенный в сети BSC, адрес смарт контракта здесь.
Сеть Solana (SOL) в Метамаске не поддерживается
У монеты SOL есть свой нативный блокчейн – Solana , он не совместим с EVM и не поддерживается Метамаском, но так же как и в случае с TRX, в Метамаск можно добавить токены SOL (Wrapped Solana) выпущенные в сетях Ethereum, BSC и Polygon, адреса всех смарт-контрактов здесь.
Сеть Terra (LUNA) в Метамаск добавить нельзя
Terra это отдельный блокчейн со своей нативной монетой LUNA, Метамаском эта сеть не поддерживается. Можно добавить токены LUNA выпущенные в других блокчейнах – Ethereum, BSC и Polygon, адреса смарт-контрактов здесь.
Если не нашли сеть которую искали – напишите в комментариях!
Обратите внимание, что этот список это не рекомендация к действию, очень внимательно относитесь к добавлению новых сетей в ваш кошелек.
Что делать, если в вашем кошельке появился Неожиданный NFT?
Иногда в вашем кошельке могут быть NFT, которые вы не покупали, не обменивали и не получали от кого-то сознательно. Они просто появляются из воздуха. Некоторые из них могут быть законными, поскольку аирдроп уже давно существует в блокчейне. Раздача токенов по адресам кошельков Ethereum часто используется для привлечения интереса к проекту.
Но эта практика также связана с фишингом в сообществе. Так что, если вы когда-нибудь получите случайный NFT в свой кошелек, вам нужно проявить осторожность. Изучите токен или проект, чтобы убедиться, что они законны. Не пытайтесь продать или передать его только потому, что вы получили его бесплатно.
Это наиболее распространенная схема мошенничества с раздачей — вы пытаетесь бесплатно обменять токен, который вы получили в своем кошельке. Но когда вы пытаетесь поменять его, вместо этого он перенаправляет вас на какой-то веб-сайт. Сайт пытается получить от вас личную информацию. В некоторых случаях он даже запрашивает вашу секретную фразу восстановления. Некоторые люди в конечном итоге делятся своей секретной фразой восстановления и теряют доступ к токенам в своих кошельках.
Вы никогда не должны делиться своей секретной фразой восстановления с кем-либо. Даже MetaMask никогда не попросит вашу секретную фразу восстановления. Как только кто-то узнает вашу секретную фразу восстановления, ему больше ничего не нужно для доступа к вашему кошельку. И как только кто-то получит доступ к вашему кошельку, он сможет обналичить или перевести все ваши токены еще до того, как вы поймете, что произошло.
Если в вашем кошельке оказались мошеннические токены, лучше просто оставьте их там. Часто, когда вы пытаетесь предпринять какие-либо действия, которые заканчиваются тем, что причиняют вам боль.
Помимо фишинговой аферы, вы, как правило, должны знать о аирдропах NFT. Они также используются, чтобы вызвать интерес к незаслуженному проекту. Эта практика также известна в сообществе как rugpull, которая часто рассматривается как эквивалент традиционной схемы Понци.
Кошелек позволяет легко управлять своими NFT. Но если вы не можете найти свой NFT в кошельке, об управлении токеном не может быть и речи. К счастью, MetaMask позволяет легко добавлять токены, которые вы не видите в кошельке. Это не значит, что кошельку еще предстоит пройти долгий путь. Кошелек должен добавить множество функций, когда речь идет о поддержке NFT. Но работать с ним все же проще, чем с большинством других кошельков, поэтому он так популярен в сообществе.
https://youtube.com/watch?v=yzgcNcqiRtE%3Ffeature%3Doembed
Добавление NFT из расширения браузера
Хотя вы не можете просматривать NFT в расширении браузера, поскольку нет пользовательского интерфейса, вы все равно можете добавить его в качестве пользовательского токена.
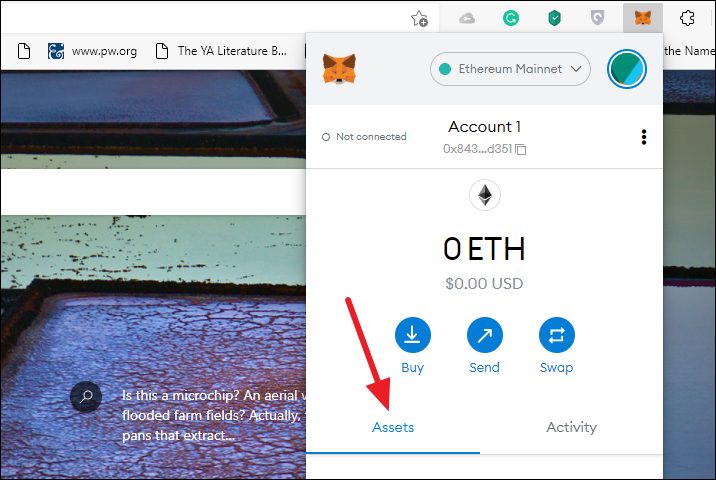
Щелкните значок расширения в браузере, чтобы развернуть меню расширений. Вы увидите, что, в отличие от мобильного кошелька, здесь нет вкладки для NFT. Единственными вариантами являются «Активы» и «Активность». Мы останемся на вкладке активов.
Нажмите «Импортировать токены» в нижней части экрана.
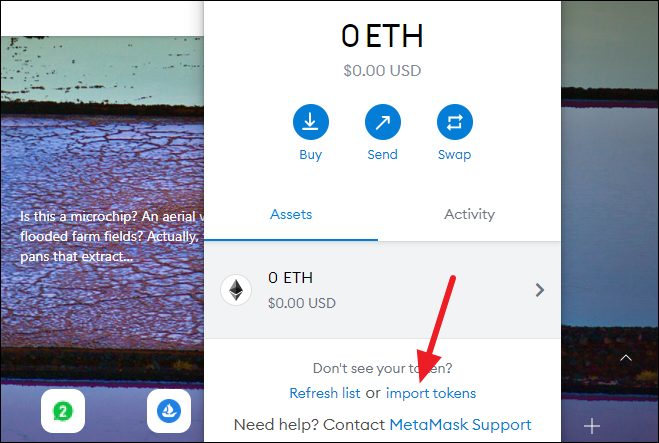
Затем переключитесь на опцию «Пользовательский токен».
В OpenSea перейдите в раздел «Подробности» NFT и щелкните гиперссылку рядом с «Контракт».
Ссылка приведет вас к Etherscan. Скопируйте адрес смарт-контракта NFT из Etherscan.
Затем вставьте его в текстовое поле «Адрес контракта токена» в расширении.
Как только вы введете адрес контракта, MetaMask выберет «Символ токена» и заполнит поле самостоятельно.
Единственная оставшаяся опция — «Token Decimal». При добавлении NFT добавьте «0» (ноль) в это поле. Затем нажмите кнопку «Добавить пользовательский токен» или «Далее».
Вы сможете увидеть, как ваш токен NFT будет добавлен в кошелек. Если вас это устраивает, нажмите кнопку «Импорт».
Но если у вас есть хоть малейшие сомнения, лучше использовать мобильное приложение для добавления NFT.
Как добавить другую сеть в Метамаск
Все сети добавляются по одному алгоритму:
Для добавления сети нужны следующие данные:
«Имя сети» – то как сеть будет называться в вашем кошельке;
«Новый URL RPC» – адрес блокчейна, у некоторых блокчейнов может быть несколько.
«Идентификатор цепочки» – цифры, разные у всех блокчейнов;
«Символ валюты» – обозначение основного токена сети;
«URL-адрес проводника блока» — адрес сайта для обзора транзакций и кошельков в сети.
После заполнения и сохранения, добавленная сеть появиться в выпадающем списке.
Если по каким-либо причинам вы не пользуетесь сетью, ее можно удалить. Для этого нажимаем на активную сеть на верхней панели.
Если вы хотите удалить именно активную сеть – сначала нужно переключиться на любую другую.
Теперь нажимаем на новую активную сеть. Далее наводим курсор на сеть, которую хотим удалить – справа появится крестик, нажимаем на него.
To begin, you will need to open a Metamask account. You will need the Metamask browser extension to make the purchase, and the Play Store Metamask App to see your NFTs in your wallet (optional).
Install the extension to your browser.
You should now see your wallet as shown in the screenshot above.
You will now need to connect Metamask to the Binance Smart Chain network.
Click on the colorful circle in the top-right corner to open a menu and click on Settings.
Next, scroll down and click on Networks.
Then, click on “Add Network”.
Click on Add Network.
The new tab
Network Name: Binance Smart Chain
Currency Symbol (optional): BNB
Adding the information.
Switching between networks
Congratulations, you have successfully added the BSC network to your Metamask! You can switch between networks by clicking on the dropdown menu as shown in the image above.
You will now need to fund the Metamask account using any method you prefer (from an exchange or another wallet) .
NOTE: If purchasing land with USDT or USDC, make sure to have at least a minimal amount of BNB in your Metamask to cover the BEP20 transaction fees!
Находясь на главной странице, нажимаем в верхней части Сеть Ethereum Mainnet.
В небольшом открывшемся окне нажимаем Добавить сеть.
Далее откроется форма для заполнения параметров сети.
Заполнить все поля необходимо следующим образом:
После этого нажимаем Сохранить.
Готово. Сеть BSC добавлена в метамаск.
Список сетей для Метамаска
Binance Smart Chain или BSC;
Источник здесь, пошаговая инструкция здесь, купить BNB здесь.
Инструкция по добавлению здесь, купить MATIC здесь.
Подробная инструкция здесь, купить AVAX здесь.
Обзор проекта и пошаговая инструкция здесь.
Купить ETH в сети Arbitrum здесь.
BitTorrent Chain Mainnet
Проверить источник здесь.
Адрес сети Cronos testnet здесь.
Альтернативные адреса – здесь, купить ONE здесь.
Страница на официальном сайте проекта – здесь, купить FTM здесь.
Velas EVM Mainnet
IoTeX Network Mainnet
Проверить актуальность здесь
XinFin Network Mainnet
Huobi ECO Chain
Energy Web Chain