
- Connect to the Ethereum network
- Create your app (and API key)
- Create an Ethereum account (address)
- Check your Balance
- Download Hardhat
- Create Hardhat project
- Add project folders
- Write our contract
- Connect Metamask & Alchemy to your project
- Install Ethers
- Update hardhat. config
- Compile our contract
- Write our deploy script
- Deploy our contract
- #What are we going to build?
- #A note about my environment
- shell. nix
- devbin (Development Binaries)
- devlog
- envrc
- vscode
- Our ERC721 Contract
- Tests for the OpenZeppelinNft Contract
- Create test/OpenZeppelinNft. test
- Start ganache-cli
- First run of the tests
- What is a Non- Fungible Token?
- Defining the ERC-721 Standard
- Creating an ERC721 Contract with Open Zeppelin
- Prerequisites
- Setting up our local development environment
- Writing the Smart Contract
- Reserve NFTs function
- Setting Base Token URI
- Mint NFTs function
- Mint Single NFT function
- Getting all tokens owned by a particular account
- Withdraw balance function
- Deploying the contract locally
- Deploying the contract to Rinkeby
- Verifying our contract on Etherscan
- ERC721 Contract
- Explanation
- Step 1:
- Step 2:
- Step 3:
- Brownie deploy
- Helpful_scripts
- # Prerequisites
- # Preparation
- # Get an API key for NFT. storage
- # Set up your workspace
- # Minting your NFT
- # Storing asset data with NFT. Storage
- # Creating your NFT on Polygon
- # Create the smart contract for minting
- # Deploy the smart contract to Polygon
- # Minting the NFT on Polygon
- Types of Upgradeable Smart Contracts
- Transparent
- UUPS
- Upgradeable Contract Deployment
- Development Environment Setup
- Other Setup
- Upload NFT Metadata
- Create Smart Contract
- Mint NFT
- Verify Contract
Connect to the Ethereum network
There a bunch of ways to make requests to the Ethereum blockchain, but to make things easiest, we’ll use a free account on Alchemy, a blockchain developer platform and API that allows us to communicate with the Ethereum chain without having to run our own nodes.
In this tutorial, we’ll also take advantage of Alchemy’s developer tools for monitoring and analytics to understand what’s going on under the hood in our smart contract deployment. If you don’t already have an Alchemy account, you can sign up for free here.
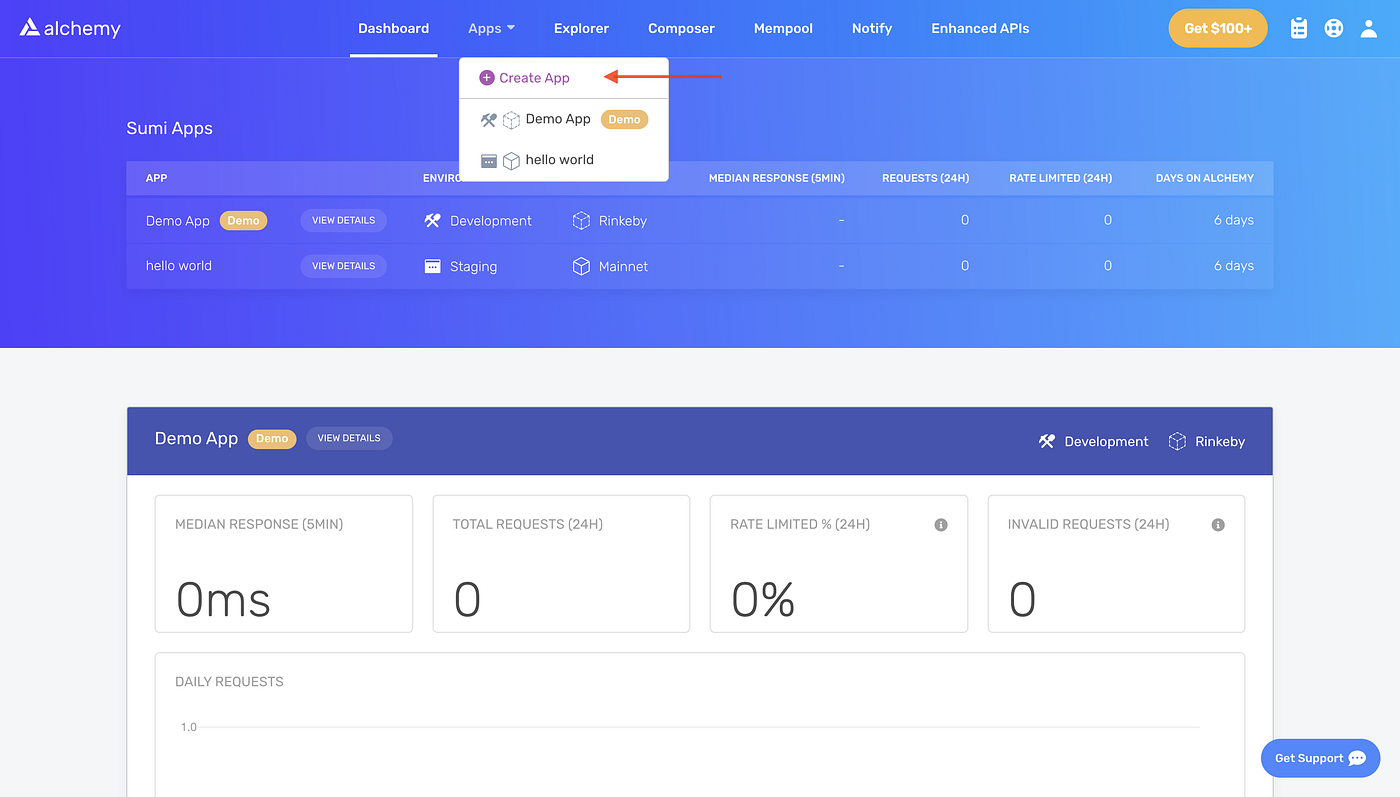
Create your app (and API key)
Once you’ve created an Alchemy account, you can generate an API key by creating an app. This will allow us to make requests to the Ropsten test network. Check out this guide if you’re curious to learn more about test networks.
- Navigate to the “Create App” page in your Alchemy Dashboard by hovering over “Apps” in the nav bar and clicking “Create App”
2. Name your app (we chose “My First NFT!”), offer a short description, select “Staging” for the Environment (used for your app bookkeeping), and choose “Ropsten” for your network.
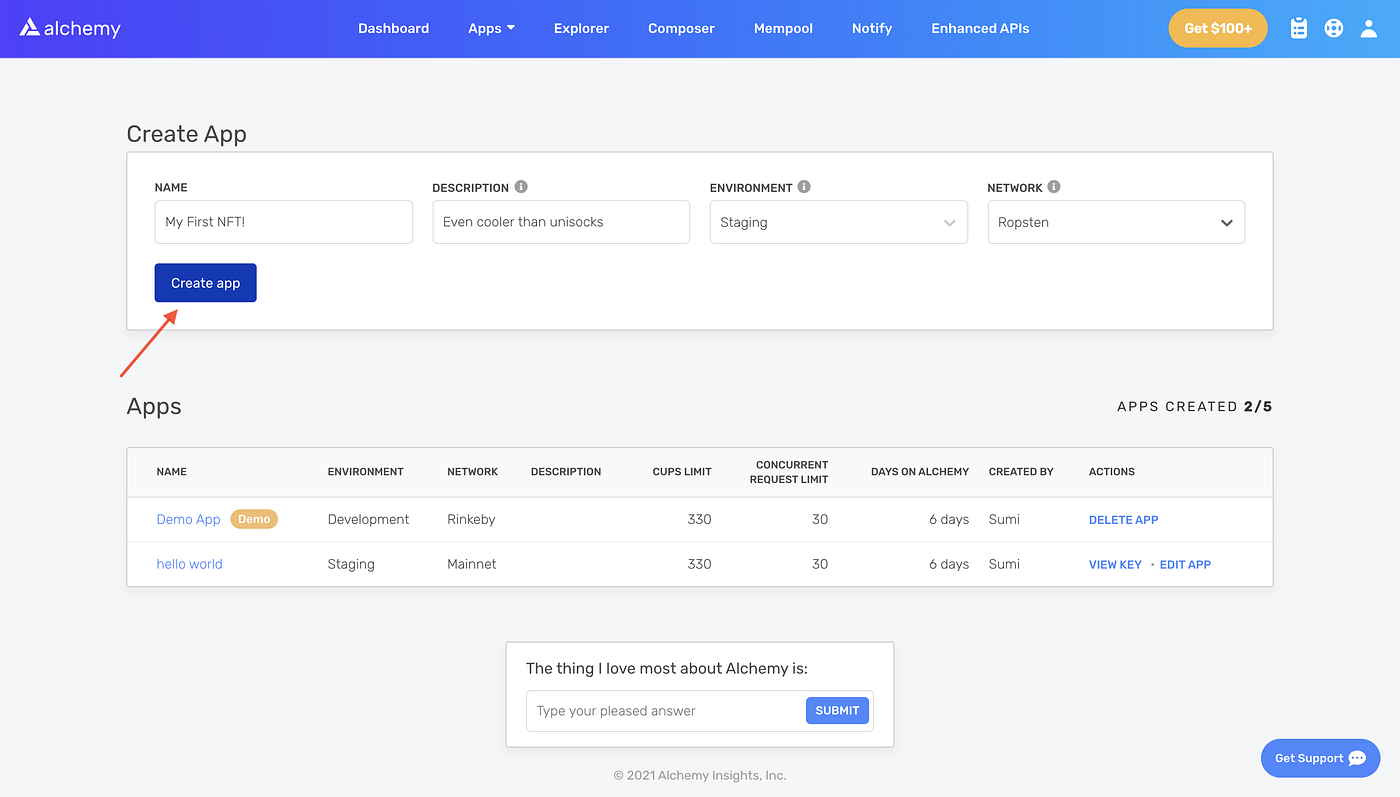
3. Click “Create app” and that’s it! Your app should appear in the table below.
Create an Ethereum account (address)
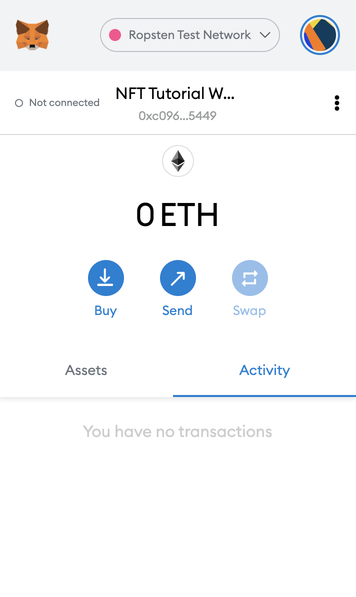
We need an Ethereum account to send and receive transactions. For this tutorial, we’ll use Metamask, a virtual wallet in the browser used to manage your Ethereum account address. If you want to understand more about how transactions on Ethereum work, check out this page from the Ethereum foundation.
You can download and create a Metamask account for free here. When you are creating an account, or if you already have an account, make sure to switch over to the “Ropsten Test Network” in the upper right (so that we’re not dealing with real money).
Step 4: Add ether from a Faucet
In order to deploy our smart contract to the test network, we’ll need some fake Eth. To get Eth you can go to the Ropsten faucet and enter your Ropsten account address, then click “Send Ropsten Eth.” You should see Eth in your Metamask account soon after!
Check your Balance
To double check our balance is there, let’s make an eth_getBalance request using Alchemy’s composer tool. This will return the amount of Eth in our wallet. After you input your Metamask account address and click “Send Request”, you should see a response like this:
NOTE: This result is in wei not eth. Wei is used as the smallest denomination of ether. The conversion from wei to eth is: 1 eth = 1⁰¹⁸ wei. So if we convert 0xde0b6b3a7640000 to decimal we get 1*1⁰¹⁸ which equals 1 eth.
Phew! Our fake money is all there🤑 .
Download Hardhat
Hardhat is a development environment to compile, deploy, test, and debug your Ethereum software. It helps developers when building smart contracts and dApps locally before deploying to the live chain.
Inside our my-nft project run:
npm install --save-dev hardhatCheck out this page for more details on installation instructions.
Create Hardhat project
Inside our project folder run:
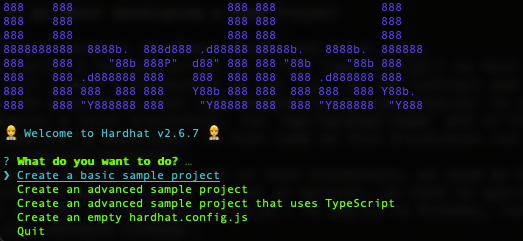
You should then see a welcome message and option to select what you want to do. Select “create an empty hardhat.config.js”:
This will generate a hardhat.config.js file for us which is where we’ll specify all of the set up for our project (on step 13).
Add project folders
To keep our project organized, we’ll create two new folders. Navigate to the root directory of your project in your command line and type:
mkdir contractsmkdir scriptscontracts/is where we’ll keep our NFT smart contract codescripts/is where we’ll keep scripts to deploy and interact with our smart contract
Write our contract
Now time that our environment is set up, onto more exciting stuff: writing our smart contract code!
Open up the my-nft project in your favorite editor (we like VSCode). Smart contracts are written in a language called Solidity which is what we will use to write our MyNFT.sol smart contract.
- Navigate to the “contracts” folder and create a new file called MyNFT.sol
- Below is our NFT smart contract code, which based off of the OpenZepplin library’s ERC721 implementation. Copy and paste the contents below into your MyNFT.sol file.
uint256 newItemId = _tokenIds.current(); _mint(recipient, newItemId); _setTokenURI(newItemId, tokenURI);return newItemId; }}
3. Because we are inheriting classes from the OpenZepplin contracts library, in your command line run npm install @openzeppelin/contracts@3.1.0-solc-0.7to install the library into our folder.
So, what does this code do exactly? Let’s break it down, line by line.
At the top of our smart contract, we import three OpenZepplin smart contract classes:
@openzeppelin/contracts/token/ERC721/ERC721.solcontains the implementation of the ERC721 standard, which our NFT smart contract will inherit. (To be a valid NFT, your smart contract must implement all the methods of the ERC721 standard.) To learn more about the inherited ERC721 functions, check out the interface definition here.@openzeppelin/contracts/utils/Counters.solprovides counters that can only be incremented or decremented by one. Our smart contract uses a counter to keep track of the total number of NFTs minted and set the unique ID our new NFT. (Each NFT minted using a smart contract must be assigned a unique ID—here our unique ID is just determined by the total number of NFTs in existance. For example, the first NFT we mint with our smart contract has an ID of «1,» our second NFT has an ID of «2,» etc.)@openzeppelin/contracts/access/Ownable.solsets up access control on our smart contract, so only the owner of the smart contract (you) can mint NFTs. (Note, including access control is entirely a preference. If you’d like anyone to be able to mint an NFT using your smart contract, remove the wordOwnableon line 10 andonlyOwneron line 17.)
After our import statements, we have our custom NFT smart contract, which is surprisingly short — it only contains a counter, a constructor, and single function! This is thanks to our inherited OpenZepplin contracts, which implement most of the methods we need to create an NFT, such as ownerOf which returns the owner of the NFT, and transferFrom,which transfers ownership of the NFT from one account to another.
In our ERC721 constructor, you’ll notice we pass 2 strings, “MyNFT” and “NFT.” The first variable is the smart contract’s name, and the second is its symbol. You can name each of these variables whatever you wish!
Finally, we have our function mintNFT(address recipient, string memory tokenURI) that allows us to mint an NFT! You’ll notice it this function takes in two variables:
address recipientspecifies the address that will receive your freshly minted NFTstring memory tokenURIis a string that should resolve to a JSON document that describes the NFT’s metadata. An NFT’s metadata is really what brings it to life, allowing it to have configurable properties, such as a name, description, image, and other attributes. In part 2 of this tutorial, we will describe how to configure this metadata.
mintNFT calls some methods from the inherited ERC721 library, and ultimately returns a number that represents the ID of the freshly minted NFT.
Connect Metamask & Alchemy to your project
Now that we’ve created a Metamask wallet, Alchemy account, and written our smart contract, it’s time to connect the three.
Every transaction sent from your virtual wallet requires a signature using your unique private key. To provide our program with this permission, we can safely store our private key (and Alchemy API key) in an environment file.
To learn more about sending transactions, check out this tutorial on sending transactions using web3.
First, install the dotenv package in your project directory:
npm install dotenv --saveThen, create a .env file in the root directory of our project, and add your Metamask private key and HTTP Alchemy API URL to it.
- Follow these instructions to export your private key from Metamask
- See below to get HTTP Alchemy API URL and copy it to your clipboard

Your .env should now look like this:
To actually connect these to our code, we’ll reference these variables in our hardhat.config.js file on step 13.
Install Ethers
Ethers.js is a library that makes it easier to interact and make requests to Ethreum by wrapping standard JSON-RPC methods with more user friendly methods.
Hardhat makes it super easy to integrate Plugins for additional tooling and extended functionality. We’ll be taking advantage of the Ethers plugin for contract deployment (Ethers.js has some super clean contract deployment methods).
In your project directory type:
We’ll also require ethers in our hardhat.config.js in the next step.
Update hardhat. config
We’ve added several dependencies and plugins so far, now we need to update hardhat.config.js so that our project knows about all of them.
Update your hardhat.config.js to look like this:
Compile our contract
To make sure everything is working so far, let’s compile our contract. The compile task is one of the built-in hardhat tasks.
From the command line run:
npx hardhat compileYou might get a warning about SPDX license identifier not provided in source file , but no need to worry about that — hopefully everything else looks good! If not, you can always message in the Alchemy discord.
Write our deploy script
Now that our contract is written and our configuration file is good to go, it’s time to write our contract deploy script.
Navigate to the scripts/ folder and create a new file called deploy.js , adding the following contents to it:
Hardhat does an amazing job of explaining what each of these lines of code does in their Contracts tutorial, we’ve adopted their explanations here.
const MyNFT = await ethers.getContractFactory("MyNFT");A ContractFactory in ethers.js is an abstraction used to deploy new smart contracts, so MyNFT here is a factory for instances of our NFT contract. When using the hardhat-ethers plugin ContractFactory and Contract instances are connected to the first signer by default.
const myNFT = await MyNFT.deploy();Calling deploy() on a ContractFactory will start the deployment, and return a Promise that resolves to a Contract. This is the object that has a method for each of our smart contract functions.
Deploy our contract
We’re finally ready to deploy our smart contract! Navigate back to the root of your project directory, and in the command line run:
npx hardhat run scripts/deploy.js --network ropstenYou should then see something like:
Contract deployed to address: 0x81c587EB0fE773404c42c1d2666b5f557C470eEDIf we go to the Ropsten etherscan and search for our contract address we should able to see that it has been deployed successfully. The transaction will look something like this:
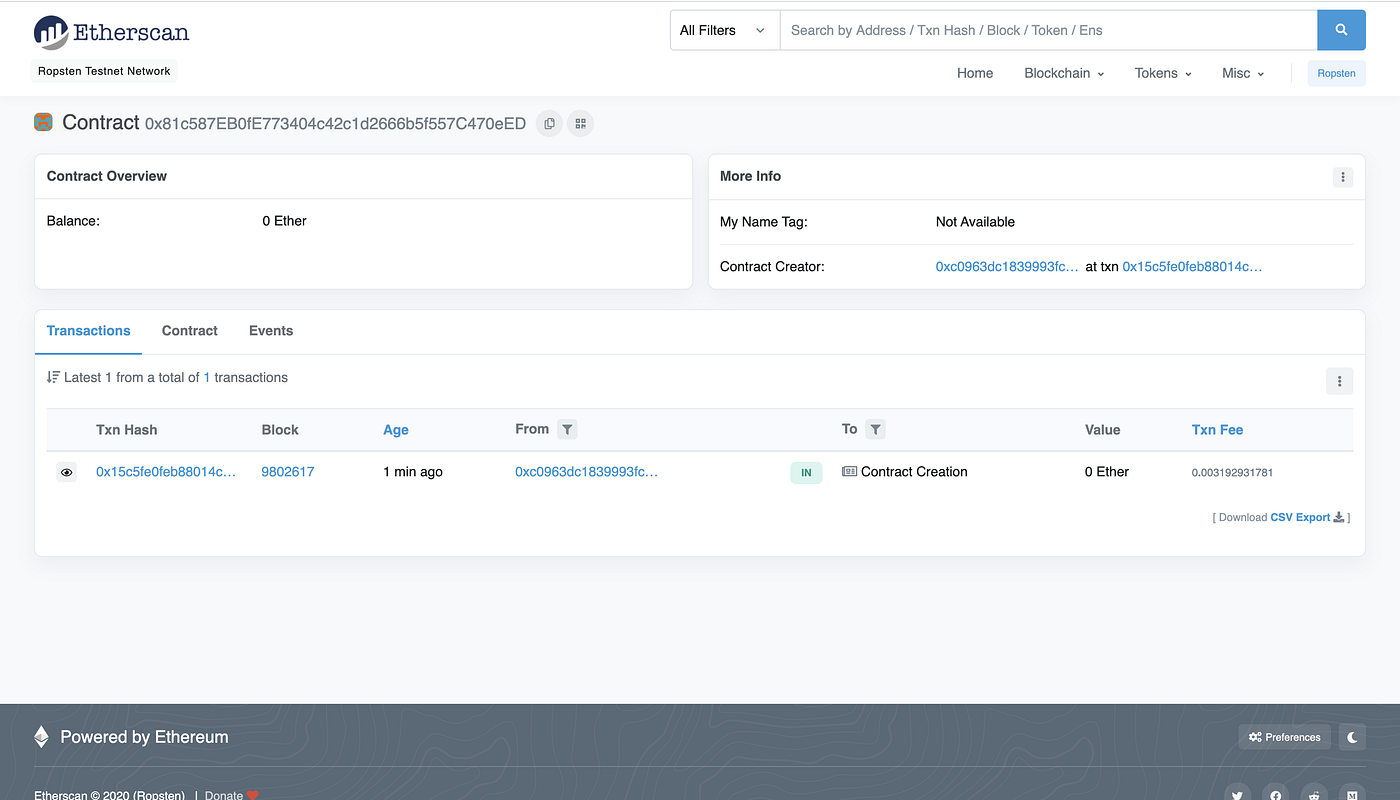
The From address should match your Metamask account address and the To address will say “Contract Creation.” If we click into the transaction, we’ll see our contract address in the To field:
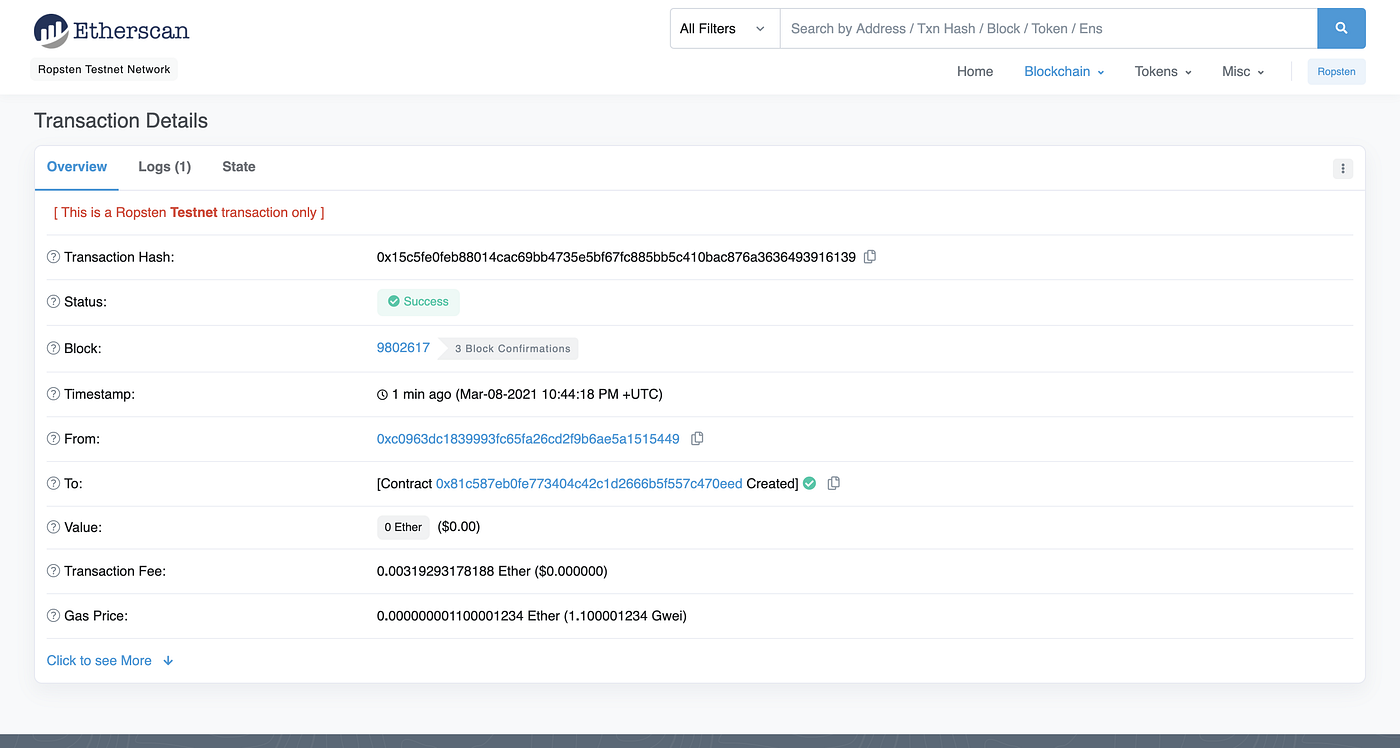
Yasssss! You just deployed your NFT smart contract to the Ethereum chain 🎉
To understand what’s going on under the hood, let’s navigate to the Explorer tab in our Alchemy dashboard . If you have multiple Alchemy apps make sure to filter by app and select “MyNFT”.
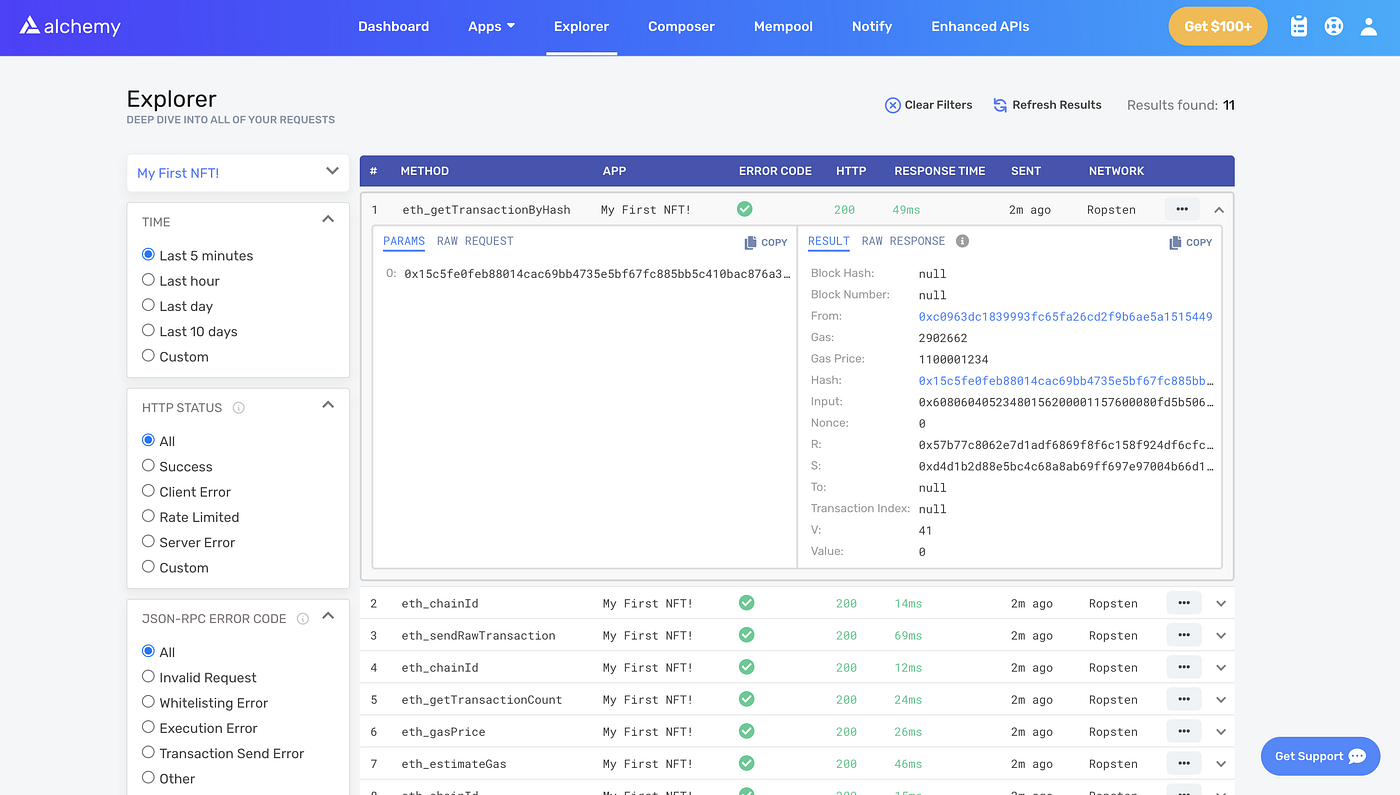
Here you’ll see a handful of JSON-RPC calls that Hardhat/Ethers made under the hood for us when we called the .deploy() function. Two important ones to call out here are eth_sendRawTransaction, which is the request to actually write our smart contract onto the Ropsten chain, and eth_getTransactionByHash which is a request to read information about our transaction given the hash (a typical pattern when sending transactions). To learn more about sending transactions, check out this tutorial on sending transactions using Web3.
That’s all for Part I of this tutorial. In Part II, we’ll actually interact with our smart contract by minting an NFT, and in Part III we’ll show you how to view your NFT in your Ethereum wallet!
Alchemy provides the leading blockchain development platform powering millions of users for 99% of countries worldwide and the biggest players in the NFT space, including OpenSea, Nifty Gateway, Makersplace, Dapper Labs, Zora, NFTfi, Super Rare, Foundation, Enjin, Origin Protocol, Immutable, and more. Our mission is to provide developers with the fundamental building blocks they need to create the future of technology, and lower the barrier to entry for developers to build blockchain applications. Alchemy currently powers 70% of the top Ethereum applications and over $15 billion in on-chain transactions, and have been featured on TechCrunch, Wired, Bloomberg and numerous other media outlets. The Alchemy team draws from decades of deep expertise in massively scalable infrastructure, AI, and blockchain from leadership roles at technology pioneers like Google, Microsoft, Facebook, Stanford, and MIT.
Never want to miss an update? Subscribe to our newsletter here! Be sure to also follow our Twitter and join our Discord.
#What are we going to build?
In this article we’ll concentrate on building a fully tested NFT contract using OpenZeppelin. It’ll be quite easy because OpenZeppelin has already written all of the code and tests for the contract, so we’ll simply use that code and those tests. We’ll take some time to explore some of the OpenZeppelin code along the way.
#A note about my environment
You’ll find several files in the top level directory of the github repositiory that are part of my development environment. I describe them here for completeness.
shell. nix
I use nix to manage the packages on my development computer. This nix expression makes node version 16 available to the project.
{ pkgs ? import <nixpkgs> {} }: pkgs.mkShell { nativeBuildInputs = [ pkgs.nodejs-16_x ];
}
devbin (Development Binaries)
There are a series of shell scripts in this directory that are added to my path when I cd into the directory. They’re there to help me rember how to do specific commands that I need to do. There is also a help script that prints out a simple description of what each script in devbin does.
devlog
Any log files that I may want review go here. For this project, this is mainly the ganache-cli log.
envrc
I use direnv to set up the specific environment necessary to work on this project when I cd into it.
use_nix ①
PATH_add devbin ②
export NFTCAR_DIR=$PWD ③use-nixis adirenvdirective that tellsdirenvto invoke theshell.nixexpression.- This adds the
devbinpath to my path. - This adds a new environment variable to my shell.
vscode
I use vscode as my IDE. The .vscode directory contains all of the configuration files for the IDE.
Our ERC721 Contract
OpenTruffle has done most of the work that needs to be done for our contract, and we’re going to use that great work to our advantage. In the node_modules folder of your project you’ll find several ethereum contracts. The one we’re looking for is:
node_modules@openzeppelincontractstokenERC721presets
It’s well worth studying this contract and all of the contracts imported by it.
Our simple contract imports the ERC721PresetMinterPauserAutoId contract and has enough boilerplate to make it work. 100% of our ERC721 contract is provided the OpenZeppelin preset.
contracts/OpenZeppelinNft.sol
// SPDX-License-Identifier: MIT ①
pragma solidity ^0.8.0; ②
import "@openzeppelin/contracts/token/ERC721/presets/ERC721PresetMinterPauserAutoId.sol"; ③
contract OpenZeppelinNft is ERC721PresetMinterPauserAutoId { ④ constructor(string memory name, string memory symbol, string memory baseTokenURI) ⑤ ERC721PresetMinterPauserAutoId(name, symbol, baseTokenURI) ⑥ { }
}
note: don’t forget to remove the circled numbers (①, etc) or your contract won’t compile.
- The Software Package Data Exchange (SPDX) license identifier for this file. The MIT License.
- The
pragma soliditytells the build system which version of the compiler to use. Read the doc for detailed information. - We’re importing the ERC721PresetMinterPauserAutoId solidity file we just mentioned. This is the basis of our contract.
- Our contract is named
OpenZeppelinNft. Its single parent (inheritance) contract is ERC721PresetMinterPauserAutoId. - The
OpenZeppelinNftcontract has aconstructorthat takes the same arguments as its parent contract. - The
OpenZeppelinNftsimply passes the arguments to its parent.
Tests for the OpenZeppelinNft Contract
In the previous section we wrote a fully functional ERC721 contract by extending a Preset. The OpenZeppelin team has already written tests for this contract and all of its consituant pieces. Using the table below, you can review some of the components of the contract and their matching tests. After that, we’ll build a test of our own based on one of the existant tests.
Create test/OpenZeppelinNft. test
The first first thing we’re going to do is make a slightly modified version of the source of the ERC721PersetMinterPauserAutioId.test.js file from github, and use it as the basis of our new OpenZeppelinNft.test.js file.
curl https://raw.githubusercontent.com/OpenZeppelin/openzeppelin-contracts/release-v4.2/test/token/ERC721/presets/ERC721PresetMinterPauserAutoId.test.js \ | sed '/SupportInterfaces/d' \ | sed 's/ERC721PresetMinterPauserAutoId\([^:]\)/OpenZeppelinNft\1/g' \ > test/OpenZeppelinNft.test.jsThere are a couple of things to notice about this:
- We’re taking a copy of the test file from a specific truffle release, so it should not vary over time.
- We’re stripping out any lines containing
SupportedInterfaces. Those lines are not usefull for our purposes and would make this process more complicated. - We’re changing some (but not all) instances of the string
ERC721PresetMinterPauserAutoIdto our contract name,OpenZeppelinNft.
If everything works correctly, the file should look like this.
Start ganache-cli
We use ganache-cli as our local ethereum test network. We’ve already configured it in truffle-config.js, so now it’s time to start it.
I like to be able to review ganache-cli logs, so I write them to a file in the devlogs folder.
mkdir devlogs
npx ganache-cli --deterministic 2>&1 > devlogs/ganache-cli.log &
First run of the tests
We can actually run our tests now, and if everything works well the solidity contracts will compile and the tests will run.
 % npx truffle test # ①
② Compiling your contracts... ===========================
> Compiling ./contracts/Migrations.sol
> Compiling ./contracts/OpenZeppelinNft.sol
> Compiling @openzeppelin/contracts/access/AccessControl.sol
> Compiling @openzeppelin/contracts/access/AccessControlEnumerable.sol
> Compiling @openzeppelin/contracts/security/Pausable.sol
> Compiling @openzeppelin/contracts/token/ERC721/ERC721.sol
> Compiling @openzeppelin/contracts/token/ERC721/IERC721.sol
> Compiling @openzeppelin/contracts/token/ERC721/IERC721Receiver.sol
> Compiling @openzeppelin/contracts/token/ERC721/extensions/ERC721Burnable.sol
> Compiling @openzeppelin/contracts/token/ERC721/extensions/ERC721Enumerable.sol
> Compiling @openzeppelin/contracts/token/ERC721/extensions/ERC721Pausable.sol
> Compiling @openzeppelin/contracts/token/ERC721/extensions/IERC721Enumerable.sol
> Compiling @openzeppelin/contracts/token/ERC721/extensions/IERC721Metadata.sol
> Compiling @openzeppelin/contracts/token/ERC721/presets/ERC721PresetMinterPauserAutoId.sol
> Compiling @openzeppelin/contracts/utils/Address.sol
> Compiling @openzeppelin/contracts/utils/Context.sol
> Compiling @openzeppelin/contracts/utils/Counters.sol
> Compiling @openzeppelin/contracts/utils/Strings.sol
> Compiling @openzeppelin/contracts/utils/introspection/ERC165.sol
> Compiling @openzeppelin/contracts/utils/introspection/IERC165.sol
> Compiling @openzeppelin/contracts/utils/structs/EnumerableSet.sol
> Artifacts written to /tmp/test--65532-dHZ8ChnGRkd7
> Compiled successfully using: - solc: 0.8.6+commit.11564f7e.Emscripten.clang
③ Contract: OpenZeppelinNft ✓ token has correct name ✓ token has correct symbol (51ms) ✓ deployer has the default admin role (71ms) ✓ deployer has the minter role (56ms) ✓ minter role admin is the default admin (40ms) minting ✓ deployer can mint tokens (176ms) ✓ other accounts cannot mint tokens (334ms) pausing ✓ deployer can pause (191ms) ✓ deployer can unpause (170ms) ✓ cannot mint while paused (207ms) ✓ other accounts cannot pause (126ms) ✓ other accounts cannot unpause (138ms) burning ✓ holders can burn their tokens (235ms) 13 passing (4s)- On my machine I use
npxto run truffle. If you have truffle installed globally, you will runtruffle test. - The contracts compile first.
- Then the tests begin.
What is a Non- Fungible Token?
NFTs are one-of-a-kind digital tokens that are not interchangeable. They are immutable data units stored on the blockchain that may be connected to nearly any digital or physical asset, such as photos, movies, or real estate. They are a strong deterrent to fraud and plagiarism since they rely on digital ledgers to confirm ownership. NFTs are often purchased and traded online, along with cryptocurrencies, which keep their exclusivity by establishing digital scarcity. Reducing a specific asset’s supply often enhances demand and therefore price.
Based on their underlying technology, they are comparable to cryptocurrencies, but unlike cryptocurrencies, which are fungible, NFTs are intrinsically non-fungible. Each one has a digital signature, making it one-of-a-kind and distinct from any other token on the market. They may be considered digital valuables that operate on blockchain technology and can be transferred and traced back directly to their creator. NFTs makes it possible to monetize practically any unique artwork, film, or non-fungible asset that may be sold online for a profit.
Defining the ERC-721 Standard
The proposal identity number is 721, and ERC stands for Ethereum Request for Comment. Simply said, ERCs are the Ethereum ecosystem’s standards. If an ERC’s proposal is to become a standard, the author must acquire the Ethereum community’s confidence and acceptance. ERC-721 was designed to track and transfer non-fungible tokens (NFTs) within smart contracts. NFTs are not limited to the ERC-721 type and can be of other ERC types. This ERC is only a collection of guidelines for working with Non-Fungible Tokens.
Although it is frequently mistaken with ERC 20, the former requires basic metadata when generating a contract, such as a name or a symbol, as well as a unique id and, in most circumstances, a URI or Uniform Resource Locator. ERC 721 is distinct from other ERCs in that it is one-of-a-kind and cannot be copied owing to a unique identifier. However, due to its rarity, age, or other characteristics, each token from an analogous contract might have a unique value. The ERC-721 standard enabled non-fiduciary tokens to be easier to handle and transfer within smart contracts.
Creating an ERC721 Contract with Open Zeppelin
Creating an ERC 721 Contract with Open Zeppelin is relatively simple and we will walk you through a step-by-step process. If, however, you wish to skip the tutorial and jump right to the full project, you may refer to our GitHub repository.
In this tutorial, we will use Remix as our IDE for writing, compiling, and deploying the contract. Let’s get started:
- Create a new “helloNft.sol” file. This is where we will write our NFT contract.
2. We will now define the Solidity compiler version for our contract using pragma:
pragma solidity ^0.8.0;3. We will now import the respective Open Zeppelin libraries from their official repo, namely, Ownable and ERC721. The Ownable library, as the name suggests, offers the basic functionality for an owned contract, wherein, the owner (deployer of the contract) has some special privileges over the smart contract. The ERC721 library includes the basic definitions for a contract to be rightfully ERC-721 standard.
4. We will name our contract Hellonft and inherit the two Open Zeppelin libraries into our contract
5. We will now define the name and symbol of our contract in the ERC721 constructor as HelloNft and HFNT, respectively
6. The tokenId (unique identifier for each token) is initialized (to 0)
7. A mapping is initialized with key as address and value as tokenMetaData
8. The tokenMetaData struct is defined to keep tokenId, timestamp and tokenURI of each token in one place, so as to be connected to the ownershipRecord of addresses in a comprehensive way.
9. We will now write our mintToken function. Minting in an NFT is the process of tokenizing an asset. In our case, we will mint a sample image in the .png format. For the purpose of learning, we will include some limitations to the contract as follows:
10. We will make our mintToken function only accessible to the owner of the contract. We can achieve this by adding the modifier onlyOwner, imported from the Ownable library into our function
11. We will now make sure that the owner is not able to mint the token to himself. Therefore, using a require statement, we check that that owner address and the recipient address are not the same.
require(owner()!=recipient, “Recipient cannot be the owner of the contract”);12. We now start the minting process imported from the ERC721 contract using the _safeMint function and maintain our own ownershipRecords by pushing the tokenMetaData to the recipient. To keep matters simple, we have hardcoded the same .png file as the URI for minting any token in our contract
tokenId = tokenId + 1;13. You may now proceed to deploy the contract on the Remix VMs or any other testnets and play around. The complete contract should now look like this:
pragma solidity ^0.8.0;require(owner()!=recipient, “Recipient cannot be the owner of the contract”);tokenId = tokenId + 1;
You might notice a plethora of available mutational and querying functions available from inherited contracts. For now, they are beyond the scope of this article but we will definitely deep dive more into them in our upcoming tutorials.
14. Call in the mintToken function and you will have tokenized your very first NFT.
Congratulations, you have just built your first NFT (ERC-721) Contract with Open Zeppelin. We hope this tutorial was helpful and will aid you in your journey to become a Smart Contract developer. Happy coding!
Prerequisites
- Intermediate knowledge of JavaScript.
(In case you need a refresher, I’d suggest this YouTube tutorial) - Intermediate knowledge of Solidity and OpenZeppelin Contracts
(We will be releasing tutorials on this very soon! For the time being, we strongly recommend CryptoZombies and Buildspace) - NodeJS and npm installed on your local computer
(You can download the latest version here) - A collection of media files and NFT metadata JSON uploaded to IPFS.
(In case you don’t have this, we have created a toy collection for you to experiment with. You can find the media files here and the JSON metadata files here).
While it may be possible for readers who do not satisfy the prerequisites to follow along and even deploy a smart contract, we strongly recommend getting a developer who knows what s/he is doing if you’re serious about your project. Smart contract development and deployment can be incredibly expensive and unforgiving wrt security flaws and bugs.
Setting up our local development environment
We will be using Hardhat, an industry-standard ethereum development environment, to develop, deploy, and verify our smart contracts. Create an empty folder for our project and initialize an empty package.json file by running the following command in your Terminal:
mkdir nft-collectible && cd nft-collectible && npm init -yYou should now be inside the nft-collectible folder and have a file named package.json .
Next, let’s install Hardhat. Run the following command:
npm install --save-dev hardhatWe can now create a sample Hardhat project by running the following command and choosing Create a basic sample project.
Agree to all the defaults (project root, adding a .gitignore, and installing all sample project dependencies).
Let’s check that our sample project has been installed properly. Run the following command:
npx hardhat run scripts/sample-script.jsIf all goes well, you should see output that looks something like this:

We now have our hardhat development environment successfully configured. Let us now install the OpenZeppelin contracts package. This will give us access to the ERC721 contracts (the standard for NFTs) as well as a few helper libraries that we will encounter later.
If we want to share our project’s code publicly (on a website like GitHub), we wouldn’t want to share sensitive information like our private key, our Etherscan API key, or our Alchemy URL (don’t worry if some of these words don’t make sense to you yet). Therefore, let us install another library called dotenv.
npm install dotenvCongratulations! We are now in a good place to start developing our smart contract.
Writing the Smart Contract
In this section, we are going to write a smart contract in Solidity that allows anyone to mint a certain number of NFTs by paying the required amount of ether + gas.
In the contracts folder of your project, create a new file called NFTCollectible.sol.
We will be using Solidity v8.0. Our contract will inherit from OpenZeppelin’s ERC721Enumerable and Ownable contracts. The former has a default implementation of the ERC721 (NFT) standard in addition to a few helper functions that are useful when dealing with NFT collections. The latter allows us to add administrative privileges to certain aspects of our contract.
In addition to the above, we will also use OpenZeppelin’s SafeMath and Counters libraries to safely deal with unsigned integer arithmetic (by preventing overflows) and token IDs respectively.
This is what the skeleton of our contract looks like:
//SPDX-License-Identifier: MITpragma solidity ^0.8.0;Reserve NFTs function
As the creator of the project, you probably want to reserve a few NFTs of the collection for yourself, your team, and for events like giveaways.
Let’s write a function that allows us to mint a certain number of NFTs (in this case, ten) for free. Since anyone calling this function only has to pay gas, we will obviously mark it as onlyOwner so that only the owner of the contract will be able to call it.
require( totalMinted.add(10) < MAX_SUPPLY, "Not enough NFTs" );We check the total number of NFTs minted so far by calling tokenIds.current(). We then check if there are enough NFTs left in the collection for us to reserve. If yes, we proceed to mint 10 NFTs by calling _mintSingleNFT ten times.
It is in the _mintSingleNFT function that the real magic happens. We will look into this a little later.
Setting Base Token URI
Our NFT JSON metadata is available at this IPFS URL: ipfs://QmZbWNKJPAjxXuNFSEaksCJVd1M6DaKQViJBYPK2BdpDEP/
When we set this as the base URI, OpenZeppelin’s implementation automatically deduces the URI for each token. It assumes that token 1’s metadata will be available at ipfs://QmZbWNKJPAjxXuNFSEaksCJVd1M6DaKQViJBYPK2BdpDEP/1, token 2’s metadata will be available at ipfs://QmZbWNKJPAjxXuNFSEaksCJVd1M6DaKQViJBYPK2BdpDEP/2 , and so on.
(Please note that there is no .json extension to these files)
However, we need to tell our contract that the baseTokenURI variable that we defined is the base URI that the contract must use. To do this, we override an empty function called _baseURI() and make it return baseTokenURI.
We also write an only owner function that allows us to change the baseTokenURI even after the contract has been deployed.
Mint NFTs function
Let us now turn our attention to the main mint NFTs function. Our users and customers will call this function when they want to purchase and mint NFTs from our collection.
Since they’re sending ether to this function, we have to mark it as payable.
We need to make three checks before we allow the mint to take place:
- There are enough NFTs left in the collection for the caller to mint the requested amount.
- The caller has requested to mint more than 0 and less than the maximum number of NFTs allowed per transaction.
- The caller has sent enough ether to mint the requested number of NFTs.
require( totalMinted.add(_count) <= MAX_SUPPLY, "Not enough NFTs!" );require( _count > 0 && _count <= MAX_PER_MINT, "Cannot mint specified number of NFTs." );require( msg.value >= PRICE.mul(_count), "Not enough ether to purchase NFTs." );
Mint Single NFT function
Let’s finally take a look at the private _mintSingleNFT() function that’s being called whenever we (or a third party) want to mint an NFT.
This is what is happening:
- We get the current ID that hasn’t been minted yet.
- We use the
_safeMint()function already defined by OpenZeppelin to assign the NFT ID to the account that called the function. - We increment the token IDs counter by 1.
The token ID is 0 before any mint has taken place.
When this function is called for the first time, newTokenID is 0. Calling safeMint() assigns NFT with ID 0 to the person who called the contract function. The counter is then incremented to 1.
The next time this function is called, _newTokenID has value 1. Calling safeMint() assigns NFT with ID 1 to the person who… I think you get the gist.
Note that we don’t need to explicitly set the metadata for each NFT. Setting the base URI ensures that each NFT gets the correct metadata (stored in IPFS) assigned automatically.
Getting all tokens owned by a particular account
If you plan on giving any sort of utility to your NFT holders, you would want to know which NFTs from your collection each user holds.
Let’s write a simple function that returns all IDs owned by a particular holder. This is made super simple by ERC721Enumerable ‘s balanceOf and tokenOfOwnerByIndex functions. The former tells us how many tokens a particular owner holds, and the latter can be used to get all the IDs that an owner owns.
Withdraw balance function
All the effort we’ve put in so far would go to waste if we are not able to withdraw the ether that has been sent to the contract.
Let us write a function that allows us to withdraw the contract’s entire balance. This will obviously be marked as onlyOwner.
Deploying the contract locally
Let us now make preparations to deploy our contract to the Rinkeby test network by simulating it in a local environment.
In the scripts folder, create a new file called run.js and add the following code:
This is some Javascript code that utilizes the ethers.js library to deploy our contract, and then call functions of the contract once it has been deployed.
Here is the series of what’s going on:
- We get the address of the deployer/owner (us)
- We get the contract that we want to deploy.
- We send a request for the contract to be deployed and wait for a miner to pick this request and add it to the blockchain.
- Once mined, we get the contract address.
- We then call public functions of our contract. We reserve 10 NFTs, mint 3 NFTs by sending 0.03 ETH to the contract, and check the NFTs owned by us. Note that the first two calls require gas (because they’re writing to the blockchain) whereas the third simply reads from the blockchain.
Let’s give this a run locally.
npx hardhat run scripts/run.jsIf all goes well, you should see something like this:

Deploying the contract to Rinkeby
To deploy our contract to Rinkeby, we will need to set up a few things.
First, we will need an RPC URL that will allow us to broadcast our contract creation transaction. We will use Alchemy for this. Create an Alchemy account here and then proceed to create a free app.
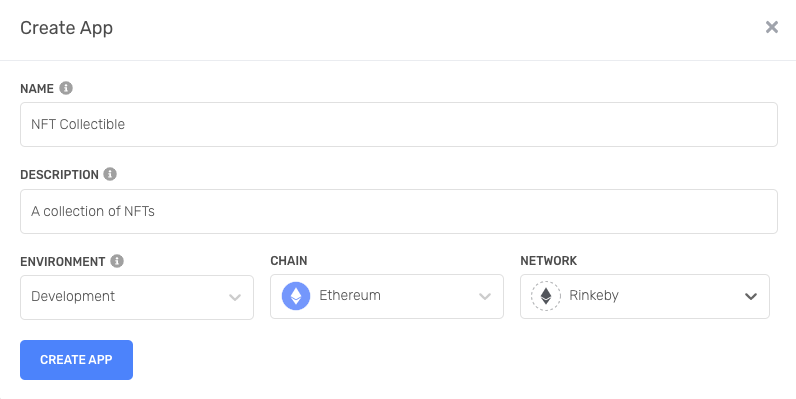
Make sure that the network is set to Rinkeby.
Once you’ve created an app, go to your Alchemy dashboard and select your app. This will open a new window with a View Key button on the top right. Click on that and select the HTTP URL.
Acquire some fake Rinkeby ETH from the faucet here. For our use case, 0.5 ETH should be more than enough. Once you’ve acquired this ETH, open your Metamask extension and get the private key for the wallet containing the fake ETH (you can do this by going into Account Details in the 3-dots menu near the top-right).
Do not share your URL and private key publicly.
We will use the dotenv library to store the aforementioned variables as environment variables and will not commit them to our repository.
Create a new file called .env and store your URL and private key in the following format:
API_URL = "<--YOUR ALCHEMY URL HERE-->"PRIVATE_KEY = "<--YOUR PRIVATE KEY HERE-->"Now, replace your hardhat.config.js file with the following contents.
We’re almost there! Run the following command:
npx hardhat run scripts/run.js --network rinkebyThis should give you output very similar to what you got earlier, except that this has been deployed to the real blockchain.
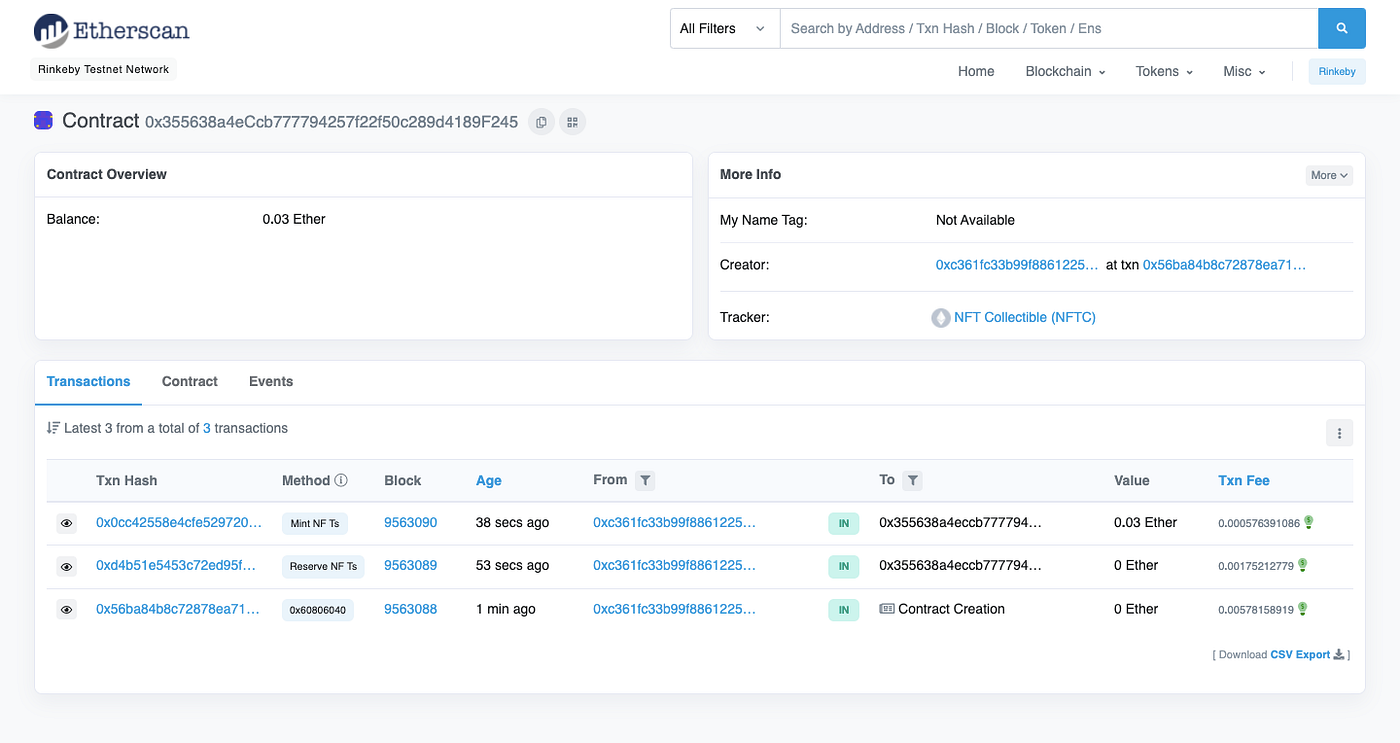
Make a note of the contract address. Ours was 0x355638a4eCcb777794257f22f50c289d4189F245.
You can check this contract out on Etherscan. Go to Etherscan and type in the contract address. You should see something like this.
Verifying our contract on Etherscan
We have come a LONG way in this article but there is one final thing we’d like to do before we go.
Let’s verify our contract on etherscan. This will allow your users to see your contract’s code and ensure that there is no funny business going on. More importantly, verifying your code will allow your users to connect their Metamask wallet to etherscan and mint your NFTs from etherscan itself!
Before we can do this, we will need an Etherscan API key. Sign up for a free account here and access your API keys here.
Let’s add this API key to our .env file.
ETHERSCAN_API = "<--YOUR ETHERSCAN API KEY-->"Hardhat makes it really simple to verify our contract on Etherscan. Let’s install the following package:
Next, make adjustments to hardhat.config.js so it looks like this:
Now, run the following two commands:
npx hardhat cleannpx hardhat verify --network rinkeby DEPLOYED_CONTRACT_ADDRESS "BASE_TOKEN_URI"
In our case, the second command looked like this:
npx hardhat verify --network rinkeby 0x355638a4eCcb777794257f22f50c289d4189F245 "ipfs://QmZbWNKJPAjxXuNFSEaksCJVd1M6DaKQViJBYPK2BdpDEP/"
Now, if you visit your contract’s Rinkeby Etherscan page, you should see a small green tick next to the Contract tab. More importantly, your users will now be able to connect to web3 using Metamask and call your contract’s functions from Etherscan itself!
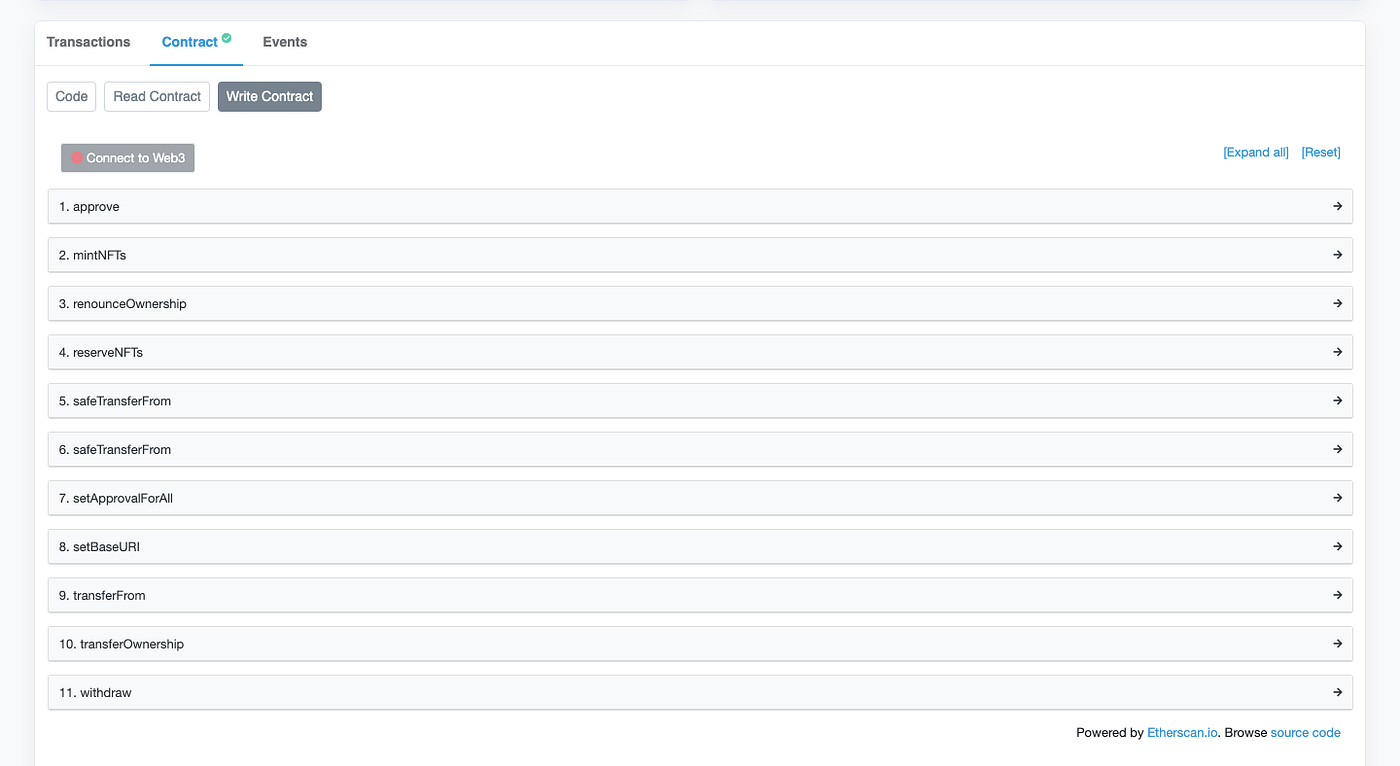
Try this out yourself.
Connect the account that you used to deploy the contract and call the withdraw function from etherscan. You should be able to transfer the 0.03 ETH in the contract to your wallet. Also, ask one of your friends to connect their wallet and mint a few NFTs by calling the mintNFTs function.
ERC721 Contract
pragma solidity ^0.8.0;
import "@openzeppelin/contracts/token/ERC721/ERC721.sol";
import "@openzeppelin/contracts/token/ERC721/extensions/ERC721URIStorage.sol";
import "@openzeppelin/contracts/utils/Counters.sol";
contract MyNFT is ERC721URIStorage { using Counters for Counters.Counter; Counters.Counter private _tokenIds; constructor() ERC721("Mynft", "ABD") {} function CreateNFT(address owner, string memory tokenURI) public returns (uint256) { _tokenIds.increment(); uint256 newid = _tokenIds.current(); _mint(owner, newid); _setTokenURI(newid, tokenURI); return newid; }
}
Explanation
Step 1:
declare solidity version and import libraries
pragma solidity ^0.8.0;
import "@openzeppelin/contracts/token/ERC721/ERC721.sol";
import "@openzeppelin/contracts/token/ERC721/extensions/ERC721URIStorage.sol";
import "@openzeppelin/contracts/utils/Counters.sol";
ERC721 — Main NFT tokens contract
ERC721URIStorage — used to store the url for token Id
Counter — To increment the teoken ID safely
Generally tokenId is used with counter but you can customixe it according to your own need. for example you can use cahinlink randomness , generate random number in chainlink and use it as token id .
Step 2:
Declare contract and constructor
contract MyNFT is ERC721URIStorage { using Counters for Counters.Counter; Counters.Counter private _tokenIds; constructor() ERC721("Mynft", "ABD") {}this will be our NFT smart contract which will hold all the tokens generated in it.
Step 3:
Generate new token
function CreateNFT(address owner, string memory tokenURI) public returns (uint256) { _tokenIds.increment(); uint256 newid = _tokenIds.current(); _mint(owner, newid); _setTokenURI(newid, tokenURI); return newid; }generate nft , this function accepts 2 arguments , the address which will be the owner of this newly generate token and token url this will point to the json file which describes this token
If you don’t want to use tokenURL you can skip including the file in step 1 , also delete the _setTokenURI function called in CreateNFT, and also we don’t need to take that tokenURI argument in CreateNFT , the customized contarct will look like this
pragma solidity ^0.8.0;
import "@openzeppelin/contracts/token/ERC721/ERC721.sol";
import "@openzeppelin/contracts/utils/Counters.sol";
contract MyNFT is ERC721URIStorage { using Counters for Counters.Counter; Counters.Counter private _tokenIds; constructor() ERC721("Mynft", "ABD") {} function CreateNFT(address owner) public returns (uint256) { _tokenIds.increment(); uint256 newid = _tokenIds.current(); _mint(owner, newid); return newid; }
}
Happy NFT Building !
Brownie deploy
from brownie import SimpleCollectible
from scripts.helpful_scripts import get_account, OPENSEA_URL
SAMPLE_TOKEN_URL = «https://ipfs.io/ipfs/Qmd9MCGtdVz2miNumBHDbvj8bigSgTwnr4SbyH6DNnpWdt?filename=0-PUG.json«
def deploy_simple_collectible():
print(«Deploying SimpleCollectible DOG…»)
account = get_account()
simple_collectible = SimpleCollectible.deploy({«from»: account})
tx = simple_collectible.createCollectible(SAMPLE_TOKEN_URL, {«from»: account})
tx.wait(1)
tokenId = simple_collectible.getLastTokenId()
print(
f»You can view your NFT at {OPENSEA_URL.format(simple_collectible.address, tokenId)}»
)
print(«May need to wait up to 20 mintes, and hit the refresh button.»)
def main():
deploy_simple_collectible()
==================================
Helpful_scripts
from brownie import accounts, config, network
FORKED_LOCAL_ENVIRONMENTS = [«mainnet-fork», «mainnet-fork-dev»]
LOCAL_BLOCKCHAIN_ENVIRONENTS = [
«development»,
«geth-dev»,
«hardhat»,
«hardhat-fork»,
«ganache-local»,
]
OPENSEA_URL = «https://testnets.opensea.io/assets/{}/{}«
def get_account(index=None, id=None):
if index:
return accounts[index]
if id:
return accounts.load(id)
if (
network.show_active() in LOCAL_BLOCKCHAIN_ENVIRONENTS
or network.show_active() in FORKED_LOCAL_ENVIRONMENTS
):
return accounts[0]
return accounts.add(config[«wallets»][«from_key»])
# Prerequisites
General knowledge about NFTs will give you background and context. NFT School covers NFT basics, advanced topics and has more tutorials.
To test and run the code found in this tutorial, you will need a working Node.js installation (opens new window).
You’ll also need a Polygon wallet on the Mumbai testnet with a small amount of the MATIC token. Follow the instructions below to get started:
- Download and install Metamask(opens new window). Metamask is a crypto wallet and gateway to blockchain apps. It’s very easy to use and simplifies a lot of steps, e.g., setting up a Polygon wallet.
- Connect Metamask to Polygon’s Mumbai testnet(opens new window) and select it in the dropdown menu. We will use Polygon’s testnet to mint our NFT as it’s free of charge.
- Receive MATIC token to your wallet by using the faucet(opens new window). Select the Mumbai testnet and paste your wallet address from Metamask into the form. To mint an NFT, we need to pay a small amount of MATIC, which is a fee charged by miners for operations to add new transactions to the blockchain, e.g., minting an NFT or creating a new smart contract.
- Copy your private key from Metamask by clicking on the three dots in the top right corner and selecting ‘Account details’. On the bottom you can find a button to export your private key. Click it and enter your password when prompted. You can copy and paste the private key in a text file for now. We will use it later in the tutorial when interacting with the blockchain.
Lastly, you will need a text or code editor. For more convenience, choose an editor with language support for both JavaScript and Solidity. A good option is Visual Studio Code (opens new window) with the solidity (opens new window) extension enabled.
# Preparation
# Get an API key for NFT. storage
In order to use NFT.Storage you need an API key. First, head over to NFT.Storage to log in with your email address (opens new window). You will receive an email with a magic link that signs you in — no password needed. After you successfully logged in, go to API Keys via the navigation bar. You will find a button to create a New Key. When prompted for an API key name, you can freely choose one or use “polygon + NFT.Storage”. You can copy the content of the key column now or reference back to NFT.Storage later in the tutorial.
# Set up your workspace
Create a new empty folder that we can use as our workspace for this tutorial. Feel free to choose any name and location on your file system. Open up a terminal and navigate to the newly created folder.
Next, we will install the following Node.js dependencies:
- Hardhat and Hardhat-Ethers, a development environment for Ethereum (and Ethereum compatible blockchains like Polygon).
- OpenZeppelin, a collection of smart contracts featuring standardized NFT base contracts.
- NFT.Storage, a library to connect to the NFT.Storage API.
- Dotenv, a library to handle environment files for configuration (e.g., injecting private keys into the script).
Use the following command to install all dependencies at once:
Hardhat needs to be initialized in the current folder. In order to start the initialization, execute:
When prompted, choose Create an empty hardhat.config.js. Your console output should look like this:
We will do some modifications to the hardhat configuration file hardhat.config.js to support the Polygon Mumbai test network. Open the hardhat.config.js that was created in the last step. Please note that we are loading your Polygon wallet private key from an environment file and that this environment file must be kept safe.
Create a new file called .env which will hold your API key for NFT.Storage and your Polygon wallet. The content of the .env file should look like the listing below:
Replace the placeholders with the API key you created during preparation and your Polygon wallet private key.
To keep our project organized, we’ll create three new folders:
contracts, for the Polygon contracts written in Solidity.assets, containing the digital asset we will mint as an NFT.scripts, as helpers to drive the preparation and minting process.
Execute the following command:
Lastly, we will add an image to the assets folder. This image will be our artwork that we will upload to NFT.Storage and mint on Polygon. We will name it ExampleNFT.png for now. If you do not have some nice art ready, you can download a simple pattern (opens new window).
# Minting your NFT
# Storing asset data with NFT. Storage
We will use NFT.Storage to store our digital asset and its metadata. NFT.Storage guarantees immutability and durability by uploading your digital asset to Filecoin and IPFS automatically. IPFS and Filecoin operate on content identifiers (CID) for immutable referencing. IPFS will provide fast retrieval with its geo-replicated caching and Filecoin guarantees durability with incentivized storage providers.
Create a script called store-asset.mjs below the scripts directory. The contents are listed below:
The main part of the script is the storeAsset function. It creates a new client connecting to NFT.Storage using the API key you created earlier. Next we introduce the metadata consisting of name, description, and the image. Note that we are reading the NFT asset directly from the file system from the assets directory. At the end of the function we will print the metadata URL as we will use it later when creating the NFT on Polygon.
After setting up the script, you can execute it by running:
Your output should look like the listing below, where HASH is the CID to the art you just stored.
# Creating your NFT on Polygon
# Create the smart contract for minting
First, we will create a smart contract that will be used to mint the NFT. Since Polygon is compatible with Ethereum, we will write the smart contract in Solidity (opens new window). Create a new file for our NFT smart contract called ExampleNFT.sol inside the contracts directory. You can copy the code of the listing below:
To be a valid NFT, your smart contract must implement all the methods of the ERC-721 standard (opens new window). We use the implementation of the OpenZeppelin (opens new window) library, which already provides a set of basic functionalities and adheres to the standard.
At the top of our smart contract, we import three OpenZeppelin smart contract classes:
\@openzeppelin/contracts/token/ERC721/ERC721.sol contains the implementation of the basic methods of the ERC-721 standard, which our NFT smart contract will inherit. We use the ERC721URIStorage, which is an extension to store not just the assets but also metadata as a JSON file off-chain. Like the contract, this JSON file needs to adhere to ERC-721.
\@openzeppelin/contracts/utils/Counters.sol provides counters that can only be incremented or decremented by one. Our smart contract uses a counter to keep track of the total number of NFTs minted and to set the unique ID on our new NFT.
\@openzeppelin/contracts/access/Ownable.sol sets up access control on our smart contract, so only the owner of the smart contract (you) can mint NFTs.
After our import statements, we have our custom NFT smart contract, which contains a counter, a constructor, and a method to actually mint the NFT. Most of the hard work is done by the base contract inherited from OpenZeppelin, which implements most of the methods we require to create an NFT adhering to the ERC-721 standard.
The counter keeps track of the total number of NFTs minted, which is used in the minting method as a unique identifier for the NFT.
In the constructor, we pass in two string arguments for the name of the smart contract and the symbol (represented in wallets). You can change them to whatever you like.
Finally, we have our method mintNFT that allows us to actually mint the NFT. The method is set to onlyOwner to make sure it can only be executed by the owner of the smart contract.
address recipient specifies the address that will receive the NFT at first
string memory tokenURI is a URL that should resolve to a JSON document that describes the NFT’s metadata. In our case it’s already stored on NFT.Storage. We can use the returned IPFS link to the metadata JSON file during the execution of the method.
Inside the method, we increment the counter to receive a new unique identifier for our NFT. Then we call the methods provided by the base contract from OpenZeppelin to mint the NFT to the recipient with the newly created identifier and setting the URI of the metadata. The method returns the unique identifier after execution.
# Deploy the smart contract to Polygon
Now, it’s time to deploy our smart contract to Polygon. Create a new file called deploy-contract.mjs within the scripts directory. Copy the contents of the listing below into that file and save it.
Deploying the contract is done with the helper functions provided by the hardhat library. First, we get the smart contract we created in the previous step with the provided factory. Then we deploy it by calling the respective method and wait for the deployment to be completed. There are a few more lines below the described code to get the correct address in the testnet environment. Save the mjs file Execute the script with the following command:
If everything is correct, you will see the following output:
Note that you will need the printed contract address in the minting step. You can copy and paste it into a separate text file and save it for later. This is necessary so the minting script can call the minting method of that specific contract.
# Minting the NFT on Polygon
Minting the NFT is now merely calling the contract we just deployed to Polygon. Create a new file called mint-nft.mjs inside the scripts directory and copy this code from the listing below:
Edit the first two lines to insert your contract address from the earlier deployment and the metadata URL that was returned when storing the asset with NFT.Storage. The rest of the script sets up the call to your smart contract with you as the to-be owner of the NFT and the pointer to the metadata stored on IPFS.
Next, run the script:
You can expect to see the following output:
Types of Upgradeable Smart Contracts
Smart contracts can be upgraded by separating a given smart contract into essentially two components: a proxy and an implementation. The diagram below symbolizes an upgrade from the contract ERC20 to the contract ERC20v2.
OpenZeppelin Contracts provide two options for proxy-based contract upgradeability: transparent proxies and universal upgradeable proxies. These are discussed briefly below. For a deep dive on the subject of smart contract upgradeability, see this blog post by Santiago Palladino.
Transparent
One type of smart contract upgrade follows what is called the transparent pattern. This pattern places both the state and the ability to upgrade in a proxy contract. The proxy points to a given implementation contract which holds the logic. When any non-admin address calls the contract, the calls are delegated to the implementation contract. When the admin calls the contract, the proxy reveals the upgradeTo function, giving the administrator the ability to point to a new implementation contract and thereby upgrade.
One downside to this proxy pattern is that interacting with it costs a lot of gas, because doing so requires two storage accesses to check if the caller’s address is the admin.
UUPS
The UUPS upgradeability pattern, on the other hand, is more efficient. This pattern places the upgrade function in the implementation contract. The proxy contract is minimal; it uses delegatecall to direct the implementation contract to execute transactions.
With this proxy pattern, it is vital to ensure that the upgrade function remains functional and present with each upgrade. Otherwise, the ability to upgrade will be lost forever.
This tutorial will follow the UUPS pattern.
Upgradeable Contract Deployment
This guide shows you how to deploy a barebones UUPS upgradeable ERC721 contract for minting gas-efficient NFTs. Ownership will be transferred to a Gnosis Safe multisig account and contract administration will be managed using OpenZeppelin Defender.
Development Environment Setup
For this tutorial, you will use Hardhat as a local development environment using node package manager. To get started, run the following:
npm init -ynpm i dotenv
Select Create a basic sample project and accept the default arguments.
You will need to install the OpenZeppelin Upgradeable Contracts library as well as the Hardhat Defender npm package for integrating upgrades with OpenZeppelin Defender.
The Upgradeable Contracts package replicates the structure of the main OpenZeppelin Contracts, but with the addition of the Upgradeable suffix for every file and contract.
The nft.storage package allows for easy deployment of IPFS-hosted NFT metadata.
The sample project creates a few example files that are safe to delete:
rm scripts/sample-script.js test/sample-test.js contracts/Greeter.solThe dotenv package allows you to access environment variables stored in a local file, but that file needs to be created:
Other Setup
You will need to obtain a few important keys to be stored in your .env file. (Double-check that this file is listed in your .gitignore so that your private keys remain private.)
In Alchemy, create an app on Rinkeby and copy the HTTP key. Add it to your .env file.
In Metamask, click Account Details -> Export Private Key to copy the private key you will use to deploy contracts.
Important Security Note: Use an entirely different browser and a different Metamask account than the one you might use for other purposes. That way, if you accidentally reveal your private key, the security of your personal funds will not be compromised.
Get an API key from nft.storage and add it to your .env file.
The contract will initially be deployed with a single EOA. After an initial upgrade, ownership will be transferred to a Gnosis Safe multisig.
To create a new Gnosis Safe in OpenZeppelin Defender, navigate to Admin, select Contracts → Create Gnosis Safe. Provide the addresses of three owners and set the threshold at two for the multisig.
You can create a new API key and secret in Defender by navigating to the hamburger menu at the top right and selecting Team API Keys. You can select yes for each of the default options and click Save.
Your .env will look something like this:
Replace your hardhat.config.js with the following:
Upload NFT Metadata
This NFT token will consist of an image. The nft.storage npm package gives developers a straightforward way of uploading the .json metadata as well as the image asset.
From the base project directory, create a folder to store the image asset:
Include the following code in this file, updating the code as necessary to use your image asset, name, and description:
import dotenv from ‘dotenv’description: ‘This is a two-dimensional representation of a four-dimensional cube’,image: new File(console.log(“Metadata stored on Filecoin and IPFS with URL:”, metadata.url).then(() => process.exit(0))
Run the script:
Metadata stored on Filecoin and IPFS with URL: ipfs://bafyreidb6v2ilmlhg2sznfb4cxdd5urdmxhks3bu4yqqmvbzdkatopr3nq/metadata.jsonSuccess! Now your image and metadata are ready to be linked to your NFT contract.
Create Smart Contract
Go to wizard.openzeppelin.com and select ERC721.
Give your token whatever features you would like. Be sure to check the box for Upgradeability and select UUPS.
Select Download → As Single File. Save this in your project’s /contracts folder.
Note the Solidity version in the contract and edit hardhat.config.js to either match this version or be more recent.
Mint NFT
Now that the contract is deployed, you can call the safeMint function to mint the NFT using the data uploaded to IFPS earlier.
Create a new file to include the following commands, substituting the address of your proxy contract and metadata URL in the relevant sections.
const CONTRACT_ADDRESS = “0x12a9ba92b3B2746f41AcC45Af36c44ac00E107b0”const META_DATA_URL = “ipfs://bafyreidb6v2ilmlhg2sznfb4cxdd5urdmxhks3bu4yqqmvbzdkatopr3nq/metadata.json”const ExampleNFT = await ethers.getContractFactory(“CubeToken”)await ExampleNFT.attach(contractAddress).safeMint(owner.address, metaDataURL)console.log(“NFT minted to: “, owner.address).then(() => process.exit(0))
Run the script:
npx hardhat run scripts/mintToken.mjsNFT minted to: 0xf39Fd6e51aad88F6F4ce6aB8827279cffFb92266
Verify Contract
Until this point, we have been able to run functions on the deployed contract because we have the Application Binary Interface (ABI). Verifying the source code makes the complete contract code and ABI available publicly. This is good practice and it also makes it easier to interact with the contract.
Go to the contract’s address in Etherscan and select Read as Proxy:
https://rinkeby.etherscan.io/address/{PROXY_ADDRESS}
Click Verify.
Copy the implementation address.
Use this address from the command line to verify the smart contract of the implementation.
npx hardhat verify — network rinkeby 0xf92d88cbfac9e20ab3cf05f6064d213a3468cf77Successfully verified contract MyToken on Etherscan.