
- Почему Solana?
- Введение
- Атаковать Солану через NFT
- Солана делает это снова, Candy Machine решает проблему
- Continue Reading
- Prerequisites
- Minting website creation
- Solana CLI installation
- Creating your wallet
- Create an NFT Candy Machine with Metaplex
- The Initial Setup for NFT Candy Machine V2
- Your Local Solana Wallet
- Configure Your NFT Candy Machine V2
- Preparing the Assets – Images and Metadata
- Create Your NFT Candy Machine and Upload Your Assets
- Candy Machine and NFT Collections
- Verifying Assets Upload
- Candy Machine v2
- How to create a Candy Machine
- How to delete a Candy Machine
- How to find Candy Machine using wallet address
- How to find Candy Machine using its address
- How to find minted NFTs from a Candy Machine
- How to insert items into a Candy Machine
- How to mint an NFT from a Candy Machine
- Minting Solana NFTs
- Beyond NFT Candy Machine – Create an NFT Dashboard
- Creating the minting website
- Error messages and how to solve them
- Как пришла идея к созданию своей коллекции?
- Guide Overiew
- Как деплоил нфт?
- Как создавалась данная коллекция?
- Что мне для этого понадобилось?
- Выход на паблик
- How to get all NFTs from a wallet?
- Candy Machine installation
- Publishing your Candy Machine
- Опустошение Candy Machine и выход на маркетплейс
- Где купить токен MPLX?
- How to create an NFT
- Upload to Arweave
- Mint the NFT
- Required pieces of software
- Install the “Hashlips” file
- Configure the “Config.js” file
- NFT generation
- Пролог
- День минта
- Minting Our NFT
- What is a Metaplex Candy Machine?
- Токен MPLX
- Prerequisites for Using NFT Candy Machine
- How to get the owner of an NFT
- How to get NFT Mint Addresses
- Candy Machine V1
- Candy Machine V2
- Заключение
- Recommended YouTube videos
Почему Solana?
Ну тут все просто
- Быстрота блокчейна
- Дешевые комиссии
- Не требуется создавать Смарт контракты как в Ethereum
Введение
В данной статье, вы узнаете
Как пришла идея к созданию своей коллекции
Как создавалась данная коллекция
Как деплоил нфт
Выход на паблик
И опустошение Candy Machine
In this guide, I’ll try my best to walk you through how to create a Metaplex Candy Machine v2 (2022). I’ll be focusing on how to do so using Linux, as it is my preferred OS. To start, we need to install some things.
I presume that you have a Phantom Wallet since we’ll import the wallet we’ll create into our main Solana wallet, so I’ll use Phantom Wallet while explaining. If you wish to do otherwise, proceed with caution.
Table of Contents
- Complete the initial setup for Candy Machine v2.
- Demonstrate how to create a Solana wallet on your local computer.
- Walk you through the Candy Machine v2 configuration.
- Show you how to prepare the assets (images and metadata).
- Create our instance of Metaplex’s NFT Candy Machine and upload the assets to Arweave.
- We will utilize our NFT Candy Machine to create an example NFT collection.
- We’ll show you how to verify if assets were uploaded properly.
- Finally, we’ll mint our Solana NFT tokens.
У Соланы (Сол) была плохая ночь. Сеть перестала работать после атаки группы ботов на проект в сети. В итоге Солана пропала из эфира на 7 часов.
Атаковать Солану через NFT
Точкой атаки ботов стала Candy Machine, инструмент, позволяющий это Незаменимые иконки (НФТ) может быть изготовлен. Говорят, что боты запускают до четырех миллионов транзакций в секунду. В конце концов, Грид больше не мог справляться с давлением, что привело к аудиторы нет консенсус можно еще проверить. Создавать новое комки вынужден остановиться.
«Бета-версия основной сети Solana потеряла консенсус после того, как огромное количество входящих транзакций (4 миллиона в секунду) затопило сеть, превысив 100 базисных пунктов. Разработчики все еще выясняют, почему сеть не смогла восстановиться, и операторы валидаторов готовятся к перезапуску».
Solana Mainnet Beta потеряла консенсус после того, как огромное количество входящих транзакций (4 миллиона в секунду) затопило сеть, превысив 100 Гбит/с. Инженеры все еще выясняют, почему сеть не может восстановиться, а операторы валидаторов готовятся к перезапуску.
СоланаСтатус 1 мая 2022 г.
И эта перезагрузка, наконец, материализовалась в 5 утра. Это означает, что сеть была перезапущена с того места, где произошла ошибка. Вкратце рассматривалась дисквалификация Candy Machine через перезапуск, но вскоре сообщество Solana пришло к выводу, что это будет цензура.
Солана делает это снова, Candy Machine решает проблему
Итак, Солана сделала это снова, и Candy Machine также позаботилась о том, чтобы это больше никогда не повторилось. у нее есть штраф за столкновение Он настроен для предотвращения слишком большого количества сделок ботов.
К слову, это не первый раз, когда Солана покидает эфир. В начале этого года было Ударь один раз расстояние Распределенный отказ в обслуживании (DDoS) атаки. Вскоре после этого Грид увидел снова проблемы. Проблемы, которые, к сожалению, случаются довольно часто, вызывают острую критику. Например, в конце прошлого года ИТ-директор Cyber Capital сказал Солана:Основные недостатки конструкции» у нее есть.

«Создатель. Дружелюбный к хипстерам социальный медиа-голик. Интернет-фанат. Страстный фанатик алкоголя».
Prerequisites
If you have a different version of Node installed on your system, you can use nvm which allows you to quickly install and use different versions of node via the command line.
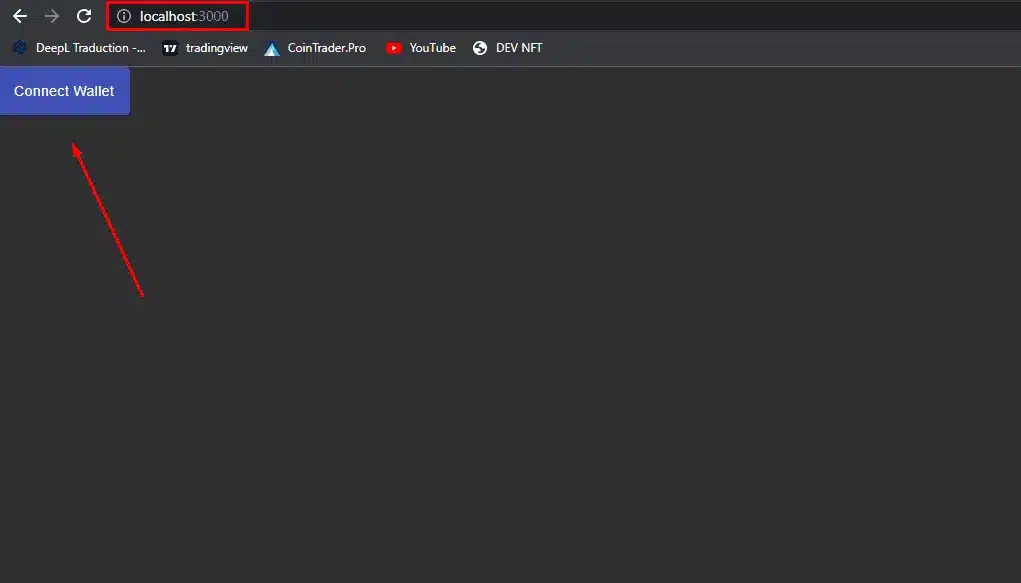
Minting website creation
Now that your pictures / JSON are generated, we will show you how to create the website where you can mint them. The last step will involve deploying the highly praised “Candy Machine” onto the website and randomly generating all the NFTs.
- First, go through similar steps as in the first part of this tutorial: click on “File”, “Open Folder”, select your “Desktop” and click on “Select folder”
- Open a new terminal by clicking on “Terminal” and “New Terminal”. Again, don’t forget to use the “CMD” command and not “Powershell”
- As “GIT” was already installed through inserting “npm install git”, we will proceed with the next step. If you haven’t installed it yet, do so by inserting the above command in your terminal
- Once the Metaplex file is installed on your computer, click on “File”, “Open Folder” and select the Metaplex file to open it. Proceed by opening a new terminal on VSC (always in CMD)
- Insert the command: npm install -g ts-node

Solana CLI installation


- Ensure that Solana is installed by entering: solana –version. If it outputs a version, Solana is correctly installed
- Enter the command: solana config set –url https://api.devnet.solana.com
(Replace “devnet” by “mainnet-beta” if you are using your main wallet).

Creating your wallet
- Create a wallet dedicated to your collection using the command: solana-keygen new –outfile ~/.config/solana/devnet-test.json
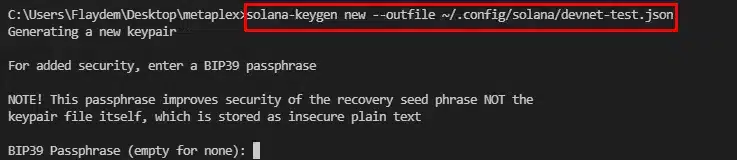
- Define your password and confirm it. The password will not be displayed on your screen
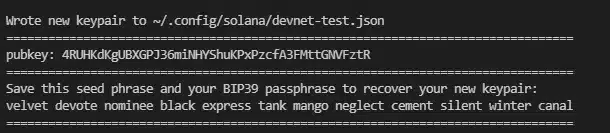
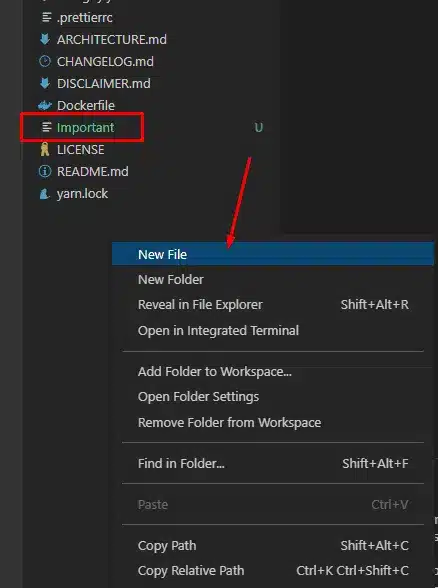
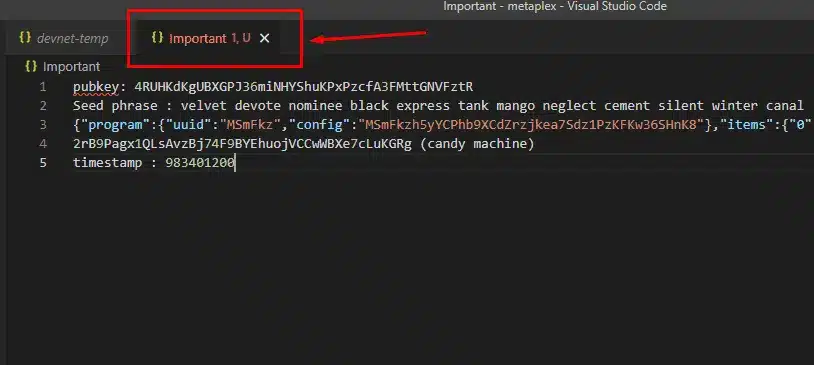
- Safely store the generated data (e.g., pubkey). To do so, go to the right-hand side of your terminal on the Metaplex folder, right click and select “New File”. Rename it “Important”
- Open this folder and store all important information (pubkey, seedphrase) displayed on your terminal
- Add SOL to your balance using: solana airdrop (number of SOL you wish to receive). Note that this only works in Devnet. On the mainnet, you must use your own wallet (e.g., Phantom) to send SOL
Check your balance using: solana balance

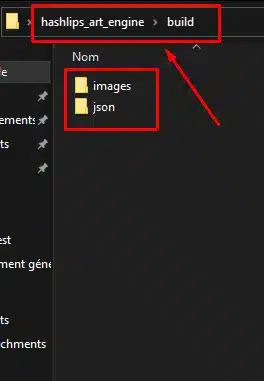
- Create a new folder named “assets” (right click / New Folder) where you can store all your images (.PNG) and your previously generated JSON files. The latter are available in your “Hashlips” folder on your desktop
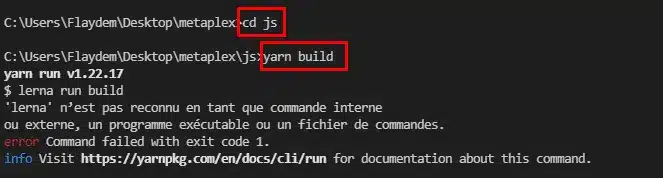
- Enter the command: cd js
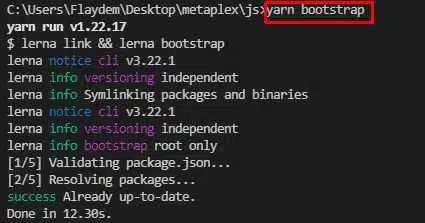
Enter the command: yarn build
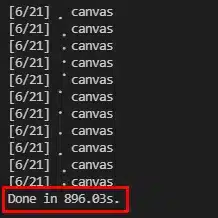
- Ensure you are in the “js” folder. If you are not in it, re-enter the command “cd js”. Then, enter the command: yarn install
The installation should take between 10 and 20 minutes. The final output should read “Done in (installation duration in seconds)”.
- Enter the command: yarn bootstrap
Create an NFT Candy Machine with Metaplex
In the first stage, we will show you how to complete the initial NFT Candy Machine v2 setup. To further simplify things for you, we also made our code available on GitHub. In the next stage, you’ll see how to set up a local Solana wallet. Then, we’ll take a closer look at the Candy Machine v2 configuration. The fifth stage will be all about preparing the assets and uploading those assets to Arweave. Next, you’ll find out how to create Candy Machine collections. You’ll also learn how to verify uploads. Last but not least, we’ll show you how to use NFT Candy Machine to mint Solana NFTs.
Note: To help us cover all of the stages in more detail, we will also refer to a video tutorial, which you can find at the end of this article.
The Initial Setup for NFT Candy Machine V2
- Git
- Node.js
- Yarn (a package manager)
- Ts-node
You need Git for cloning the repository, Node.js as JavaScript runtime, Yarn to install the required dependencies, and TypeScript node (ts-node) as an execution environment.
Note: Install additional dependencies (“brew install pkg-config cairo pango libpng jpeg giflib librsvg”) if you are using an Apple M1 chip.
Your Local Solana Wallet
Note: It’s important to keep in mind that local wallets are not very safe. Thus, use them only for development purposes and not to store greater amounts of funds.
Here are the steps you need to complete to create your local Solana wallet:
- Enter the “solana –version” command into your terminal.
- Use your terminal and enter the “solana address” command.
- Finally, enter the “solana balance” command.
Note: If you don’t have your Solana address yet, you can set up your new devnet wallet. In that case, use the Metaplex docs as a guide.
As mentioned above, you must also have a sufficient amount of SOL in your Solana wallet. Since we are focusing on the Solana devnet, you can get SOL for free. As such, simply enter the “solana airdrop 2” command. The latter will ensure you get two SOL tokens in your wallet.
Note: Once you decide to take your NFT Candy Machine to the Solana mainnet, you will need real SOL. Hence, you’ll need to use one of the reputable exchanges to buy it and then transfer it to your wallet.
Configure Your NFT Candy Machine V2
As mentioned in the intro, the above screenshot indicates that we’ll use Arweave to store our assets. But, this option is not set in stone. Accordingly, you can explore other reputable alternatives (video below starting at 4:39).
Preparing the Assets – Images and Metadata
We covered the basics of NFTs above; however, we didn’t point out that NFTs can’t be minted out of thin air. Instead, you need to have a file (e.g., an image) and metadata. The former represents the tangible part of NFTs, while the latter provides the details that are also used when minting. Moreover, the most common types of files are images (e.g., PNGs). On the other hand, metadata comes in the form of JSON files. However, since preparing assets is not the core of this tutorial, we encourage you to use our example assets for your practice run:
Create Your NFT Candy Machine and Upload Your Assets
Use the video below, starting at 12:27, for detailed guidance on how to execute the “upload” command. The latter will upload your assets to Arweave (or another cloud service of your choosing). Essentially, you only need to copy the command provided by the Metaplex documentation and edit the paths to match this project:
The above command lines indicate that you’ll deploy your NFT Candy Machine on the Solana devnet. So, after applying all the necessary tweaks, hit “enter”. That way, your code will upload all the assets and create your instance of the NFT Candy Machine program.
Candy Machine and NFT Collections
With your assets uploaded and your NFT Candy Machine program created, you can create your NFT collections. For details, refer to the video below, starting at 15:35. However, basically, you again just need to copy the command line from the Metaplex docs. Of course, you also need to implement the necessary tweaks to match your project:
Once you run the above command, you will prepare a collection for your assets. Then, you can set this collection as part of your NFTs’ details during the mint process.
Verifying Assets Upload
Verifying assets upload is another optional but recommended step. This is a way to ensure that all of your assets are uploaded properly:
Use the video below (17:23) or visit the Metaplex documentation for detailed instructions regarding the “verify assets upload” step.
Candy Machine v2
Metaplex JS SDK now supports creating and updating Candy Machine v2 via code. It enable the developers to interact with the Candy Machine v2 program and create, update, and delete Candy Machines as well as mint NFTs from them.
How to create a Candy Machine
Press </> button to view full source
keypairIdentity Metaplex sol toBigNumber Keypair Connection connection payer Keypair // request airdrop airdropSignature connection payerpublicKey // creating metaplex instance with payer as the authority metaplex Metaplexconnectionpayer // creating a candy machine candyMachine metaplex sellerFeeBasisPoints // 0.05% royalties price // 0.0001 SOL itemsAvailable // 5 items available How to delete a Candy Machine
Press </> button to view full source
Metaplex keypairIdentity sol toBigNumber Connection Keypair connection payer Keypair // request airdrop airdropSignature connection payerpublicKey // creating metaplex instance with payer as the authority metaplex Metaplexconnectionpayer // creating a candy machine candyMachine metaplex sellerFeeBasisPoints // 0.05% royalties price // 0.0001 SOL itemsAvailable // 5 items available // deleting the candy machine response metaplex candyMachine To find all the Candy Machines whose authority is a certain public key, we have use the findAllByopen in new window function along with the type parameter as authority
Press </> button to view full source
Connection PublicKey Metaplex connection metaplex connection authority candyMachines metaplex type publicKey authority candyMachinescandyMachine index /** * #1 Candy Machine ID - HSZxtWx6vgGWGsWu9SouXkHA2bAKCMtMZyMKzF2dvhrR */How to find Candy Machine using wallet address
To fetch the Candy Machine object via its wallet address, we have use the findAllByopen in new window function along with the type parameter as wallet. You can get the wallet address of the Candy Machine from the «Anchor data» tab in the explorer.
Press </> button to view full source
Connection PublicKey Metaplex connection metaplex connection wallet candyMachines metaplex type publicKey wallet candyMachinescandyMachine index /** * #1 Candy Machine ID - HSZxtWx6vgGWGsWu9SouXkHA2bAKCMtMZyMKzF2dvhrR */How to find Candy Machine using its address
To find a Candy Machine using its address, we have to use the findByAddressopen in new window function.
Press </> button to view full source
Connection PublicKey Metaplex connection metaplex connection candyMachineId candyMachine metaplex address candyMachineId How to find minted NFTs from a Candy Machine
Press </> button to view full source
Connection PublicKey Metaplex connection metaplex connection candyMachineId candyMachine metaplex candyMachine candyMachineId How to insert items into a Candy Machine
Press </> button to view full source
Connection PublicKey Metaplex connection metaplex connection candyMachineId metaplex candyMachineId items name "My NFT #1" uri name "My NFT #2" uri name "My NFT #3" uri How to mint an NFT from a Candy Machine
By default, the owner of the minted NFT would be metaplex.identity().publicKey. If you want to mint the NFT to some other wallet, pass that public key along with the newOwner parameter
Press </> button to view full source
Connection PublicKey Metaplex connection metaplex connection candyMachineId // by default, the owner of the minted nft would be `metaplex.identity().publicKey`. if you want to mint the nft to some other wallet, pass that public key along with the `newOwner` parameter candyMachine metaplex candyMachine candyMachineId // newOwner: new PublicKey("some-other-public-key"); Minting Solana NFTs
By completing all of the previous stages, you can finally mint Solana NFTs (18:18). Just like with all of the above steps, Metaplex makes minting quite simple. As such, you will again copy the correct command from the Metaplex docs. But, before running that command, you need to implement the necessary tweaks to match your file paths. Nonetheless, it is also worth pointing out that you have two mining options. On the one hand, you can mint Solana NFTs individually. On the other hand, you can do batch or bulk minting, which enables you to mint multiple NFTs in one transaction.
The minting process takes your assets and converts them into NFTs. As such, you can now use the Solana explorer to view the details of those NFTs. Don’t forget to switch to devnet:
Beyond NFT Candy Machine – Create an NFT Dashboard
Now that you know how to create an NFT Candy Machine, you might be interested in taking things to the next level. Thus, we want to show you how to create an NFT dashboard. Fortunately, another powerful Web3 tool makes this a whole lot simpler. By using Moralis, the best Web3 backend platform, you can focus on the frontend. Here is an example Solana NFT portfolio tracking dapp:
Creating the minting website
Go to metaplex/js/packages/candy-machine-ui . You’ll see a file named .env.example . Delete the .example part so that the file would be named .env . Now, here, go to the .cache folder in the root directory and open the devnet-temp.json file. Just around the beginning of that JSON file, you’ll see the value of your candyMachine .Copy that and past is your REACT_APP_CANDY_MACHINE_ID value.
Since we’re going to be on the devnet, we’ll not change anything. If it was mainnet, we’d have to specify that.
Now to go metaplex/js/packages/candy-machine-ui/src and open the index.tsx file. You’ll see the file contents as:
import React from 'react';
import ReactDOM from 'react-dom';
import App from './App';
import reportWebVitals from './reportWebVitals';
import './index.css';
ReactDOM.render( <React.StrictMode> <App /> </React.StrictMode>, document.getElementById('root'),
);
// If you want to start measuring performance in your app, pass a function
// to log results (for example: reportWebVitals(console.log))
// or send to an analytics endpoint. Learn more: https://bit.ly/CRA-vitals
reportWebVitals();ReactDOM.render(<App />, document.getElementById('root'));yarn install && yarn start
And that’s it! Your NFTs are now ready to be minted.
Error messages and how to solve them
As a rule of thumb, each case is different and we cannot solve all errors you might get. Thus, we recommend that you leverage the “Metaplex” Discord server where many members (e.g., developers) can help you resolve your issues FOR FREE.

Как пришла идея к созданию своей коллекции?
Зима 2021 — 2022 г.
Возможно вы застали то время, когда стреляли почти-что все коллекции НФТ, многие тогда фармили WL и после чего лутали десятки иксов, и многие коллекции предлагали держателем доступ в DAO, но это было сложно назвать DAO ведь в большинстве случаев вы получали неликвидную НФТ, и грустное комьюнити которое пришло флипануть данную коллекцию, и не более. (Но есть и те кто реализовал все на высшем уровне — их можно пересчитать на пальцах)
В таких DAO люди не получали право голоса где всех просто ставили в известность постфактум
И тогда уже зародилась идея создание своей коллекции, конечно хотелось заскамить кого-то но я понимал что лучше сделать все правильно и красиво, и не залутать десятки тысяч вечно зеленых, а собрать комьюнити. На тот момент в паблике было всего-лишь 150-500 человек и я понимал что если сейчас это все делать то
- Не наберу свою аудиторию
- Выпаду из рынка на месяц, и пропущу всю активность с НФТ
Поэтому я стал просто искать инфу как создать свою коллекцию, и готовится к создание коллекции.
Данная НФТ дает доступ в наше закрытое DAO
В апреле 2022 года — я уже начал делать исходники для коллекции
- Это были бейджи, которые я перерисовывал в Photoshop неделями, но так и не зашло мне это
- Потом я вспомнил про коллекцию Portals — их коллекция в виде банковской карты, и начал кидать исходники, но тоже понял что это не то что я хотел увидеть
- Персонажи, сначала начал с идеи персонажа, первые на ум пришли нинзя, но они за один день отвалились, и тут я увидел его странное сушество, немного посидев в Photoshop я отрисовал первого Гуманоида
Сложность была в моих кривых руках, и все что я не рисовал выходило мягко сказать говном, и в один прекрасный день родился мой первый Гуманоид
Конечно в первом варианте он был убожеством, но уже с отрисованным телом, если у него оно вообще есть)
И далее на основе этого тела я отрисовал
Humanoid — 11 разных гуманоидов, 7 из них похожие по форме, 4 залитых градиентом, и эксклюзив 9 отрисованные полностью с нуля — т.е без генерации
Background — 17 фонов скаченных из интернета с бесплатной лицензией, но не все фоны были скачаны, многие это просто градиент, и один это первая сгенерированная коллекция в размытом виде
Eyes — 5 обычных глаз, и одни в виде Thug очков
Teeth — 6 видов зубов, которые в день генерации нфт в основную сеть были перерисованными ибо они не попадали под гуманоида
Вот так и появились исходники для генерации моей первой НФТ коллекции
Guide Overiew
After what felt like walking through a mine field trying to figure out how to create my own NFT on Solana with the current guides, I decided to put together a guide myself in a very beginner friendly fashion.
I won’t be taking a deeper dive into the specifics of how everything works, but rather help people with zero knowledge of rust obtain a general understanding on how to create their very own NFT on Solana with the help of Metaplex candy machine and a web starter kit.
Note: I used Ubuntu 21.10 — Wayland for it. Some things may vary depending on the operating system you are running.
Как деплоил нфт?
Деплой коллекции происходил через Metaplex
Что мне для этого понадобилось?
Тут все так-же было по детальной инструкции
Да на заметку, опустошать Candy Machine надо после того как: Все НФТ были отчеканены, и не раньше!
Как создавалась данная коллекция?
Выше вы уже узнали что данная коллекция рисовалась в Photoshop
Все исходники были в формате 2000х2000
Сначала сохранял гуманоидов, а после каждый отдельный атрибут, и далее стал вопрос о генерации нфт с метаданными
Прочитав документации по Ethereum и Solana выбор пал на Solana.
Узнал что все можно сделать без каких-либо знаний, я приступил к генерации нфт.
В данном случае я использовал Hashlips Art Engine — это открытый исходник для генерации нфт
Прочитав их инструкцию я сделал все по шагам, и первая коллекция сгенерирована!
Что мне для этого понадобилось?
- Linux — но не обязательно, можно все сделать и в Windows
- Visual Studio Code — для удобного редактирования кода
И библиотеки для генерации колекции
Выход на паблик
Первый анонс своей коллекции был сделан 03.06.2022 в данном посте , т.е от создания первого гуманоида — 16.05 прошло 17 дней!
И уже 03.06 был создан сайт для минта — исходник лежит на github
Сайт был создан очень быстро, был взят исходник, сделал сверху удобное меню, добавил кривой блок с информацией, и в тот же день были отчеканены первые WL НФТ
Далее, я протестировал сайт, он работал нормально, только вот столкнулся с проблемой в виде минта для WL, я создал обычный токен, и данный сайт все не как не хотел брать 1 токен, а брал 0.000000001, перерыв все я понял что проблема была в сайте.
Решил я данную проблему созданием нового WL токена только уже в виде НФТ, и о чудо он берёт 1 нфт и соляну для минта
Определился с датой минта — 07.06.2022, я отправил свою коллекцию в НФТ календари, по итогу только один календарь разместил мою коллекцию.
NFTCALENDAR, а условия разрешения были очень простыми — поставить их баннер у себя на сайте, и сделать превью для своей коллекции
How to get all NFTs from a wallet?
When getting all NFTs from a wallet, you’ll need to get all token accounts and then parse which ones are NFTs. This can all be done using findDataByOwneropen in new window from the Metaplex JS library.
Press </> button to view full source
Metaplex keypairIdentity Connection clusterApiUrl Keypair PublicKey connection keypair Keypair metaplex connection metaplexkeypair owner allNFTs metaplexowner allNFTsCandy Machine installation
As the minting website is now set up, we can proceed with installing the Candy Machine.
- First, go back into the Metaplex folder using the command: cd (copy the part before “js” and paste it after “cd” – see picture)

- Download the Candy Machine using the command: ts-node js/packages/cli/src/candy-machine-cli.ts upload ./assets –env devnet –keypair ~/.config/solana/devnet-test.json
(Similar to previously, replace “devnet” by “mainnet-beta” if this is not a test.)

- Copy your “wallet public key” and “candy machine with publickey” (see red outline on the picture above) and paste it into your “Important” file as they will be required later on
- Following the installation of the Candy Machine, a “.cache” file was created in your Metaplex folder. Open it and open the “devnet-temp” located inside it
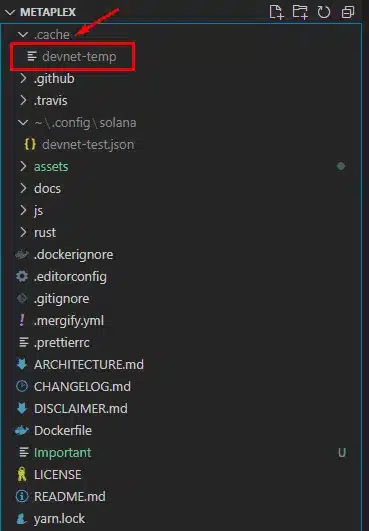
- In this file, you will see a long line of code. Copy it and save it in your “Important” file
- Create your Candy Machine and define the “mint price” of your NFTs (1 = 1 SOL, etc.) using the command:
ts-node js/packages/cli/src/candy-machine-cli.ts create_candy_machine ./assets –env devnet –keypair ~/.config/solana/devnet-test.json 1
(Replace “1” by your mint price)
- Save your generated “candy machine pubkey” in your “Important” file
- Set up your minting date using:
ts-node js/packages/cli/src/candy-machine-cli.ts update_candy_machine –keypair ~/.config/solana/devnet-test.json –date ‘3 Nov 2021 00:00:00 GMT’
Replace “3 Nov 2021 00:00:00 GMT” by the current date and the local time (e.g., GMT, PST) of your location. Note that for the purpose of the tutorial, we used a past date so that our NFTs can be directly minted.

- Copy the code displayed on the right-hand side of “– updated startDate timestamp :” (see red outline on the picture above) and save it on your “Important” file
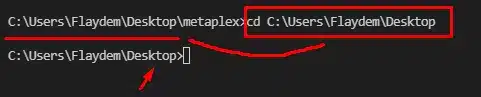
- Go back into your desktop using: cd (copy the part before “metaplex” and paste it after “cd” – see picture below)

- As the folder is now installed on your computer, open it by clicking on “Folder”, “Open Folder” and selecting “candy-machine-mint”
- Open a new terminal (still in CMD) and enter the command: yarn install

- Enter the command: yarn build
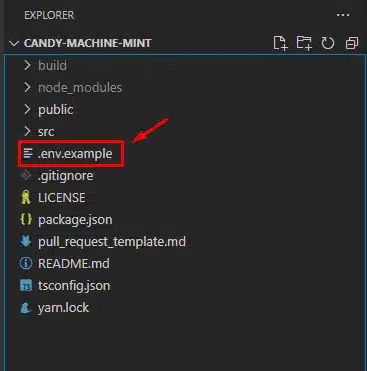
- Rename the “.env.example” file: “.env”

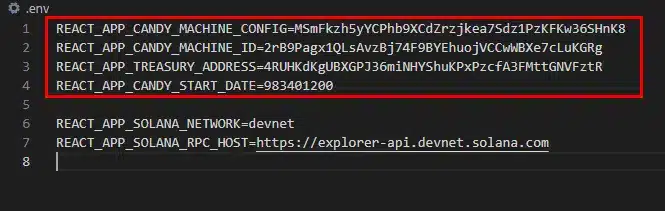
- You will now need the information stored in your “Important” file
To get this information, open a second VSC window without closing the initial one (right click on the VSC icon on the taskbar and click on “New Window”), re-open your “metaplex” folder and open your “Important” file.
- Import all information from your “Important” file into the “.env” file and replace “__PLACEHOLDER__” by:
- 1 – REACT_APP_CANDY_MACHINE_CONFIG= your “Candy Machine with Publickey“
- 2 – REACT_APP_CANDY_MACHINE_ID= your “Candy Machine Pubkey“
- 3 – REACT_APP_TREASURY_ADDRESS= your “Pubkey“
- 4 – REACT_APP_CANDY_START_DATE= your “Timestamp” (code associated to your minting date)
For our example, this leads to the result below:
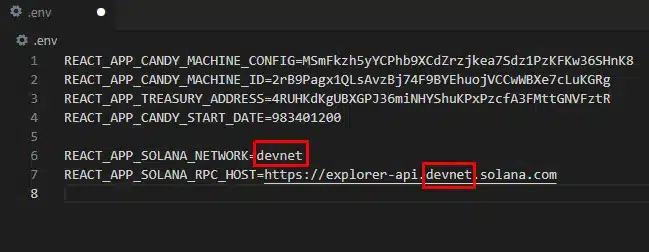
Note that if you wish to reproduce this tutorial on your “mainnet”, you need to replace “devnet” by “mainnet-beta” in Lines 6 and 7.
Publishing your Candy Machine
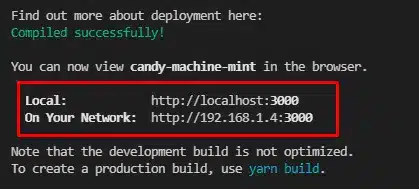
- Enter the command: yarn start
Connect your wallet and click on “Mint”. Ensure that you hold enough SOL.
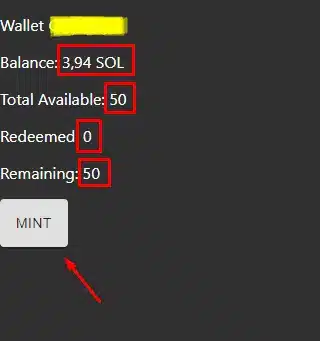
Last but not least, you can discover your NFTs in your wallet (with all their attributes). All the displayed data (e.g., balance, remaining, etc.) will be updated after each mint.
Опустошение Candy Machine и выход на маркетплейс
Коллекция сминчена на 100%, иду подписывать все нфт, и столкнулся с проблемой соль в тот момент не очень быстро работала, и две подряд транзакции у меня идут с фейл, хотя если бы я сразу все чекнул в Exploler то я бы не потратил много времени на эту ошибку
Далее я выдохнув, что это не ошибка и пошёл листится на все маркетплейсы
OpenSea — самый лучший маркетплейс, листинг моментальный
Magic Eden — тут возникла проблема, хотя я так и нечего не понял — Команда отклонила ваш листинг) — но в конце концов коллекция на Magic Eden
Ну и далее я опустошаю Candy Machine на которой лежало 0.2 SOL, и всё данная коллекция была официально запушена
Вот такая получилась статья, возможно она вам поможет!
Где купить токен MPLX?
Токен MPLX можно приобрести на нескольких крупных криптовалютных биржах, самые крупные из которых: Kucoin, FTX и Huobi Global.
How to create an NFT
To create an NFT you have to:
- Upload the image to IPFS like Arweave
- Upload the json metadata to IPFS like Arweave
- Call metaplex to create an account for the NFT
Upload to Arweave
Press </> button to view full source
fs Arweave arweave Arweave host port protocol timeout logging // Upload image to Arweave data fs transaction arweave data data transaction wallet fs arweavetransactionstransaction wallet response arweavetransactionstransaction response id transactionid imageUrl id imageUrl // Upload metadata to Arweave metadata name "Custom NFT #1" description "A description about my custom NFT #1" seller_fee_basis_points external_url attributes trait_type value collection name family properties files uri imageUrl type category maxSupply creators address share image imageUrl metadataRequest metadata metadataTransaction arweave data metadataRequest metadataTransaction arweavetransactionsmetadataTransaction wallet metadataTransactionid arweavetransactionsmetadataTransaction arweavearweave_lib Wallet Transaction API_URL json# Load your arweave walletyour_ar_wallet Wallet f img_in_bytes fread# Upload image to Arweavetransaction Transactionyour_ar_wallet dataimg_in_bytes
transactionadd_tag
transactionsign
transactionsend
image_url API_URLtransaction# Define metadatametadata "Custom NFT #1" "A description about my custom NFT #1" image_url image_url# Upload metadata to Arweavemeta_transaction Transactionyour_ar_wallet datajsondumpsmetadata
meta_transactionadd_tag
meta_transactionsign
meta_transactionsend
metadata_url API_URLmeta_transaction
metadata_urlMint the NFT
Press </> button to view full source
 Metaplex keypairIdentity Connection clusterApiUrl Keypair dotenv
dotenv connection keypair Keypair Bufferprocessenv metaplex connection metaplexkeypair feePayerAirdropSignature connection keypairpublicKey connectionfeePayerAirdropSignature mintNFTResponse metaplex uri maxSupply mintNFTResponse
You cannot mint an NFT with a different creator than your wallet. If you run into creator issues, make sure your metadata lists you as the creator.
Metaplex NFTs have metadata that is stored on Arweave. In order to get the Arweave metadata, you must get the Metaplex PDA and decode the account data.
Press </> button to view full source
Metaplex keypairIdentity Connection clusterApiUrl Keypair PublicKey connection keypair Keypair metaplex connection metaplexkeypair mint nft metaplexmint nftmetadata Required pieces of software
Before beginning this tutorial, several pieces of software must be installed on your computer. Be sure to download the versions corresponding to your operating system.
Install the “Hashlips” file
- First, open your newly installed Visual Studio Code software. Click on “File” and “Open Folder”.
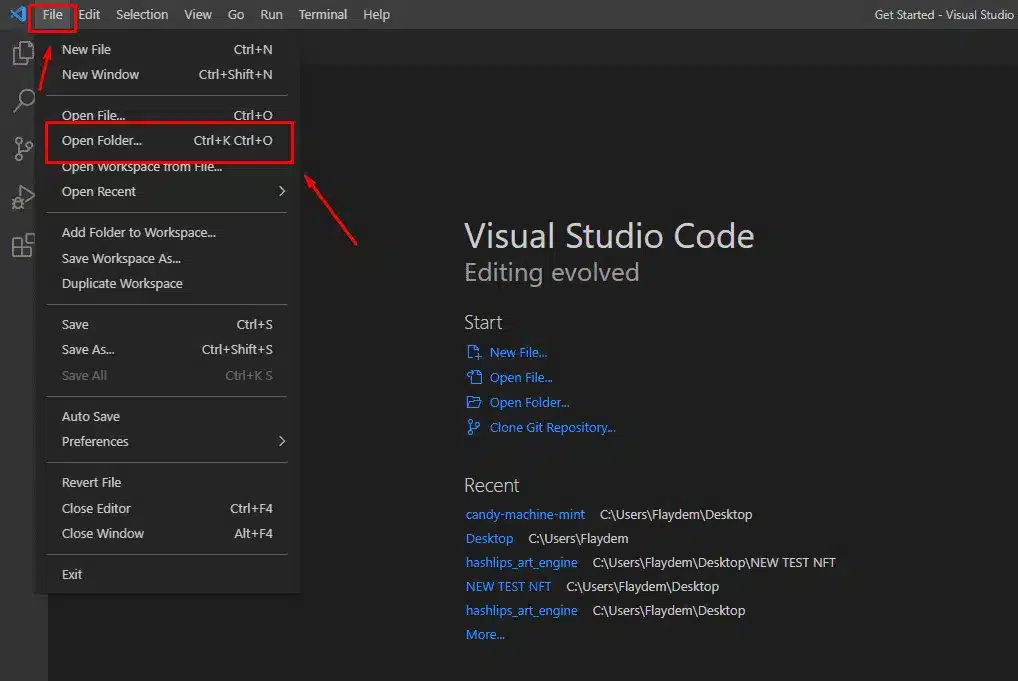
- Click on “Desktop” and on “Select folder”.
- Open a new terminal by clicking on “Terminal” and on “New Terminal” or by using the shortcut Ctrl+Shift+ù on your keyboard.
Caution: Be sure to use the “CMD” (Command Prompt) command and not “Powershell”. This applies to all command instructions in this tutorial. To do so, click on the downward arrow on the left-hand side of the terminal and click on “Command Prompt”.

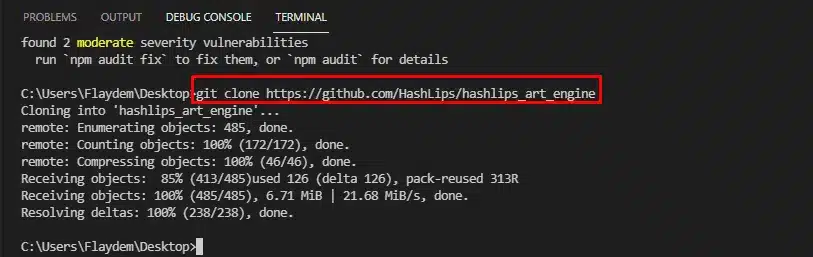
- If “Git” is not yet installed on your computer, enter the following command: npm install git and press the “enter” key.


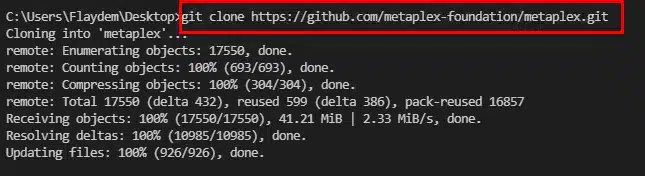
- Install the “Hashlips” file on your desktop using the following command: git clone <copied link from Github>
Note that you can install this file directly on Github by choosing the indicated version on the right-hand side of your screen (be sure you choose the latest version). You can then install the “Source Code.zip” on your desktop.
Configure the “Config.js” file
- Once the file is installed, open it up on VSC (Visual Studio Code) by clicking on “File” and “Open Folder”. Select the “hashlips_art_engine” folder.
- You can see the content of the HashLips file (layers, modules, scr, etc.) on the right-hand side of the VSC software. Open a new terminal and set it up as “CMD”, as previously explained.
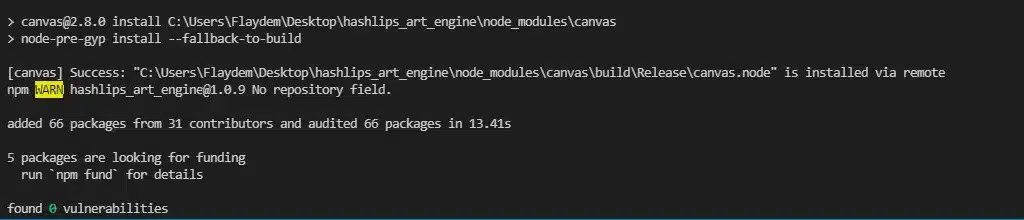
You can now install the “npm” through inserting: npm install
- Click on “SRC” (on the right-hand side of your screen) and on the “Config.js” file. This is where you will set up the parameters of your collection (number of NFTs, name, description, attributes, etc.).
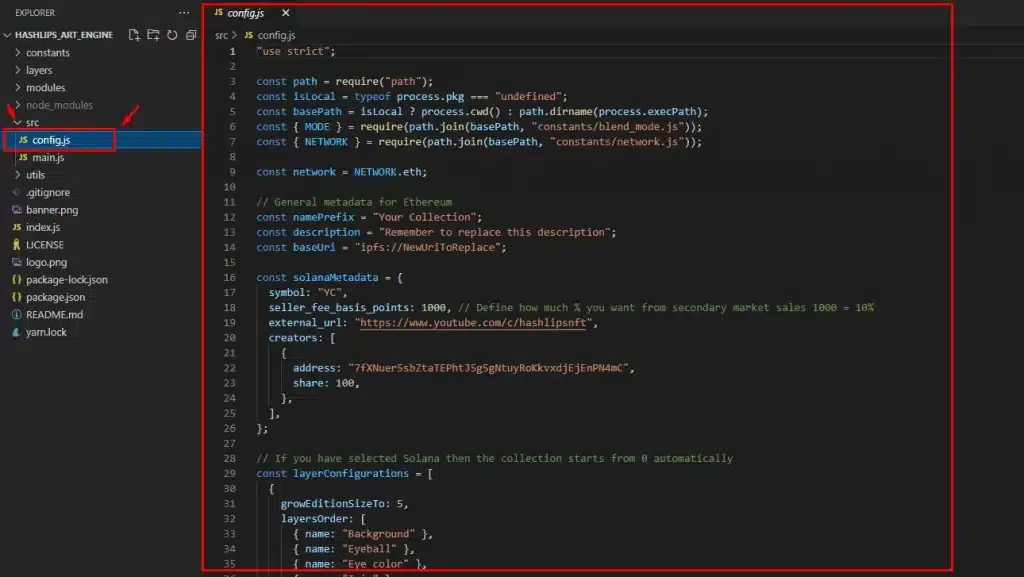
Below is a list of changes you need to perform on the file (use “Ctrl+F” to speed up the process):
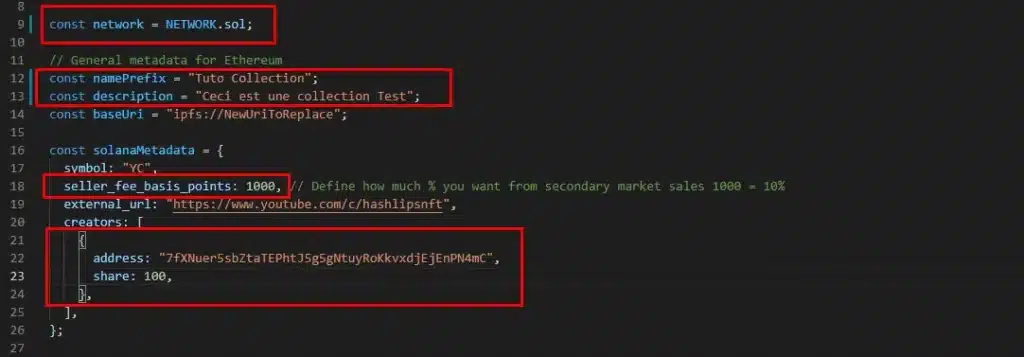
- const network = NETWORK.eth; (for Ethereum) / NETWORK.sol; (for Solana); for the purpose of our example, you need to replace “Const network = NETWORK.eth” with “Const network = NETWORK.sol;”
- const namePrefix = “Your Collection”;: replace “Your Collection” with the name of your NFT collection
- const description = “Remember to replace this description”;: Replace the sentence between quotes with the description of your collection. This is what will appear on Phantom Wallet once the collection is minted
- seller_fee_basis_points: 1000,: Define the fees (which you will receive) that will be charged to buyers for sales on secondary marketplaces (e.g., Solanart, Magic Eden, Alpha.art, etc.). Note that 1000 basis points correspond to 10% (i.e., 500 = 5%, 250 = 2.5%, etc.)
- You must now replace the “creator’s address” with your own to ensure you receive the SOL in your wallet after minting
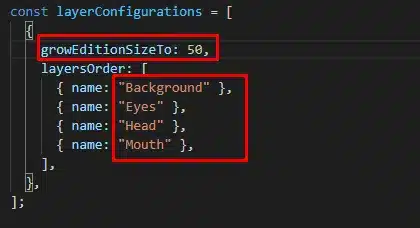
- We can now start configuring your NFTs’ attributes (traits). First, define the number of pictures (NFTs) you wish to generate using “growEditionSizeTo”. For the purpose of the example, we will generate 50 NFTs so this number will be “50”
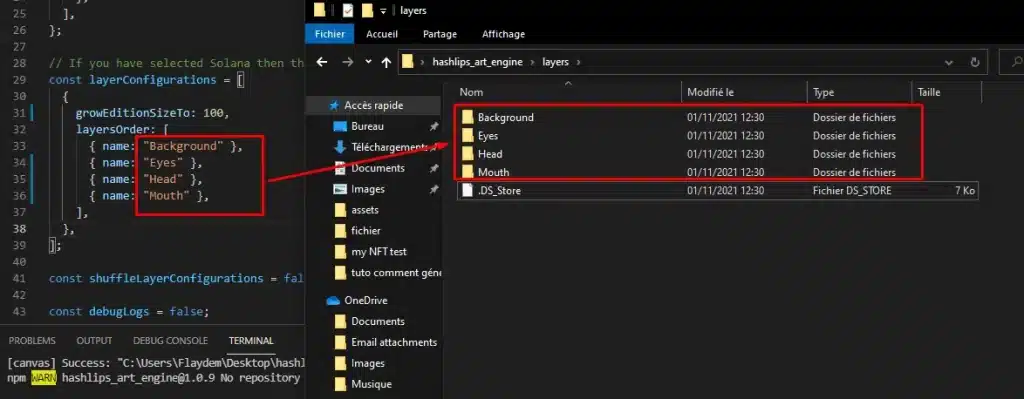
- Define your NFTs’ attributes by modifying the attributes displayed on the screen. If they include 4 attributes, indicate their “name/category” on the file instead of those already written (e.g., “Background”, “Eyes” or “Head” for hats or other head accessories). If you wish to add more categories, simply add extra lines under the last one using the format: { name: “attribute category name” }
- In the “hashlips_art_engine” folder, go into “layers” and rename all files to the names of your NFT categories (e.g., background) as shown in your “Config.js” file (see below)
- Delete all initial files from these folders and replace them with your attributes (in .PNG) in the dedicated folders. If not already done, rename ALL attributes from the collection to: “Name of the attribute”#”rarity index” (e.g., Cowboy hat#100). The rarity index must be between 1 and 100
- The default size of an NFT is 512×512. To change it, go into the “const format” section and define the size of your NFT using the “width” and “height” fields
- If your NFTs do not have any background attributes, go into the “const background” section and replace “true” by “false”
NFT generation
Once your “Config.js” file is finalized, you need to generate all NFTs. To do so, enter “node index.js” in the Terminal.
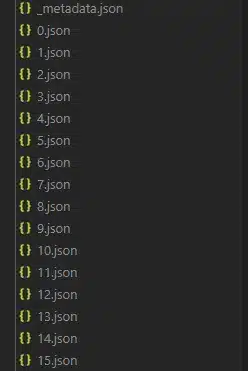
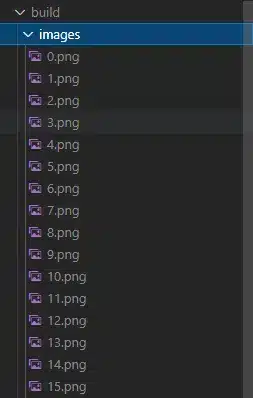
Congratulations, your NFTs are now successfully created! A “build” folder was also generated in your Hashlips folder where all your NFTs and your “metadata.json” are stored.
Пролог
Давным давно в 2020 г. когда я только познавал мир крипты и параллельно торговал на фондовом рынке, я состоял в открытой группе где сидели как и трейдера с стажем, так и такие новички как и я.
В данной группе мне сказали что создавай своё комьюнити, или хотя-бы найди пару человек что-бы иметь больше информации, распределять обязанности. В тот момент я видел свое комьюнити так:
Два-три человека сидят, отбирают стаки для торговли внутри дня, каждому отведено определенной сектор или же, по своим скринерам.
За пару часов до начала торговой сессии все созваниваются и обсуждают какие стаки торговать, а какие нет.
Ну и ходил я с этой идеей очень долго. Потом, когда я уже погрузился с головой в крипту понял что без команды ты никто (Только если ты не торгуешь внутри дня), ведь когда ты понимаешь что хочешь зарабатывать в крипте то ты должен как минимум знать «все» , и захватывать все сферы
Ну а далее время шло и я все продумывал как же организовать это всё
День минта
Я сразу ожидал что будет отчеканено не более 5-10 шт.
— Но вы спросите зачем такая большая коллекция?
А ответ будет простым — просто захотел, ибо дальше данная NFT возможно будет сжигаться, для разного рода наград.
В первый час отчеканили почти все кто хотел, далее я просто ждал окончания минта — 08.06.2022.
В день окончания также были отчеканены 1-2 НФТ.
Minting Our NFT
To mint our NFT, we can use mint_one_token like so:
$ ts-node metaplex/js/packages/cli/src/candy-machine-cli.ts mint_one_token --env devnet --keypair ~/.config/solana/devnet.jsonIf all goes well, you can now open your phantom wallet, open the collectibles page (It’s beside the $ symbol on the bottom) and voila! Your newly minted NFT will be there!
What is a Metaplex Candy Machine?
Metaplex is a command line tool that interacts with the candy-machine program. In this guide, we will use it to:
- Upload your images along with their metadata to arweave, then register them on the Solana blockchain.
- Verify that the state of your candy machine is valid and complete.
- Mint individual tokens.
Candy Machine is a system that manages fair mints.
• The minting process starts and finishes at the same time for everyone.
• It won’t accept your funds if there are no more NFTs to sell.
Токен MPLX
Для дальнейшего продвижения платформы Metaplex Foundation выпустила токен Metaplex (MPLX) в качестве децентрализованного метода управления будущими проектами и стратегическими решениями. Владельцы MPLX могут проголосовать за Metaplex DAO для непосредственного участия в определении будущего направления протокола. Криптовалюта имеет максимальный запас 1,000,000,000 14,000,000 0.35 XNUMX токенов MPLX и непогашенный запас XNUMX XNUMX XNUMX монет MPLX по цене выпуска XNUMX доллара США.
Prerequisites for Using NFT Candy Machine
These programs ensure that things run smoothly, such as executing automatic actions according to predefined rules. Furthermore, these programs are also what we use to mint NFTs on Solana. In addition, it’s also worth pointing out that Solana has its token standard (the SPL standard). The latter covers fungible and non-fungible tokens. Save our “What is Solana?” and “SPL vs ERC20 Tokens” articles for later reading!
It is also worth mentioning that non-fungible tokens (NFTs) are special types of crypto assets. NFTs have a set of unique properties, making them suitable for digital collectibles and digital art representation. Moreover, NFT utility offers countless opportunities in the digital and real world.
On the other hand, Metaplex is a popular NFT ecosystem for marketplaces, games, arts, and collectibles. The Metaplex protocol has been providing standards and tools to support NFT development. Among other solutions, Metaplex enables developers to create NFTs in a decentralized manner. Essentially, Metaplex is a combination of smart contracts and tools, which makes creating and launching NFTs simpler. The latter currently come in two forms: Metaplex Storefront and NFT Candy Machine. The latter is an NFT minting tool that we will use herein to mint Solana NFTs.
How to get the owner of an NFT
If you have the mint key of an NFT, you can find its current owner by sneak-peeking at the largest token account for that mint key.
Remember that NFTs have a supply of 1, and they are indivisible, meaning that only one token account will hold that token at any point in time, whilst all other token accounts for that mint key will have a balance of 0.
Once the largest token account is identified, we can retrieve its owner.
Press </> button to view full source
Connection PublicKey connection tokenMint largestAccounts connection tokenMint largestAccountInfo connection largestAccountsvalueaddress largestAccountInfovaluedataparsedinfoowner How to get NFT Mint Addresses
Candy Machine V1
Press </> button to view full source
 Connection clusterApiUrl PublicKey bs58 connection candyMachineId firstCreatorAddress PublicKey metadataAccounts connection // The mint address is located at byte 33 and lasts for 32 bytes. dataSlice offset length filters // Only get Metadata accounts. dataSize // Filter using the first creator. memcmp offset bytes firstCreatorAddress metadataAccountsmetadataAccountInfo bs58metadataAccountInfoaccountdata
candyMachineId
Candy Machine V2
If you’re using a Candy Machine v2, you’ll first need to access its «Candy Machine Creator» address which is a simple PDA using candy_machine and the Candy Machine v2 address as seeds. Once you have the creator address, you can use it the same way we were for v1.
Press </> button to view full source
Connection clusterApiUrl PublicKey bs58 connection candyMachineId firstCreatorAddress PublicKey metadataAccounts connection // The mint address is located at byte 33 and lasts for 32 bytes. dataSlice offset length filters // Only get Metadata accounts. dataSize // Filter using the first creator. memcmp offset bytes firstCreatorAddress metadataAccountsmetadataAccountInfo bs58metadataAccountInfoaccountdata getCandyMachineCreator candyMachine PublicKey PublicKey PublicKey Buffer candyMachine candyMachineCreator candyMachineId candyMachineCreatorЗаключение
Метаплекс — крупнейшая в мире экосистема NFT, основанная на протоколе Metaplex с открытым исходным кодом, одной из самых быстрорастущих авторских платформ всех времен. Всего за один год с момента создания для художников и создателей, использующих технологию Metaplex, было получено более 1 миллиарда долларов первичного дохода и 3 миллиарда долларов вторичных продаж. PortalCripto надеется, что статья принесла необходимую информацию о проекте Metaplex.
Recommended YouTube videos
Here are a few videos which may come in handy to generate NFTs and install the Candy Machine: